
The largest curved magnum isn’t automatically the right choice for a smoother shade. Choosing curved magnum needles for shading means matching the needle arrangement and grouping to the artwork, working area and control your technique requires.
If you’re comparing a curved magnum with a standard or flat magnum, start with the shape of the needle tips. A curved arrangement follows a slight arc, while flat magnums place their needles in a straighter line. Needle count and diameter are separate details, so check them independently rather than inferring them from the grouping name.
This guide explains those differences and offers practical criteria for comparing groupings, diameters and pack options. Instead of naming one universal best size, it helps you connect a configuration to the design and your workflow. Tatt Lab is an artist-owned Australian retailer offering Traditional Curved Magnum needles in 10-pack and 50-pack options.
Key Takeaways
- Curved magnum needles for shading have an arched arrangement of needle points rather than the straighter edge of a flat magnum.
- Compare curved, standard and flat magnums by their grouping shape and the task, not by assuming one is best.
- Start with the artwork and working area, then compare grouping size and needle diameter as separate factors.
- Check the needle format against your machine and grip system before setup.
- Tatt Lab offers Traditional Curved Magnum needles in 10-pack and 50-pack options.
What Are Curved Magnum Needles for Shading?
A curved magnum, also called a curved mag or RM, is a multi-needle grouping in which the points form a shallow arc rather than a straight edge. Artists commonly consider this configuration for shading, including work involving transitions or broader coverage. The name describes the grouping’s shape, not a guaranteed finish. The result also depends on machine setup, hand movement, the skin being worked on and the design.
Understanding the geometry is a more useful starting point than relying on a product label alone. A tattoo machine moves a needle or group of needles, and the grouping affects how those points meet the working surface. With a curved magnum, the outer points sit slightly back from the centre, creating an arc across the tip. That profile is one factor in how an artist plans a pass; it does not determine technique or outcome by itself.
How does a curved magnum grouping differ from a straight magnum?
Viewed from the front, a curved magnum’s needle tips follow a gentle curve, while a straight or flat magnum presents a more level edge. Both are magnum configurations, but their contact profiles differ. Artists may consider that distinction when choosing a grouping for a particular shading task or body area. Neither shape is inherently safer or superior; suitability depends on the work and the artist’s established technique.
The difference is easiest to see by looking at the line formed by the tips, rather than assuming that “curved” guarantees a particular shading result. Groupings can vary, and the curve may be subtle. Read the packaging and inspect the configuration so you know what the label describes. This keeps comparisons grounded in the actual arrangement instead of broad claims about smoothness or coverage.
What does RM mean on a tattoo needle?
RM is a common abbreviation for “round magnum” or curved magnum. Manufacturers don’t always use identical naming conventions, so the letters alone may not tell you everything about a needle. Read the full grouping and diameter information together, then relate those details to the area and shading approach you have in mind. That gives you a clearer basis for comparing options than relying on an abbreviation by itself.
As you assess a needle, separate three questions: what shape are the tips arranged in, how many needles are in the grouping, and what is the needle diameter? These describe different characteristics. A curved arrangement doesn’t tell you the grouping count or diameter, and those details shouldn’t be inferred from RM. Use the product label and specifications to identify the configuration.
It’s also useful to treat shading as a system rather than a needle-only decision. Machine setup and handling influence the movement of the grouping; the skin and design shape how the artist approaches the area. The same needle configuration may be used differently across projects. Curved magnum needles for shading are one option in an artist’s toolkit, best considered alongside the other variables that guide the work.
How Curved Magnum Needles Shape Shading Work
A magnum grouping places multiple needles in rows, so it can cover a broader path than a round liner grouping. That wider footprint may suit shading areas where a liner’s narrower grouping would call for a different approach. The curved edge is one design consideration among several; it doesn’t create a particular gradient or amount of coverage by itself.
Think of the needle arrangement as defining the contact area available to the artist. What happens across that area still depends on machine setup, hand movement, the skin and the demands of the design. A curved magnum used over a broad shaded form calls for different considerations from one used near fine details or a narrow transition.
Why the needle arc matters during shading
The arc changes the outline formed by the needle tips. As an artist works across a shaded area, that profile may influence how they plan passes and manage transitions between areas. It is a geometric feature, not evidence of a guaranteed finish or healing response. Artists may have different preferences based on technique, machine setup and the work in front of them.
For a practical comparison, consider whether the grouping’s edge suits the movement and access the area requires. The arc alone doesn’t tell you how to move the machine or what settings to use. Those decisions remain part of the artist’s process. Treat claims about reduced drag, less trauma or superior smoothness as product-specific, rather than assuming they apply to every configuration.
Where curved mags are commonly considered
Curved mags are commonly considered for broader shading and blending, but those aren’t exclusive uses, and the shape doesn’t dictate the result. Artists may also consider them for colour work when the grouping and technique suit the design. The useful question is whether the needle footprint fits the section being worked, not whether the configuration is marketed for a particular style.
Scale matters. A larger shaded form may call for a broader working area, while a small motif with tight detail may need more precision and room to manoeuvre. A grouping that covers more area isn’t automatically more practical. If the design has narrow spaces or closely placed elements, its footprint may be difficult to work around. Match the choice to the shapes, transitions and level of detail in the artwork.
Before settling on curved magnum needles for shading, assess the whole setup rather than expecting geometry to do the work. Consider the design’s scale, the target area, your machine settings and the movement you use. Then evaluate the needle’s labelled configuration against your established workflow. This keeps product claims in context and makes the choice task-led.
To compare the category with your setup in mind, explore Tatt Lab’s curved magnum needles.
Curved vs. Standard and Flat Magnums: What Changes?
The main difference is the profile formed by the needle tips. A curved magnum has an arc; a flat magnum has a straighter edge. “Standard magnum” is often used for a conventional straight grouping and may overlap with “flat magnum” in product descriptions. Naming conventions can vary, so compare the actual grouping details rather than treating every label as a universal technical standard.
| Grouping | Tip arrangement | Typical consideration |
|---|---|---|
| Curved magnum | Needle points follow an arc | Consider the curved edge in relation to the working area and intended movement. |
| Standard magnum | Commonly a straighter, conventional magnum profile | Check the manufacturer’s description to understand how the term is being used. |
| Flat magnum | Needle points form a relatively straight edge | Consider whether that edge profile suits the shape and access of the area. |
These descriptions are selection prompts, not rankings. The grouping’s shape doesn’t determine the finished result on its own, and the same configuration may suit one artist’s approach better than another’s. For wider equipment context, Tatt Lab’s professional tattoo supplies guide discusses how to consider equipment as part of a complete setup.
Keep two other details separate from shape: grouping size and needle diameter. Grouping size describes how many needles are arranged together; diameter describes the thickness of each needle. Neither is another name for curved or flat, and one detail can’t be inferred from the other. Read the product description and packaging for the full configuration before comparing options.
When might an artist compare curved and standard magnums?
An artist may compare them when the edge profile, access to the working area or a familiar movement pattern makes one configuration more suitable for the task. A curved edge and a straighter edge present different outlines across the area being worked. Artists can evaluate those differences within their professional workflow; a curved grouping doesn’t always produce softer shading.
How do flat magnums differ from curved magnums?
A flat magnum’s needle points sit along a relatively straight edge, while a curved magnum’s points trace an arc. That is the structural distinction. Either may be considered for shading or other work, depending on the design, area and artist’s technique. Think about the space you need to work across and the edge profile you prefer, rather than assuming one shape suits every application.
For a useful comparison, start with the task, then check the stated grouping and diameter for each needle. That helps distinguish geometry from marketing language and keeps the choice connected to your established technique. Curved magnum needles for shading are one configuration to assess, not a universal solution.
How to Choose Curved Magnum Needles for Your Shading Setup
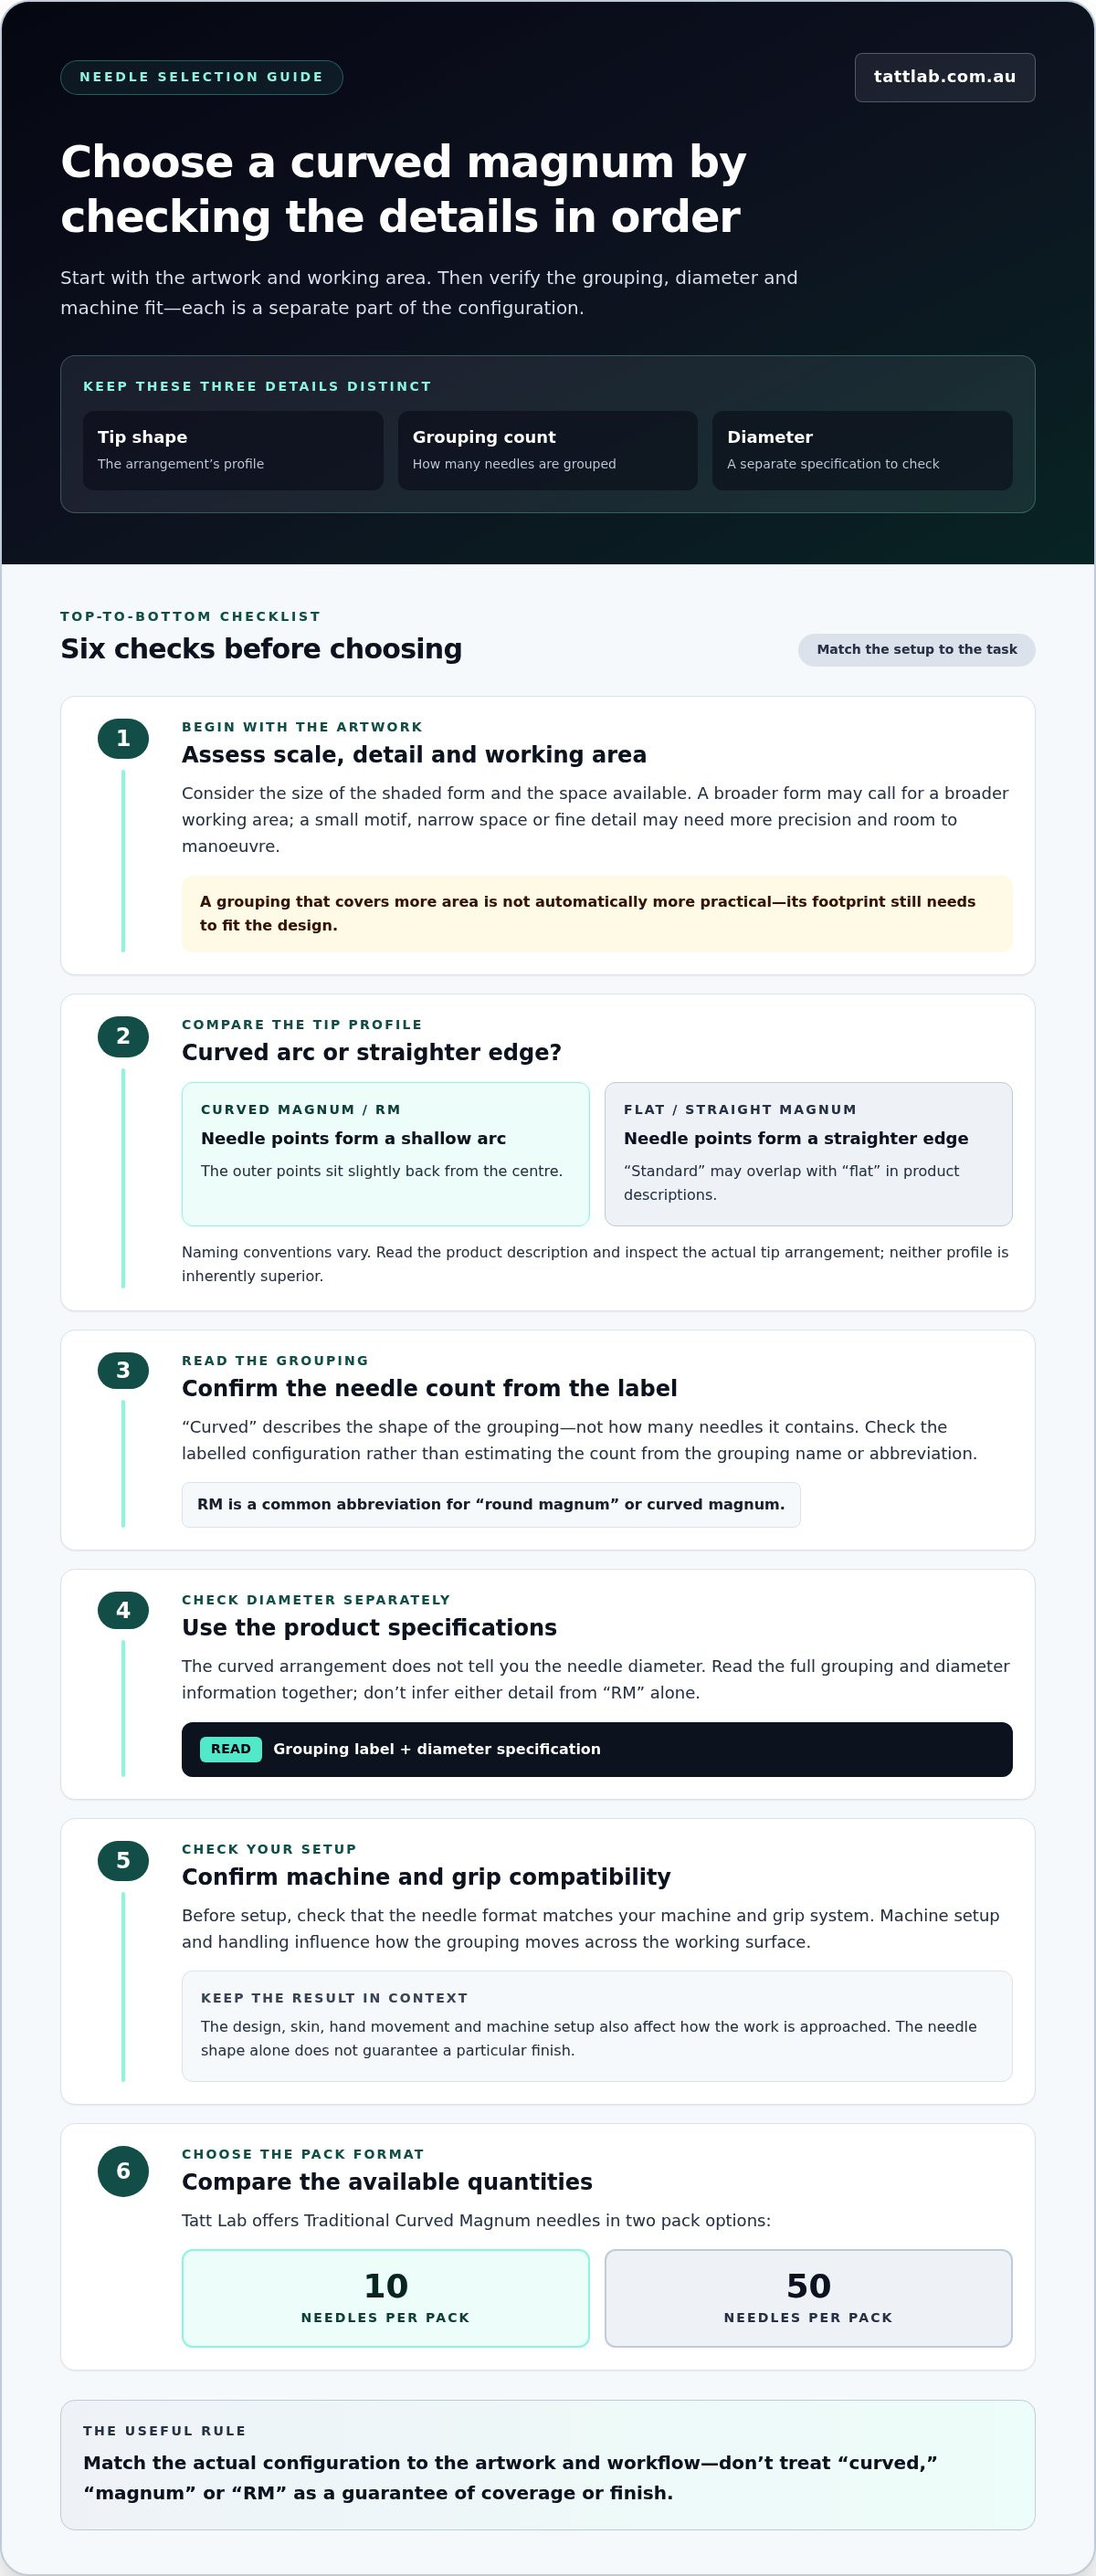
A considered choice starts with the tattoo, not the most popular configuration. Use this sequence to narrow your options: define the artwork, assess the shaded area, compare groupings, then check that the needle suits your equipment. Curved magnum needles for shading can be useful, but suitability depends on the task and your established professional approach.
- Define the artwork. Identify the areas that need shading, the transitions in the design and how much detail sits nearby. A broad section of tone presents a different task from a small, tightly detailed area.
- Assess the working area. Consider the shape and space available. Note where access or nearby detail may affect the practical working footprint.
- Compare grouping count. Consider whether a narrower or wider grouping better fits the area and your intended movement. More needles do not automatically make a grouping the better choice.
- Check equipment compatibility. Review the needle format and the instructions for your machine and grip system before setup.
Which grouping should you consider for the artwork?
Start with the area to cover and the level of detail. A narrower grouping may be easier to position around confined shapes, while a wider one may suit a larger working area if it fits the design and your technique. These are practical comparisons, not universal rules. Machine setup and personal technique affect how manageable each grouping feels in a professional workflow.
Keep grouping count separate from needle diameter. Count describes how many needles are arranged together; diameter describes the thickness of each needle. A wider grouping doesn’t necessarily have a larger diameter, and neither detail alone determines suitability. Compare both against the task and the specifications on the product label.
What should you check before using a needle?
Before setup, read the product label for the grouping, diameter and format. Confirm that the format is compatible with your machine and grip system, then follow the product packaging and applicable professional hygiene procedures. Use your training and equipment instructions to guide setup. Don’t rely on a shorthand label or general recommendation when the full specifications are available.
Keep ink selection separate from needle selection. The grouping helps define your equipment choice, while ink considerations need their own assessment. Tatt Lab’s professional tattoo ink guide provides broader context for evaluating ink independently of needle configuration.
Choose a shading needle for the artwork, working area and compatible setup, not because a configuration is trending. That keeps the decision focused on the job in front of you and your professional workflow.
For your next comparison, explore Tatt Lab’s curved magnum needles.
Explore Tatt Lab Traditional Curved Magnum Needles
Once you’ve matched a needle configuration to the shading task and considered how it fits your equipment, choose a pack option that works for your studio workflow. Tatt Lab is an artist-owned and operated Australian tattoo supply retailer serving customers nationally. Its Traditional Curved Magnum needle category offers two pack options: a 10-pack and a 50-pack.
What to know about Tatt Lab Traditional Curved Magnum needles
Tatt Lab’s Traditional Curved Magnum category is a practical starting point for artists seeking this configuration. The pack choices are straightforward: 10-pack or 50-pack. Pack quantity tells you how many needles are included; it doesn’t indicate a change in needle performance, quality or configuration.
Keep the selection criteria from earlier in the guide in view when assessing a needle for a particular job. Pack option is separate from the configuration details that determine whether a needle suits your artwork and equipment. Don’t infer grouping count, diameter, taper or format from pack size. Refer to the product information for the details relevant to your setup, and follow equipment instructions and professional practices.
This separation keeps the decision clear. First establish whether the needle configuration fits your work and workflow. Then choose the pack quantity that makes sense for how you manage supplies. A larger pack doesn’t change the needle’s intended use, just as choosing a smaller pack doesn’t make a configuration more suitable for a particular shading task.
Choose a pack option for your studio workflow
Think about your planned use and stock-management preferences. If you’re organising supplies around a specific upcoming need, consider how that purchase fits your existing stock. If you manage needle inventory differently, factor that into the choice between the 10-pack and 50-pack. These are workflow considerations, not performance comparisons.
Keep pack quantity and needle selection as two distinct decisions. Choose a curved magnum based on the artwork, working area, machine compatibility and required specifications. Pack size is about how you prefer to organise and replenish supplies. That keeps the process grounded in practical requirements rather than assumptions that one option is inherently better.
Tatt Lab’s Traditional Curved Magnum category gives artists a place to explore the 10-pack and 50-pack options after identifying the configuration their workflow calls for. Review the product information alongside your machine and grip requirements, then choose the pack option that suits your stock-management approach.
Explore Tatt Lab’s Traditional Curved Magnum needles and select the 10-pack or 50-pack option that fits your studio workflow.
Make Your Next Setup a Deliberate Choice
Make needle selection a repeatable part of your studio workflow. Before a shading session, consider what the artwork asks of the grouping and how the chosen needle fits your equipment and technique. Keeping those factors in view can help you assess which configurations suit different tasks, without relying on trend-led recommendations or expecting one setup to cover every situation.
Keep the focus on the work in front of you. The right choice of curved magnum needles for shading is the one that aligns with your professional judgement, the design and your established process. When you’re ready to compare options, Tatt Lab’s Traditional Curved Magnum category offers 10-pack and 50-pack choices.
Careful choices build confidence, one project at a time.
Frequently Asked Questions
Are curved magnum needles the same as round magnum needles?
Often, “curved magnum” and “round magnum” describe the same general grouping, and both may be abbreviated RM. Naming conventions aren’t perfectly consistent across manufacturers, however. If a listing uses one term but doesn’t show the needle arrangement, use the product description or packaging to identify the full configuration. Don’t rely on the name alone when comparing needles for a particular setup.
Can curved magnum needles be used for colour packing?
They may be used for colour work, including packing, depending on the artist’s method and the design. A needle’s curved arrangement doesn’t by itself establish how effectively it will pack colour. Consider the area, colour application technique, machine setup and the specific needle specifications. Treat performance claims as specific to the product rather than assuming they apply to every curved magnum.
Do curved magnum needles work with every tattoo machine?
No. Compatibility depends on the needle format and the machine and grip system being used. Traditional needles and cartridge needles use different formats, so don’t assume a needle will fit simply because it has the grouping you want. Check the product details and your machine’s instructions before setup. If you’re switching formats, follow the equipment manufacturer’s guidance and your professional training.
How do I read the grouping number on a curved magnum needle?
The grouping number generally indicates how many needles are arranged together, while the diameter describes the thickness of each needle. They’re separate measurements. A label may show a grouping count alongside a diameter; read both rather than treating either as a shorthand for the other. Manufacturer labelling can vary, so use the packaging or product specification to interpret the complete configuration.
Are traditional curved magnum needles different from cartridge needles?
Yes. Traditional needles are arranged on a needle bar and are used with compatible equipment, while cartridge needles are supplied in a cartridge format designed for compatible machines and grips. The curved magnum grouping describes the needle arrangement, not whether it’s traditional or cartridge-based. Check the product format separately from grouping and diameter so your selection matches your equipment and studio workflow.
How should tattoo needles be handled and disposed of after use?
Use a new, sterile, single-use needle for each client and dispose of it promptly in an appropriate sharps container after use. Don’t reuse needles or leave used needles loose on a work surface. Follow the infection-control procedures that apply to your studio and the relevant state or territory guidance, as requirements can differ across Australia. Handle sharps carefully throughout the procedure to reduce the risk of injury.
Explore Tatt Lab’s Traditional Curved Magnum needles and choose the pack option that suits your studio workflow.


Comments (0)
There are no comments for this article. Be the first one to leave a message!