
The curve is built into the needle grouping, shaping how curved magnum tattoo needles meet the skin across a broader area. In a traditional hand-soldered example, 17 needles are laid flat in a row, then alternate needles are lifted to create staggered rows. Configurations commonly start at 5 needles and increase in odd-numbered steps.
That arrangement helps explain why a curved magnum can feel different from a flat magnum, but needle count alone doesn’t determine coverage. Gauge also affects the grouping’s contact span, so a higher count in a finer gauge can cover a similar width to fewer needles in a thicker gauge.
This guide explains how curved magnums are arranged, how their contact span affects shading and colour blending, and where their practical limits lie. You’ll also learn why the right configuration depends on the area and effect being worked, not simply on choosing the widest grouping.
Key Takeaways
- Understand how needle arrangement creates a staggered grouping, and why configuration matters when selecting a setup for shading or colour blending.
- Compare contact span rather than needle count alone to judge how much area a grouping can cover.
- Learn how the arched edge influences contact with the skin and the finish of a pass.
- Identify where curved magnums suit broad shading work, and where their coverage may be less practical.
How Are Curved Magnum Tattoo Needles Made?
Australian tattoo hygiene requirements are administered through state and territory frameworks, so the applicable rules depend on location. Use a sterile, single-use needle for each tattoo procedure and discard it afterwards. Never reuse needles.
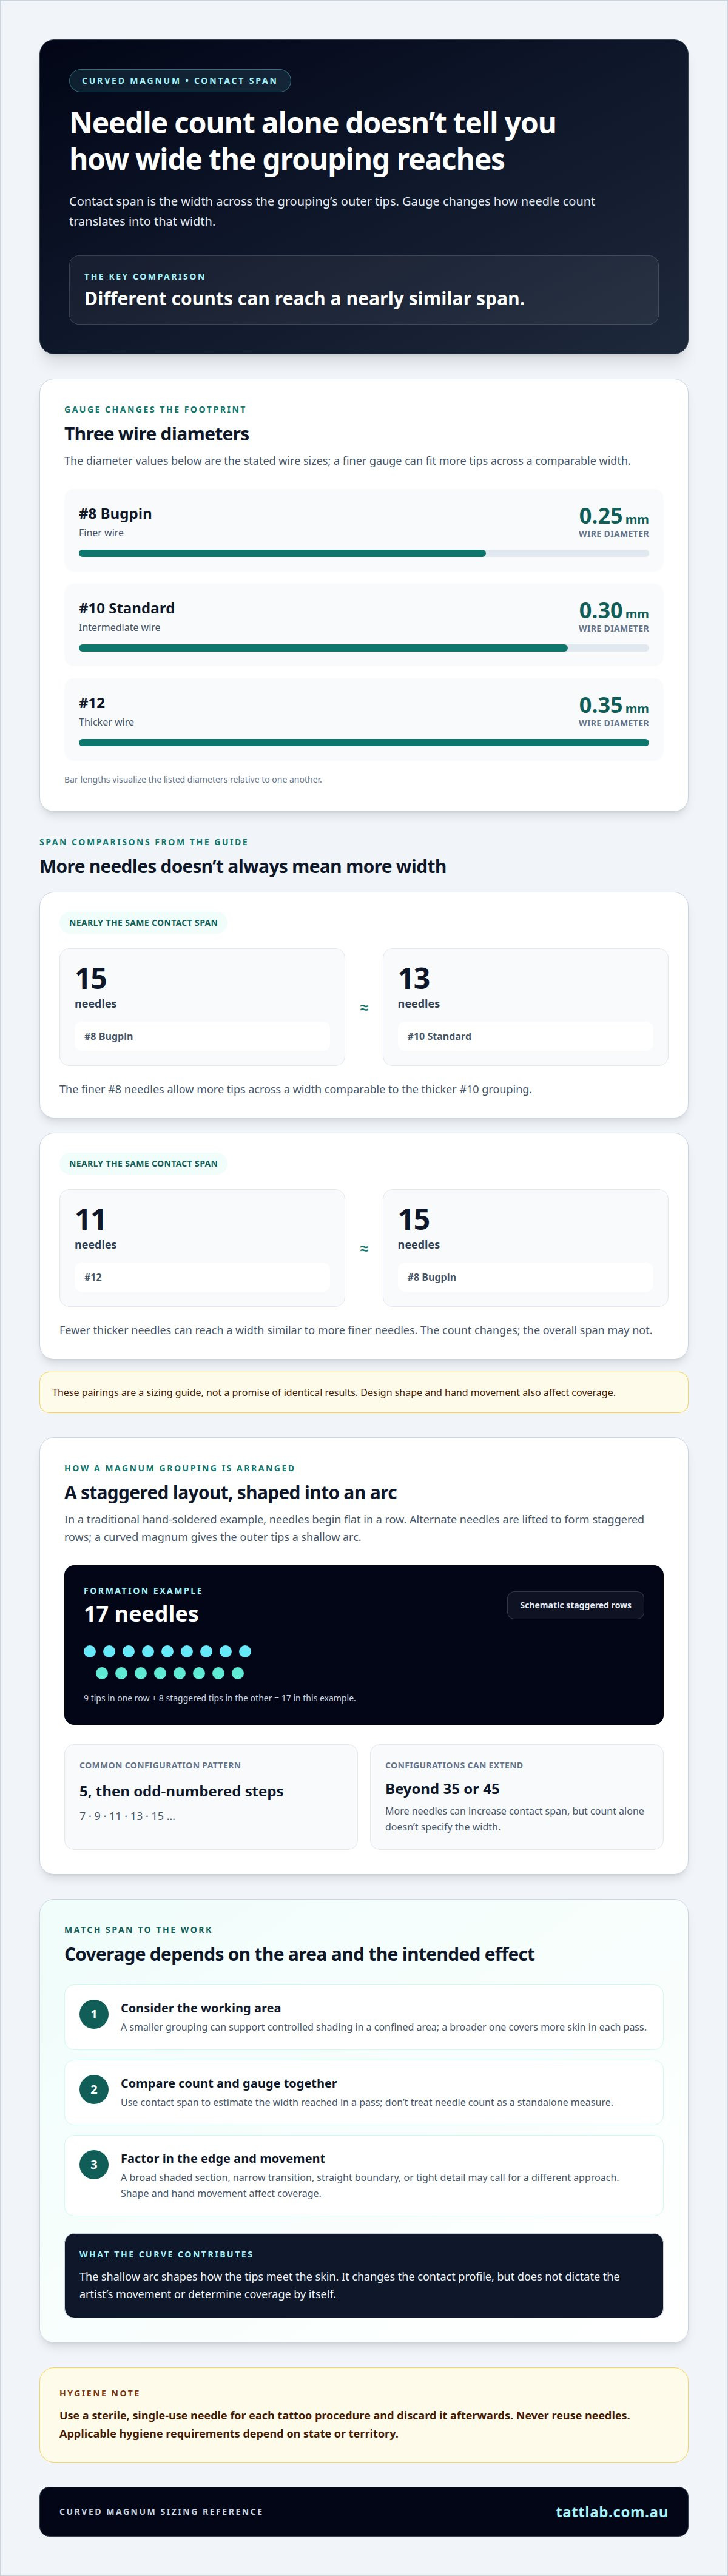
A traditional hand-soldered magnum begins with needles arranged flat in a single row. In a 17-needle example, the maker lifts alternate needles to create staggered rows. This arrangement spreads the needle tips across a wider working edge than a single row. The curved configuration adds a gentle arc to that edge, shaping how the tips meet the skin.
Curved magnum configurations commonly start at 5 needles and can extend beyond 35 or 45. They often progress in odd-numbered steps, such as 7, 9, 11, 13 and 15 needles. More needles can increase the grouping’s contact span, but needle count alone doesn’t tell you how wide that span will be.
Gauge also changes the width. A #8 Bugpin needle has a 0.25 mm wire diameter; #10 Standard measures 0.30 mm, and #12 measures 0.35 mm. These differences affect how needle count translates into the grouping’s footprint. For example, 11 needles in #10 Standard provide a versatile starting configuration for shading and colour blending.
Choose a configuration by matching its contact area to the work. A smaller grouping can support controlled shading in a confined area, while a broader one covers more skin in each pass. For gradual tonal transitions, consider how the needle arrangement and gauge work together instead of defaulting to the highest count.
For example, an artist planning to blend colour across a broad section might begin by assessing the available surface and the desired transition. An 11-needle #10 Standard grouping offers a practical reference point; finer or thicker gauges change the contact span. The intended coverage, not needle count in isolation, guides the choice.
Tattoo hygiene requirements are administered through state and territory frameworks, so the applicable rules depend on location. Use a sterile, single-use needle for each procedure and discard it after use. Do not reuse needles.
Contact span and coverage
Contact span is the width across the grouping’s outer tips. It helps estimate the area reached in a pass, but needle count alone can be misleading. Gauge affects how much width each needle adds, so groupings with different counts may have a similar span. This distinction matters when planning broad shading or a controlled colour transition.
Compare a 15-needle #8 grouping with a 13-needle #10 grouping: their contact spans are nearly the same. The finer #8 needles allow more tips across a width comparable to the thicker #10 grouping. Choosing by count alone could therefore make the 15-needle option seem wider than it is. Gauge and configuration need to be considered together.
A second comparison makes the relationship clearer. An 11-needle #12 grouping produces nearly the same contact span as a 15-needle #8 grouping. For an artist assessing coverage, that means fewer thicker needles can reach a similar width to more finer needles. The choice changes the configuration without necessarily changing the overall span.
Use these comparisons as a sizing guide, not a promise of identical results. Contact span describes the grouping’s width, while the design’s shape and the artist’s hand movement affect coverage. A broad area may suit a wider span, while a narrow transition may call for more controlled placement. The intended edge and shading effect help determine the best fit.
Before settling on a grouping, define the area to be covered and the role of each pass. Then compare needle count and gauge to estimate whether the contact span suits that area. A 15-needle #8 and a 13-needle #10 offer one useful reference; an 11-needle #12 and 15-needle #8 offer another. These pairings show why a higher count doesn’t automatically mean broader coverage. Explore curved magnum configurations alongside the intended shading task, rather than treating needle count as a standalone measure.
Curved magnum needle formation and arched edges
A curved magnum keeps the staggered layout of a magnum but arranges the outer tips in a shallow arc. This curved edge changes how the grouping meets the skin compared with a flat edge. The centre and outer needles don’t form one straight line, so the contact profile follows the grouping’s shape. The curve is a physical arrangement, not a separate needle count.
During a pass, the arched edge can distribute contact across the grouping rather than concentrating it along one straight outer line. The effect depends on the needle configuration, gauge, angle and movement. A broad sweep across a shaded area uses the grouping differently from short, controlled movements near a design boundary. The curve shapes the contact profile, but it doesn’t dictate the artist’s movement.
Hand-soldered magnums form their staggered rows by lifting alternate needles from a flat arrangement. In cartridge designs, the needles sit inside a housing. Curved magnum cartridges can use stainless steel needles with a medical-grade plastic body. A needle stabiliser guide inside the housing helps keep the needle steady, while a safety membrane is designed to prevent backflow.
These cartridge components support the grouping’s structure, but they don’t change what its arched edge means. A plastic rubber surround can provide grip and guidance, while an added fingertip grip is intended to support comfort during extended sessions. These features relate to handling and needle control. The curve itself shapes the arrangement of the tips.
When assessing an arched edge, consider the intended pass and the contour being worked. A curved grouping may suit a broad shaded section where a softened edge is useful. A straight boundary or tight detail may call for a different approach. The choice depends on how the grouping’s arc, contact width and movement work together, not on the word “curved” alone.
Think of the arc as one part of a complete setup. Pair it with a suitable needle count and gauge, then match your movement to the design area. A cartridge’s stabiliser and grip features affect handling, while the arched tips define its contact profile. Keeping these functions distinct makes it easier to understand what the needle formation contributes to a tattooing pass.
Curved magnum uses and limitations
Curved magnums suit broader shading and colour blending, while their arched edge and width shape how each pass lands. Their advantages depend on the design area and the artist’s control.
Applications and Practical Limitations
A curved magnum is a staggered needle grouping with an arched working edge, used for shading and colour blending across broader areas. Compared with a standard magnum’s straight edge, the curve changes the contact profile. A round shader’s compact grouping is better suited to smaller, focused areas. A broad colour transition may suit a curved magnum, while a tight detail may need a smaller grouping. Its width can limit precision near fine outlines.
Safe Use and Handling
Safe handling means using sterile, single-use equipment and preventing contamination during setup and tattooing. Use a new sterile needle or cartridge for each procedure, handle it without touching the working tips, and discard it after use. Keep the work area and handling process clean, and follow the applicable health requirements in your Australian jurisdiction. A cartridge’s safety membrane is designed to prevent backflow, but it doesn’t replace clean handling or correct disposal.
Risks from Needle and Technique Choices
A mismatch between needle and technique can compromise control and produce uneven coverage. A wide grouping used near a fine boundary can make precise placement harder, while unsuitable movement can leave shading inconsistent. Excessive pressure or repeated passes can also reduce control. Match the grouping to the design area, use deliberate movement, and adjust your technique to maintain even application.
Choose the setup according to the work: broad transitions, tight edges, or smaller shaded details call for different contact profiles. For equipment suited to that decision, explore curved magnum needles.
Tatt Lab: Traditional Needles
Tatt Lab offers Traditional Needles and Curved Magnums for tattoo artists choosing equipment to suit different techniques. Explore these options when matching a needle format to the work, such as choosing a curved grouping for broader shading or blending.
Tattoo Cartridges offer another format to consider, while Tattoo Aftercare supports the care stage after tattooing. Keeping these categories distinct helps you focus on the equipment or care product relevant to your next step, without assuming one needle configuration suits every task.
For equipment suited to your setup and intended work, shop Tatt Lab’s needle range.
Make Your Next Setup Intentional
Use your next setup as an opportunity to match equipment to the work ahead. Treat the design, tattoo area and preferred working method as connected decisions, rather than relying on one configuration for every task. This keeps your selection grounded in technique and practical use.
As you plan your equipment needs, Tatt Lab offers Traditional Needles, Tattoo Cartridges and Tattoo Aftercare alongside its tattoo needle range. Consider which category supports your next step, whether you’re preparing for a session or organising aftercare supplies.
If you’re ready to explore curved magnum tattoo needles for your setup, contact Tatt Lab. A considered choice is a steady next step towards work that fits your process.
Frequently Asked Questions
What are curved magnum tattoo needles and how are they shaped?
Curved magnum tattoo needles are magnum groupings arranged with an arched outer edge. The staggered layout places needle tips across multiple rows, while the arc shapes the grouping’s contact profile. For example, a 15RM configuration identifies a round magnum grouping with 15 needles. The designation describes the grouping, not the gauge, so read both specifications when comparing setups.
What tattooing techniques are curved magnum needles used for?
Artists use curved magnum needles for broad shading and colour blending, especially when a design calls for gradual tonal movement across an area. A soft transition between adjacent colour regions, for example, may suit a magnum grouping better than a round shader. The result still depends on the artist’s movement, angle and chosen configuration, so the needle supports the technique rather than replacing it.
What curved magnum needle sizes, tapers, and configurations are available?
Configurations commonly include odd counts such as 7, 9, 11, 13 and 15, with gauges including #8 Bugpin, #10 Standard and #12. A taper describes how the needle point narrows; treat it as a separate specification from count and gauge. For example, a 15RM label identifies a 15-needle round magnum grouping, while its gauge and taper require separate consideration.
How do I choose the right curved magnum needle for a tattoo?
Start with the design area and desired finish, then match the configuration and gauge to the required contact width. For a broad blend, consider a grouping suited to wider coverage; for a narrow transition, prioritise control around the boundary. Compare the needle’s count, gauge and taper together, and choose a setup that fits your trained technique and equipment compatibility.
How much do curved magnum tattoo needles cost in Australia, and where can I buy them?
Tatt Lab offers curved magnum needles.


Comments (0)
There are no comments for this article. Be the first one to leave a message!