

The very liquids designed to protect your clients from cross-contamination are often the primary culprits behind premature motor failure. It is a frustrating irony that many artists face; the more rigorous your hygiene routine, the higher the risk of moisture breaching the sensitive internal housing of your rotary pen. You likely understand the anxiety of trying to achieve a medical-grade sterile field without inadvertently voiding your warranty or damaging the precision mechanics that define your craft.
We agree that maintaining a clinical environment should never come at the expense of your equipment's integrity. This guide provides a definitive protocol for how to clean a rotary tattoo machine, bridging the gap between high-level disinfection and mechanical preservation. You'll learn to navigate the critical differences between surface sanitation and autoclave sterilization while ensuring compliance with the latest safety standards. We will outline a repeatable, low-pressure maintenance workflow that protects your investment and, most importantly, the physical wellbeing of every client who enters your studio.
Key Takeaways
- Understand the clinical distinction between surface disinfection and sterilization to ensure every procedure meets professional safety standards.
- Learn the precise steps of how to clean a rotary tattoo machine while protecting the sensitive motor housing from moisture and chemical damage.
- Implement a rigorous decontamination protocol using a dedicated cleaning station and high-quality nitrile gloves to eliminate cross-contamination risks.
- Preserve mechanical precision by identifying worn O-rings and applying targeted lubrication to maintain optimal machine tension and performance.
- Optimize your studio hygiene efficiency with professional barrier products that reduce cleanup time without compromising clinical integrity.
The Importance of Clinical Hygiene for Rotary Tattoo Machines
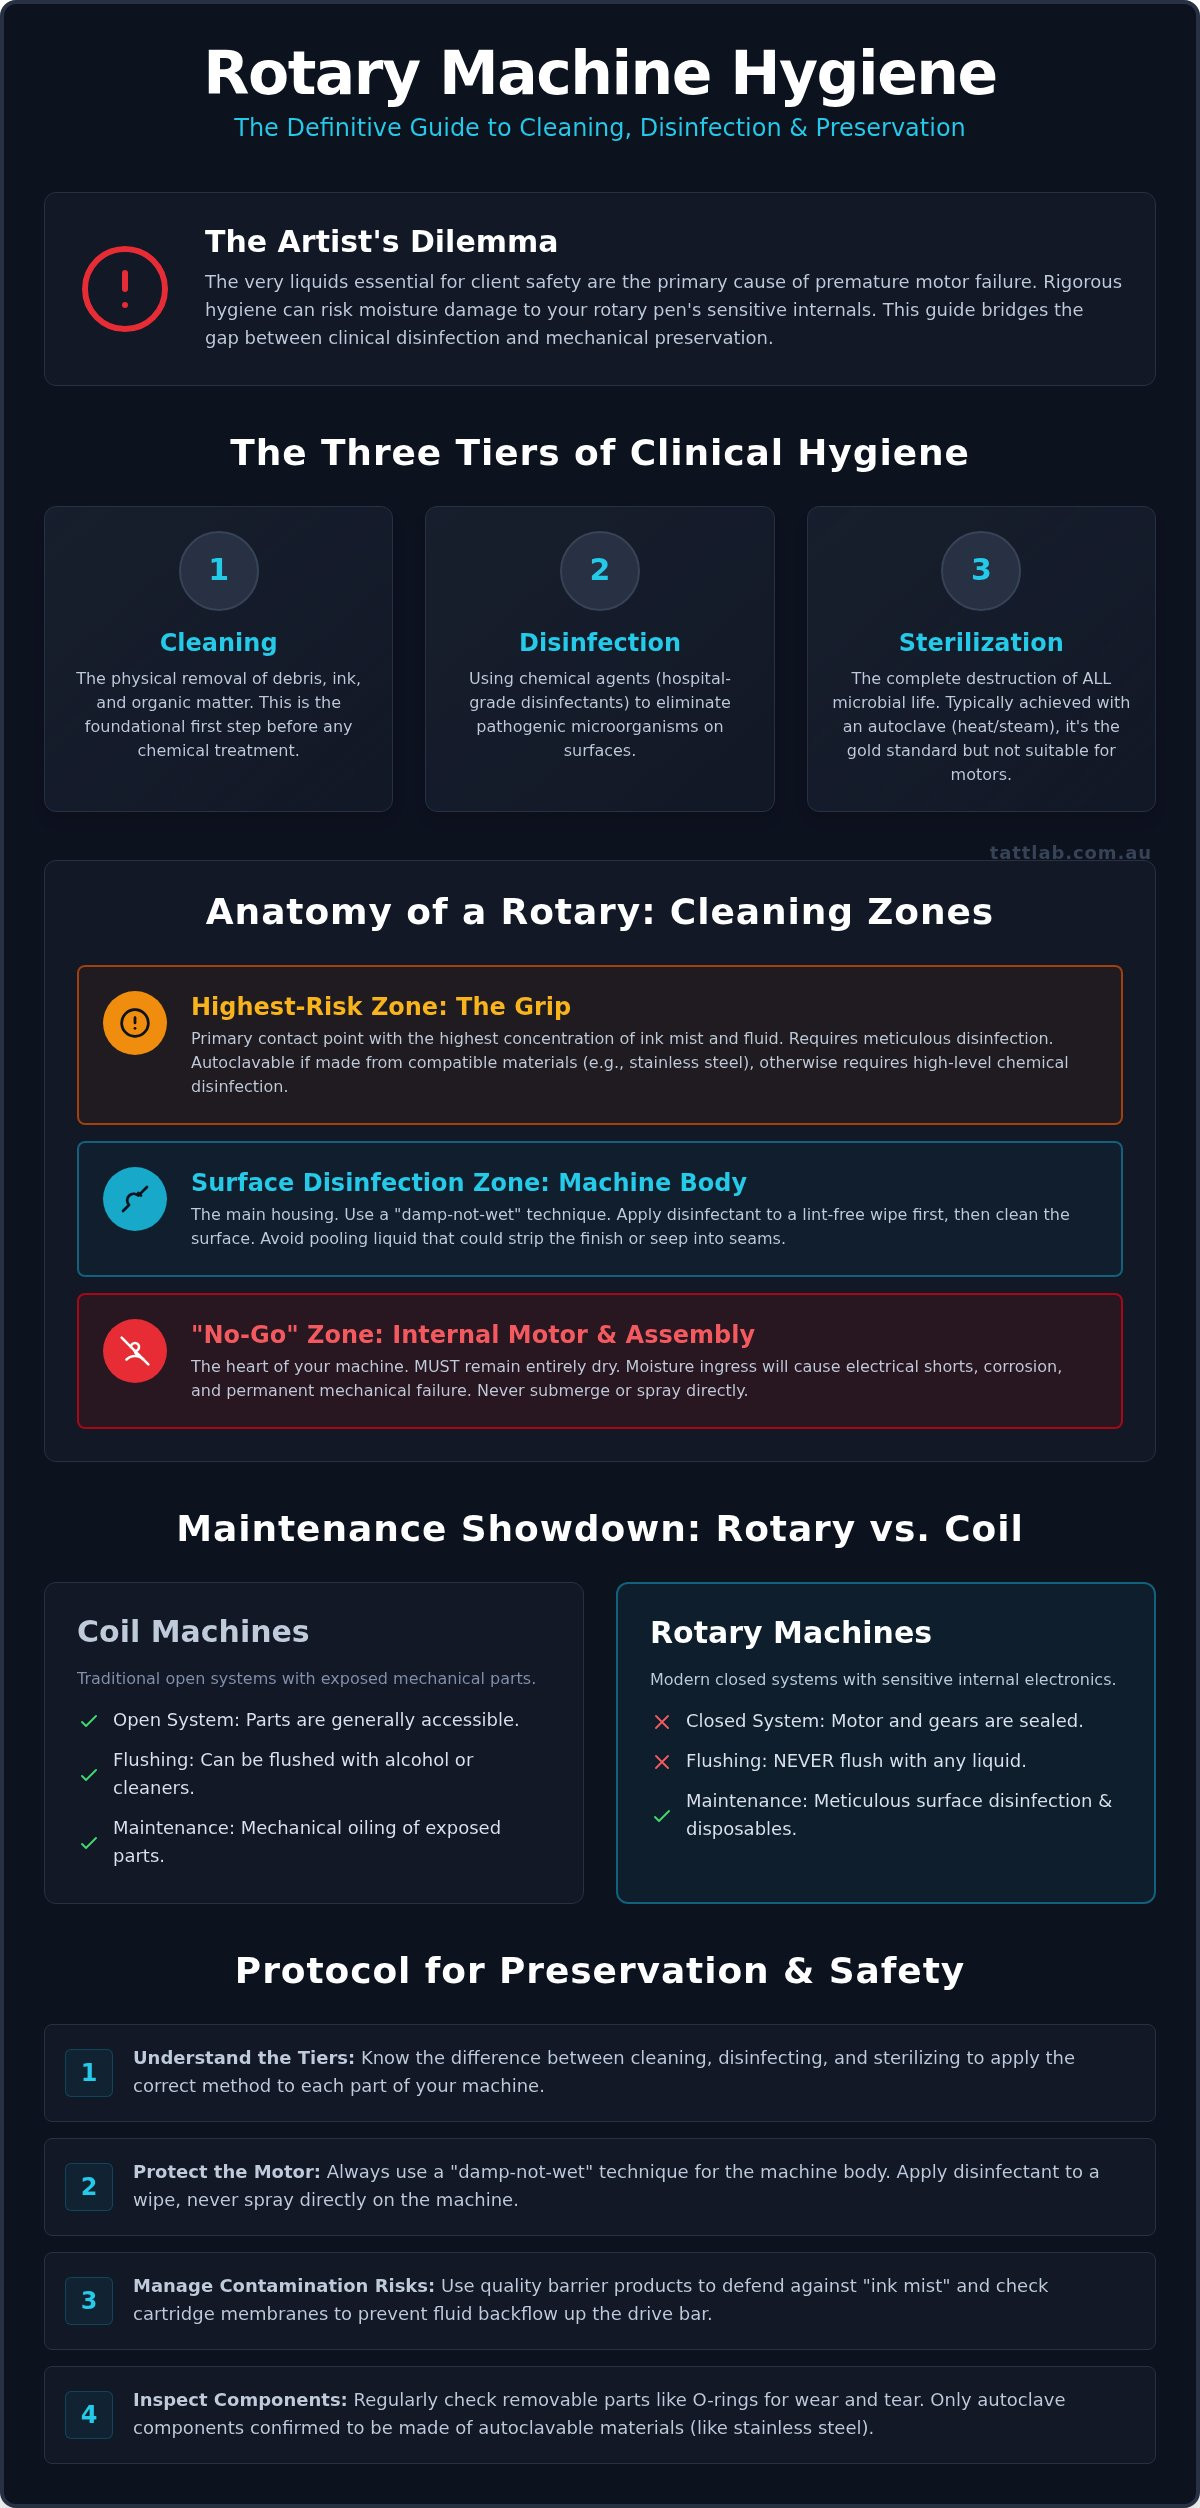
Professional tattooing requires more than artistic skill; it demands a deep understanding of microbial control. In the context of tattooing studio hygiene, we must differentiate between three distinct tiers of safety: cleaning, disinfecting, and sterilising. Cleaning is the physical removal of debris and organic matter. Disinfection uses chemical agents to eliminate pathogenic microorganisms on inanimate surfaces. Sterilisation, the gold standard, is the complete destruction of all microbial life, typically achieved through high-pressure steam in an autoclave.
Bio-burden refers to the number of bacteria living on a surface that hasn't been sterilised. On a rotary machine, this burden accumulates silently. Microscopic droplets of blood, interstitial fluid, and pigment settle into the fine seams of the machine body. Over time, these organic materials can harden, creating a protective layer for pathogens that resists standard surface wipes. Effectively managing this requires a protocol that addresses the machine's unique geometry and mechanical sensitivity.
Maintaining these clinical protocols isn't just about safety. It's about the longevity of your professional reputation and your equipment. Many studio accreditation programs and local health regulations now mandate specific logs for equipment processing. Demonstrating a methodical approach to machine care ensures your studio remains a trusted facility where science and art coexist safely. Learning how to clean a rotary tattoo machine correctly is the only way to ensure these internal components remain pristine for years of service.
Cross-Contamination Risks in Modern Tattooing
During a session, the high-speed vibration of the needle creates an 'ink mist' or aerosolised spray. These particles travel beyond the immediate area of the skin, settling on the machine housing. While barrier films and bags provide an essential first line of defence, they're porous at a microscopic level and can be breached during the teardown process. Understanding how to clean a rotary tattoo machine involves recognising that the machine body itself remains a potential vector for cross-contamination, even when bagged. Additionally, non-cartridge systems or cartridges with faulty membranes allow fluids to travel up the drive bar, potentially reaching the internal mechanics where they're nearly impossible to remove.
Rotary vs. Coil: A Different Approach to Maintenance
Traditional coil machines are open systems. Artists often 'flushed' them with alcohol or specialised cleaners to remove debris from the springs and bars. You can't do this with a rotary pen. Modern rotaries are closed systems housing delicate electric motors and complex gear assemblies. Introducing liquid directly into the motor housing will cause internal corrosion and electrical failure. The maintenance shift is significant. We've moved from mechanical oiling of exposed parts to meticulous surface-level chemical disinfection and the use of disposable components. This evolution respects the precision of the motor while prioritising the biological safety of the client.
Anatomy of a Rotary Machine: What Can and Cannot Be Cleaned
To master how to clean a rotary tattoo machine, you must first view your equipment as a collection of distinct biological zones. Not every component can withstand the same level of chemical or thermal stress. We categorize the machine into three primary areas: the grip, the machine body, and the internal motor. Each requires a specific approach to maintain both clinical safety and mechanical integrity.
The grip is your primary contact point and faces the highest concentration of ink mist and fluid. Behind this sits the machine body, often crafted from anodized aluminum or high-grade polymers. While aluminum is robust, harsh medical disinfectants can eventually strip the finish or cause pitting if left to pool. Finally, the internal motor and cam assembly represent the "No-Go Zone." This area is the heart of your machine. It must remain entirely dry to prevent electrical shorts, corrosion, or mechanical seizure.
Removable parts like plunger bars, cams, and rubber O-rings require individual attention. If these are made of stainless steel, they're likely autoclavable. However, plastic components or rubber parts will degrade under extreme heat or prolonged chemical exposure. You should consult Professional Tattooist Safety Resources to ensure your specific disinfection chemicals are compatible with the materials used by your manufacturer. Understanding these material limits prevents the accidental destruction of expensive equipment during the sanitation process.
The Motor Housing: Preservation Protocols
The motor housing is designed to protect the electrical drive, but it's rarely waterproof. You should never submerge this section or spray disinfectant directly onto the motor vents or power ports. Instead, utilize a "damp-not-wet" technique. Apply your hospital-grade disinfectant to a lint-free wipe first, then gently clean the external surface. If you notice a sticky residue on the cam or hear a grinding sound in the motor's pitch, fluid may have breached the housing. This usually requires professional servicing to avoid permanent damage.
Grips and Cartridge Receivers
The grip and the cartridge receiver are the highest-risk areas for fluid accumulation. If you use a reusable metal grip, it must be detached and processed in an autoclave according to specific temperature guidelines. Disposable grips must be discarded immediately after the session. Pay close attention to the cartridge receiver, the recessed area where the needle locks in. This area can trap bio-burden that surface wipes can't reach. Using a specialized cotton swab dampened with disinfectant is necessary here. For those looking to streamline this process, investing in high-quality Tattoo Cartridges with reliable safety membranes can significantly reduce the risk of backflow into the receiver area.
Step-by-Step Rotary Machine Disinfection Protocol
Mastering how to clean a rotary tattoo machine requires more than a quick wipe down after a session. It demands a dedicated environment. You should establish a cleaning station physically separate from your tattooing workstation to prevent cross-contamination from used barriers and paper towels. This area must be treated as a clinical facility, kept clear of unnecessary items and regularly disinfected. Before you begin the teardown, the use of fresh nitrile gloves is non-negotiable. This protects you from pathogens and ensures you don't transfer oils or contaminants back onto the machine during the cleaning process.
We utilize the "Two-Wipe" method to achieve clinical-grade results. The first wipe is dedicated to the physical removal of visible debris, ink mist, and organic matter. This step clears the bio-burden that would otherwise shield bacteria from the disinfectant. The second wipe is for chemical disinfection. It is a common mistake to spray and immediately wipe dry. Pathogens require specific "wet contact time" to be neutralized. Most hospital-grade disinfectants require the surface to remain visibly wet for 2 to 3 minutes, though you should check the label of your specific product for the exact duration. Only after this time has elapsed should you perform a final inspection and move the machine to a dust-free, sterile storage container.
For mobile artists or those traveling to guest spots, placing these containers inside a weather-protected gear bag from Tak-tical provides an extra layer of security against external contaminants and moisture during transport.
Phase 1: Breakdown and Surface Debris Removal
Safety begins with disconnecting your power source. Whether you use an RCA cord or a wireless battery pack, removing it prevents electrical shorts and allows you to clean the connection ports. Remove the grip and any exposed O-rings. For textured areas or knurling on the machine body, a soft-bristled brush is effective for dislodging trapped pigment without scratching the anodized finish. Work carefully around the motor vents, ensuring no bristles or liquids enter the housing. This methodical breakdown ensures that no hidden pockets of contamination remain between the machine's moving parts.
Phase 2: Chemical Disinfection and Sterilisation
Choosing high-quality medical supplies for tattoo artists is essential for this phase. For non-autoclavable removable parts, such as certain plunger bars or plastic components, a cold soak in an EPA-registered disinfectant is the preferred method. Ensure these parts are fully submerged for the manufacturer's recommended time. If you are using high-grade stainless steel or aluminium grips, they must be processed in an autoclave. Standard cycles typically involve 15 to 20 minutes at 121°C (250°F) under 15 psi of pressure. Always verify the material specifications of your machine components before exposing them to high heat, as incorrect settings can warp precision-engineered parts.
Mechanical Maintenance: O-Rings and Lubrication
Sanitisation is only half the battle. If you focus solely on how to clean a rotary tattoo machine externally, you neglect the internal mechanical friction that eventually compromises performance. Mechanical maintenance is a delicate balance of protecting seals and reducing friction. Unlike coil machines that require frequent oiling, modern rotaries are precision-engineered tools where less is almost always more. For those interested in how these principles of rotary electrical integrity scale up to industrial applications, visit TME Systems Pty Ltd. Over-lubricating creates a magnetic environment for dust and pigment, leading to a "sludge" that forces the motor to work harder and run hotter.
O-rings serve as the silent guardians of your machine's interior. They maintain the necessary tension for consistent needle depth while acting as a barrier against fluid ingress. During your post-session teardown for how to clean a rotary tattoo machine, inspect these seals for signs of degradation. Worn O-rings often appear cracked or "gummy" to the touch. This physical breakdown is usually a chemical reaction to harsh disinfectants that haven't been properly wiped away. If an O-ring fails, the seal integrity is lost, leaving your motor vulnerable to the very liquids you use for cleaning.
Maintaining the Slider and Cam
Traditional rotaries with exposed moving parts require a disciplined approach to lubrication. We recommend applying a "pin-drop" amount of synthetic grease to the slider and cam surfaces every 20 to 30 hours of run time. Avoid generic machine oils; they are too thin and can migrate into the motor housing, causing electrical failure. After applying the grease, run the machine for a few seconds to distribute it, then use a clean wipe to remove any excess. This prevents the lubricant from attracting airborne contaminants during your next session.
O-Ring Longevity and Replacement
The frequent use of rubbing alcohol as a quick-dry cleaner is a leading cause of O-ring failure. Alcohol siphons moisture from the rubber, causing it to become brittle and lose its elasticity. To extend the life of these components, we prefer silicone-based lubricants which nourish the material while providing a moisture-resistant seal. Establish a monthly inspection checklist to ensure your machine remains in peak condition:
- Check O-rings for visible cracks or flat spots.
- Listen for changes in motor pitch or increased vibration.
- Ensure the cam set-screw remains tight and free of debris.
- Wipe down the power connection ports with a dry, lint-free swab.
Maintaining these high standards ensures your equipment performs with the same precision as the day you bought it. For the components that can't be saved, ensure you are sourcing medical-grade professional tattoo supplies to keep your workflow uninterrupted.
Setting Up Your Studio for Maximum Hygiene Efficiency
Efficiency in a professional studio isn't just about the speed of your work; it's about the precision of your decontamination cycle. By integrating high-quality barrier protection from the start, you minimize the surface area exposed to aerosolized contaminants. This proactive approach simplifies the process of how to clean a rotary tattoo machine by ensuring that the bulk of the bio-burden is captured by disposable films rather than the machine's finish. A dedicated ultrasonic cleaner for reusable grips is another essential investment for the modern studio. These devices use high-frequency sound waves to create cavitation, dislodging microscopic debris from textured surfaces that manual scrubbing might overlook. This provides a superior level of cleanliness before the final autoclave cycle.
Organizing your workstation with professional tattoo supplies allows for a streamlined workflow that reduces the risk of accidental contamination. When every disinfectant, wipe, and barrier is within reach but protected from ink mist, you create a controlled environment that mirrors a clinical laboratory. This meticulousness doesn't just protect the equipment; it builds immediate trust with your clients. They see the rigor of your setup and understand that their physical integrity is your highest priority. Adopting this safety-first mindset transforms your maintenance routine from a chore into a core component of your professional brand.
Effective Barrier Protection Strategies
Wrapping a rotary pen requires a nuanced touch to balance hygiene with mechanical health. You must achieve total coverage without obstructing the motor vents, as restricted airflow can lead to overheating and premature mechanical fatigue. Cord sleeves are equally critical. Since the RCA or power cord often contacts the floor or the artist’s lap, it acts as a primary vector for cross-contamination. Using high-quality grip wrap over your barrier film not only improves ergonomic comfort during long sessions but also ensures the film remains secure, preventing it from sliding and exposing the machine body to fluids.
The Tatt Lab Standard: Quality and Safety
At Tatt Lab, we believe that the tools you choose define the safety of your practice. We only stock artist-vetted tattoo supplies because we understand the high stakes of the clinical environment. This commitment extends to the selection of tattoo ink formulated for both vibrancy and stability. High-quality pigments are less prone to excessive spattering, which keeps your workstation cleaner and reduces the volume of fine mist settling on your equipment. Ultimately, mastering how to clean a rotary tattoo machine is part of a larger responsibility to public health. By choosing superior products and following a disciplined maintenance protocol, you ensure a liberating experience for your clients, characterized by safety and exceptional results.
Elevating Your Clinical Standards
Mastering the technical nuances of how to clean a rotary tattoo machine is a commitment to both your craft and the long-term health of your clients. By respecting the boundaries between autoclavable components and sensitive motor housings, you ensure your equipment remains a reliable partner in your artistic progression. This methodical approach replaces the anxiety of mechanical failure with the calm assurance of a predictable, sterile workflow. It transforms maintenance from a technical necessity into a liberating practice of professional self-assurance.
True professional results depend on the quality of your facility's environment. Utilizing artist-vetted supplies ensures that every barrier and disinfectant meets the rigorous demands of a modern studio. As an artist-owned and operated specialist, we understand the precision required to maintain high-performance tools. We provide a comprehensive range of medical-grade studio sanitisers and equipment designed for physical integrity and clinical excellence.
Shop Professional Medical Supplies and Tattoo Equipment at Tatt Lab and benefit from express nationwide shipping across Australia. Your dedication to safety is the foundation of your professional reputation. Stay meticulous, stay safe, and let your equipment reflect the excellence of your work.
Frequently Asked Questions
Can I use an autoclave to clean the entire rotary machine?
No, you cannot place the entire machine in an autoclave. Only detachable, heat-resistant components like stainless steel or high-grade aluminium grips are designed to withstand high-pressure steam sterilisation. Subjecting the motor housing to an autoclave cycle will cause immediate electrical failure and permanent mechanical damage to the internal drive system.
Is rubbing alcohol safe to use on my tattoo machine's motor housing?
Rubbing alcohol should be used with caution and only as a secondary option. While it is an effective antiseptic, its rapid evaporation can siphons moisture from rubber O-rings, causing them to become brittle and fail. It can also degrade the anodised finish of your machine over time. It is safer to use a dedicated, hospital-grade surface disinfectant wipe specifically formulated for medical equipment.
How often should I deep clean my rotary tattoo machine?
Surface disinfection is mandatory after every single session to eliminate bio-burden. A more intensive mechanical "deep clean," which involves inspecting internal seals and applying fresh lubricant, should occur every 20 to 30 hours of run time. This dual approach ensures you understand how to clean a rotary tattoo machine for both clinical safety and mechanical preservation.
What should I do if ink gets inside my rotary pen motor?
If you suspect ink has breached the motor housing, stop using the machine immediately and disconnect all power sources. Do not attempt to flush the motor with cleaning liquids, as this will likely spread the contamination and cause an electrical short. Your best course of action is to contact the manufacturer for professional servicing to prevent permanent motor seizure.
Do I need to oil my rotary machine after every session?
No, you don't need to lubricate your machine after every use. Over-oiling is a common mistake that creates a "sludge" of grease, dust, and pigment, which forces the motor to work harder and run hotter. Stick to the manufacturer’s recommended schedule, typically every 20 to 30 hours, and only apply a pin-drop amount of approved synthetic grease to the moving parts.
Can I use baby wipes or household disinfectants to clean my equipment?
Baby wipes and standard household cleaners are entirely insufficient for a professional studio environment. These products aren't formulated to kill bloodborne pathogens like Hepatitis B, Hepatitis C, or HIV. You must use EPA-registered, hospital-grade disinfectants to ensure your equipment meets the clinical standards required for public health and safety.
Why is my rotary machine getting louder after cleaning?
Increased noise is usually a sign of dry friction on the slider or cam assembly. If your machine's pitch changes after you learn how to clean a rotary tattoo machine, it's likely that your cleaning agents have stripped away the necessary lubrication. Applying a tiny amount of manufacturer-approved lubricant should resolve the friction and restore the machine's quiet operation.
Should I remove the O-rings before putting the grip in an autoclave?
Yes, you should remove standard rubber O-rings before autoclaving your grips. Unless the seals are specifically identified as high-temperature medical silicone, the intense heat and pressure will cause them to warp, melt, or lose their elasticity. It is better to process these rubber components separately using a cold-soak chemical disinfection method to maintain their seal integrity.


Comments (0)
There are no comments for this article. Be the first one to leave a message!