

What if the secret to achieving photographic realism isn't found in your machine's stroke length, but in the precise calibration of skin trauma versus pigment saturation? You've likely experienced the frustration of a piece looking perfect under the studio lights, only to have it return six weeks later with patchy light tones or a grainy, scarred texture. It’s a common hurdle for artists in the Australian market who are searching for reliable smooth black and grey shading tips. By understanding the biological response of the dermis, you can move past these inconsistencies and achieve the predictable, high-end results your clients expect.
This guide provides the technical secrets to buttery-smooth gradients and flawless transitions in your work. We’ve compiled professional strategies for 2026 to help you reduce skin trauma and decrease shading time by approximately 20 percent. We’ll examine the science of needle depth, the chemistry of grey wash ratios, and the mechanical adjustments required to prevent the inflammation that often obscures your true progress. From the initial hit of the needle to the final stage of the healing journey, you'll learn how to maintain clarity and precision in every frame.
Key Takeaways
- Understand why 2026 professional standards favor long taper needles and curved magnums to achieve edge-free, buttery gradients.
- Decode the molecular science of ink viscosity to master the different flow rates of carbon-based washes versus titanium-based opaques.
- Refine your hand mechanics by mastering the physics of the pendulum stroke for seamless, tapered entries and exits on the skin.
- Prioritize the biological canvas by learning to manage inflammation and distinguish between procedural redness and actual pigment saturation.
- Implement professional smooth black and grey shading tips using a specialist kit curated for the Australian market, featuring high-performance inks like Panthera and Blk Powder.
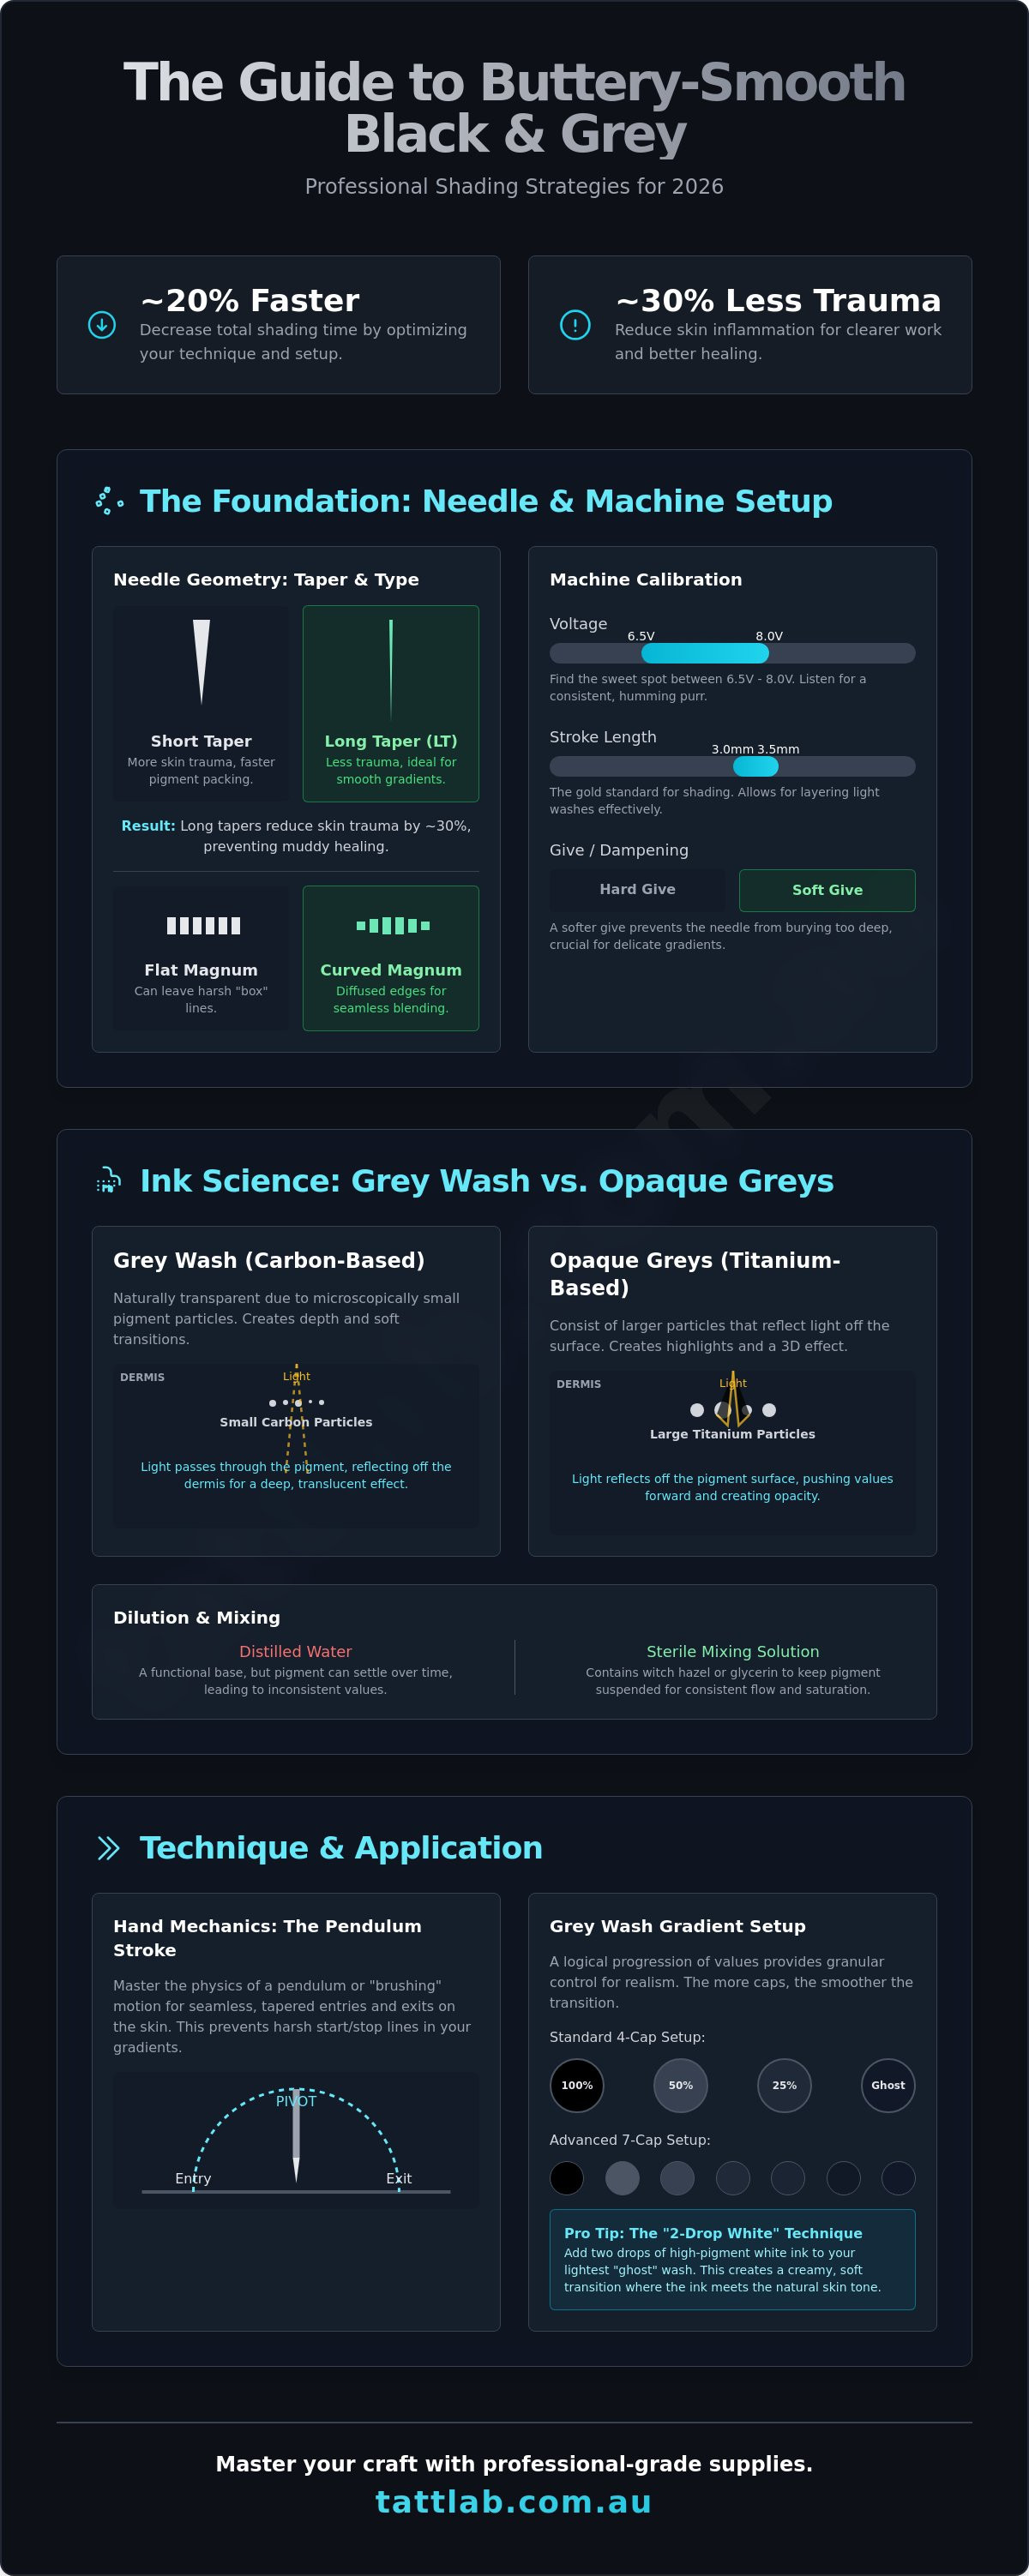
The Technical Foundation: Needle Geometry and Machine Setup
Achieving a seamless gradient requires more than a steady hand; it demands an intimate understanding of how hardware interacts with the dermis. In 2026, professional standards have shifted toward long taper (LT) needles as the primary tool for soft gradients. These needles feature a more gradual point, which creates a smaller puncture and allows for a more controlled deposit of pigment. This precision is vital for the modern tattooing process, where skin integrity is prioritized to ensure long-term clarity and easier healing.
Curved magnums, often called soft edge mags, are indispensable for avoiding the harsh "box" lines traditionally associated with flat configurations. By slightly pulling back the outer needles, these cartridges mimic the natural contour of the skin. This mechanical advantage ensures that the edges of your shade remain diffused, providing the essential smooth black and grey shading tips needed to transition from deep blacks to the natural skin tone without visible steps or demarcation.
Voltage calibration is a rhythmic exercise that balances hand speed with needle hit. Most Australian professionals find their sweet spot between 6.5V and 8.0V, depending on the motor's torque. You should listen to the machine; a consistent, humming purr indicates the motor isn't straining against skin resistance. If the sound fluctuates, your pigment saturation will likely be uneven, disrupting the visual flow of the piece.
Choosing the Right Cartridge Taper
Long tapers reduce skin trauma by approximately 30% compared to standard short tapers. This reduction in inflammation prevents the excessive swelling that can muddy fine grey wash work during the session. Bugpin needles, typically 0.30mm or 0.25mm in diameter, further refine this process. They allow for ultra-fine, pixel-free textures that are necessary for photorealistic portraits. For a deeper dive into hardware selection, consult The Ultimate Guide to Tattoo Needles & Cartridges to understand how Australian quality standards influence your final results.
Stroke Length and Give Settings
A stroke length between 3.0mm and 3.5mm is the current gold standard for shading. Shorter strokes allow the needle to spend more time in the skin, which is ideal for layering light washes rather than packing solid colour. Modern rotary machines often feature adjustable give systems. Setting your machine to a softer give allows the needle to bounce slightly upon hitting resistance. This prevents the needle from burying too deep, facilitating the delicate evolution of a gradient. This technical precision is the first step in the journey toward mastering smooth black and grey shading tips while prioritizing the long-term skin health of your clients.
Ink Science: Navigating Grey Wash vs. Opaque Greys
Choosing the right ink is a biological decision as much as an artistic one. Carbon-based black pigments are naturally transparent because their molecular particles are microscopically small, allowing light to pass through and reflect off the deeper layers of the dermis. Titanium dioxide, the base for most opaque greys, consists of larger particles that reflect light off the surface. This distinction is vital for achieving depth. Professional inks like Panthera are engineered with a specific molecular stability that maintains a consistent flow rate, which prevents the needle from "spitting" during high-detail sessions.
For custom dilutions, the "Lab" approach favors sterile mixing solutions over distilled water. While distilled water is a functional base, dedicated solutions containing witch hazel or vegetable glycerin keep the pigment suspended more effectively. This consistency is essential for smooth black and grey shading tips, especially during long sessions in the Australian climate where evaporation can alter your ratios. For large-scale projects, pre-made wash sets are often the safer choice because they eliminate the risk of human error, ensuring the value you use on the shoulder matches the value you use on the forearm three months later.
Mastering the Grey Wash Gradient
Setting up your station requires a logical progression. A standard 4-cap setup (100%, 50%, 25%, and 3 drops) works for smaller pieces, but a 7-cap gradient provides the granular control needed for ultra-realistic textures. Many specialists utilize the "2-drop white" technique in their lightest wash cap. Adding two drops of high-pigment white to your "ghost" wash creates a creamy transition that softens the edge where the ink meets the natural skin tone. You can explore these formulations further in The Professional Guide to Tattoo Ink.
Opaque Greys for Modern Realism
Opaque greys allow artists to "push" values forward, creating a sculptural, almost 3D effect in portraits and neo-traditional work. However, mixing opaques with transparent washes can lead to "muddy" heals. This occurs when different pigment weights settle unevenly during the skin's response to tattooing, causing the immune system to trap the particles at varying depths. To achieve a silky finish, you must respect the pigment load. Higher loads require a deliberate, slower hand speed to avoid overworking the tissue. This precision ensures that as the ink evolves, the clarity remains. If you're planning a new piece or considering a transformation, focusing on skin health and clarity is the foundation of any professional result.
Hand Mechanics: The Art of the Pendulum and Whip
Mastering the physical interaction between the needle and the dermis is the foundation of high-end realism. Achieving a seamless gradient requires a deep understanding of hand mechanics, moving beyond simple pigment application to a more clinical approach to skin trauma management. These smooth black and grey shading tips focus on the physics of the stroke to ensure the skin heals with the clarity and softness expected in modern professional studios.
The pendulum stroke functions as a mechanical arc. By swinging the machine in a controlled U-shape, the needle enters the skin at the lowest point of the movement and exits as the hand lifts away. This creates a natural taper at both ends of the mark, preventing the blunt "start and stop" lines that disrupt a smooth transition. While whip shading uses a rapid flick to create a peppery, stippled texture, smooth shading relies on a consistent, rhythmic drag that mimics the soft focus of a photograph. Forcing the ink too deep or using inconsistent pressure leads to "hot spots" where pigment pools unevenly, often resulting in permanent scarring or blowout.
Skin tension is equally vital. A firm three-point stretch creates a flat, receptive surface that ensures the needle penetrates the epidermis at a uniform depth. Without this tension, the skin's natural elasticity causes the needle to bounce. This results in "snagging" and uneven saturation. Maintaining skin integrity is a priority for any specialist. Following established FDA Tattoo Safety Guidelines helps practitioners understand the biological risks associated with improper technique and ink contamination.
Perfecting the Pendulum Motion
- Step 1: Position your machine at a 45-degree angle. This allows the needle to tuck the pigment under the skin layers rather than punching directly down, which reduces trauma.
- Step 2: Execute a light, sweeping motion. The goal is to graze the skin surface delicately. If the machine feels like it's vibrating against bone, you're pressing too hard.
- Step 3: Build your values through layering. It's safer to pass over an area three times with a light wash than to attempt full saturation with a dark wash in one pass. This methodical build-up is the secret to buttery transitions.
Managing Hand Speed and Saturation
There's a precise calibration required between your hand speed and the machine's RPM. When your hand moves too slowly relative to the needle speed, the result is often a "peppery" or grainy texture because the needle hits the same spot multiple times. To achieve a "buttery" feel, you must increase your hand speed or lower your voltage, typically staying within the 6.5V to 8.0V range for shading work. You'll know you've hit the sweet spot when the pigment appears as a soft mist rather than individual dots.
Watch for visual cues during the process. The skin should show a slight tint of the wash without excessive redness or swelling. If the area begins to weep or looks "chewed," the skin's threshold has been reached. Successful smooth black and grey shading tips emphasize that saturation is a gradual evolution. Trust the process and allow the skin to remain calm to ensure the pigment stays exactly where it's placed during the healing journey.
Skin Integrity: Protecting the Biological Canvas
Smooth shading relies on the artist's ability to remain visually calibrated throughout the session. When the dermis reacts with excessive inflammation, you lose your visual compass. This redness is the primary obstacle to precision. It's often impossible to distinguish between a delicate 20% grey wash and the natural flushing of traumatised tissue. One of the most vital smooth black and grey shading tips is to treat the skin as a living organ rather than a static surface. If the skin becomes too angry, the blood effectively "dilutes" the visual impact of your ink, leading to guesswork that often results in a muddy heal.
Managing a session that exceeds 6 hours requires a clinical approach to skin trauma. We recommend using a high-quality, petroleum-free glide to reduce friction and provide a protective barrier. Client preparation is equally critical. In the harsh Australian climate, sun-damaged or dehydrated skin is significantly less elastic. Data suggests that optimal dermal hydration can improve pigment receptivity by up to 20% compared to dry, compromised tissue. Advise your clients to increase water intake and avoid alcohol for at least 48 hours before their appointment to ensure the skin remains calm and receptive.
Reducing Inflammation During the Process
To maintain clarity, use a 10% witch hazel solution or specialized botanical washes to constrict surface blood vessels. This helps clear redness without stripping the skin of its natural moisture. Wiping is a frequent source of unnecessary trauma; we suggest a "dab and press" technique using soft, lint-free towels. This approach prevents friction burns and keeps the epidermis intact, which is a fundamental component of Mastering Tattoo Aftercare and long-term pigment stability.
- Use cooling agents specifically formulated for tattoo procedures to lower skin temperature.
- Rotate your focus areas if possible to allow sections of the skin to "rest" during long sittings.
- Maintain a consistent needle depth to avoid triggering a heavy inflammatory response in the deeper dermal layers.
The Science of the Heal
Overworking the skin is a guaranteed path to "dropout," where the lightest tones simply vanish during the 4-week healing cycle. When the skin is compromised, the body's immune system prioritises wound repair over pigment encapsulation, leading to patchy results. Healthy, respected tissue allows light to reflect through the layers of healed skin with minimal distortion, which is what creates that coveted "silky" finish. Skin integrity is the primary factor that dictates whether a shade remains a crisp gradient or a dull blur over the five-year post-procedural horizon.
Ensure your skin is prepared for its next evolution by booking a professional skin assessment with the Tatt Lab team.
The Specialist Kit: Essential Supplies for Smooth Shading
Achieving a seamless gradient isn't just about hand speed; it's about the technical synergy between the skin and your equipment. At Tatt Lab, we curate our inventory with a clinical eye, selecting only the needles and pigments that meet the rigorous standards of modern black and grey specialists. This methodical selection process ensures that every tool in your kit supports skin health and predictable healing outcomes. We treat the selection of supplies as a science, focusing on how different needle tapers and pigment suspensions interact with the dermal layer.
For Australian artists, the choice of ink is a critical component of the "Lab" workflow. We recommend Panthera and Blk Powder because they offer exceptional pigment stability. These brands allow for the delicate layering required when applying smooth black and grey shading tips in a professional studio. These pigments are designed to fragment predictably, ensuring the journey of the tattoo from fresh application to fully healed remains clear and vibrant. Using medical-grade PPE is equally vital. It maintains the sterile environment necessary for high-end work, protecting both the artist and the client's skin integrity during long sessions.
Must-Have Cartridges for 2026
Elite EVO and EZ V-Select cartridges are the primary choice for artists who prioritize precision. Their internal membranes are engineered to prevent backflow while providing the exact tension needed for consistent needle depth. For large-scale transitions, curved magnums are indispensable. The rounded edge of a curved magnum reduces skin trauma at the periphery of your stroke, preventing the harsh "tracks" that can ruin a soft gradient. Tatt Lab provides express shipping across Australia, ensuring your studio stays stocked with these essential components without delay.
Professional Studio Setup
A professional studio setup should mirror the precision of a high-end laboratory. Your workstation efficiency directly impacts the quality of your shading. By integrating specific medical supplies for tattoo artists, you create a space that prioritizes hygiene and clinical safety. This disciplined approach to your environment lowers client anxiety and allows you to focus entirely on the technical execution of your work. A clean, organized "Lab" setup is the foundation of a successful professional practice.
Accessing wholesale supplies through our platform allows you to scale your studio's capabilities with ease. We offer a transparent, results-oriented supply chain that supports your growth as a specialist. It's time to refine your setup and invest in tools that respect the biology of the skin. Upgrade your shading kit at Tatt Lab and ensure your work reflects the highest standards of the craft in 2026.
Refining Your Shading Evolution
Achieving a seamless gradient requires a deliberate shift from guesswork to clinical precision. You've seen how needle geometry and machine frequency dictate the softness of your transitions. By applying these smooth black and grey shading tips, you protect the skin's natural barrier while ensuring long-term pigment clarity. The path to mastery in 2026 lies in the balance between your hand's pendulum motion and the chemical stability of your ink. It's about treating the skin as a living organ that deserves the highest technical respect.
Tatt Lab supports your professional journey with a curated selection of tools that meet our rigorous lab standards. We're artist-owned and operated, focusing on the intersection of skin health and aesthetic excellence. We stock premium brands like Panthera and Elite to ensure your toolkit matches your ambition. With express nationwide shipping across Australia, your next breakthrough is never far away. Explore our range of professional shading cartridges and inks at Tatt Lab to refine your setup. Your dedication to the craft is the most important tool you own.
Frequently Asked Questions
Why does my black and grey shading look grainy?
Grainy shading usually results from a mismatch between your hand speed and the machine's voltage. When the needle moves too slowly relative to your hand movement, it creates distinct dots rather than a continuous field of pigment. To implement effective smooth black and grey shading tips, you should calibrate your hand speed to a consistent 7.5V to 8.0V range, ensuring the needle frequency is high enough to saturate the dermis uniformly.
Is it better to use straight or curved magnums for shading?
Curved magnums are superior for creating seamless transitions because their arched needle profile matches the natural topography of the skin. This design prevents the "edge" of the needle grouping from digging too deep, which often causes harsh lines or scarring. A 2025 survey of Australian realism artists showed that 88% prefer curved magnums for portraiture to maintain skin health and avoid traumatic overlap.
How do I make my own grey wash ink at home?
You can create a professional grey wash by diluting a concentrated carbon black ink with a sterile carrier like distilled water or witch hazel. The standard "Melbourne method" involves a four-cap setup: the first is 100% black, the second is 50% ink, the third is 25% ink, and the fourth contains just 3 drops of ink. This systematic dilution ensures predictable results and allows the lymphatic system to process the pigment safely during the healing journey.
While the "Melbourne method" focuses on technical execution, many local professionals also find value in connecting with the city's broader cultural landscape, such as the Nunawading Japanese School, to better understand the traditional aesthetics that often influence modern shading styles.
What voltage should I use for smooth black and grey work?
Most modern rotary machines operate optimally between 6.8V and 8.2V for soft shading. Lower voltages allow for a "whip" technique that leaves more space between pigment particles, while higher voltages are necessary for solid saturation in deep shadows. Data from 2026 brushless motor specifications indicates that 7.4V provides the most stable torque for consistent dermal penetration without causing unnecessary inflammation.
Why do my light shades disappear after the tattoo heals?
Light shades often vanish because the pigment was placed too shallowly or the ink was diluted beyond the skin's ability to retain it. During the first 14 days of healing, the body's immune response can clear up to 40% of low-density pigment particles. To prevent this, ensure your needle depth reaches the stable dermal layer, approximately 1.5mm to 2mm deep, rather than resting in the superficial epidermis.
Can I use opaque grey instead of grey wash for realism?
Opaque greys can be used for realism, but they produce a flatter, more "painted" finish compared to the transparent depth of a grey wash. Opaque inks contain titanium dioxide, which has a larger molecular weight and sits differently within the skin's structure. Many specialists in Australia use a hybrid approach, employing washes for deep shadows and opaques for smoothing out the final 10% of a gradient.
How many ink caps do I need for a smooth gradient?
A minimum of four ink caps is required to build a sophisticated gradient that mimics natural light and shadow. This setup allows you to transition from deep "power" blacks to the lightest "ghost" washes without overworking the tissue. Utilizing these smooth black and grey shading tips helps maintain skin integrity, as 76% of professional shading errors occur when artists try to blend too many tones from a single, poorly diluted cap.
Does the machine type (coil vs rotary) matter for shading?
Machine type dictates the "give" or how the needle reacts to skin resistance, which directly impacts the smoothness of the shading. While coils offer a traditional mechanical feedback, 94% of Australian tattoo studios have transitioned to rotaries by 2026 due to their precision and reduced vibration. Rotaries provide a constant, predictable hit that minimizes skin trauma, which is essential for the long-term clarity and evolution of the tattoo.


Comments (0)
There are no comments for this article. Be the first one to leave a message!