
Your stencil isn't just a purple guide; it's a biological negotiation between the dermis and the carbon that can't be won by simply applying more primer. Every artist knows the sinking feeling of watching their roadmap vanish under a paper towel mid-session, especially during complex shading. Understanding how to make a tattoo stencil last longer requires a shift from viewing the process as a simple transfer to treating it as a clinical preparation of the skin's surface. In 2026, as regulations like EU REACH and the US MoCRA demand higher standards for pigments and prep, your technique must prioritize both safety and extreme durability.
We'll show you how to lock in your design so it survives heavy wiping and long sessions without irritating the client's skin. You'll discover the specific prep protocols and procedural ergonomics that professional artists use to maintain clarity from the initial line to the final shade. This guide breaks down the science of skin-to-carbon adhesion, allowing for faster, more confident tattooing with a roadmap that remains crisp until the piece is complete.
Key Takeaways
- Master the science of biological adhesion by treating the skin as a clinical canvas, ensuring the stratum corneum is perfectly prepared for carbon transfer.
- Implement the "less is more" primer rule to prevent smudging and ensure a single-contact application that eliminates ghosting.
- Discover the professional secrets of how to make a tattoo stencil last longer through directional wiping and the "dab vs. drag" methodology.
- Optimize your procedural ergonomics to protect the design roadmap from the first line through the final stages of complex shading.
- Upgrade your technical results by selecting high-density carbon paper and professional-grade supplies designed for modern regulatory compliance.
The Science of Adhesion: Why Tattoo Stencils Fail
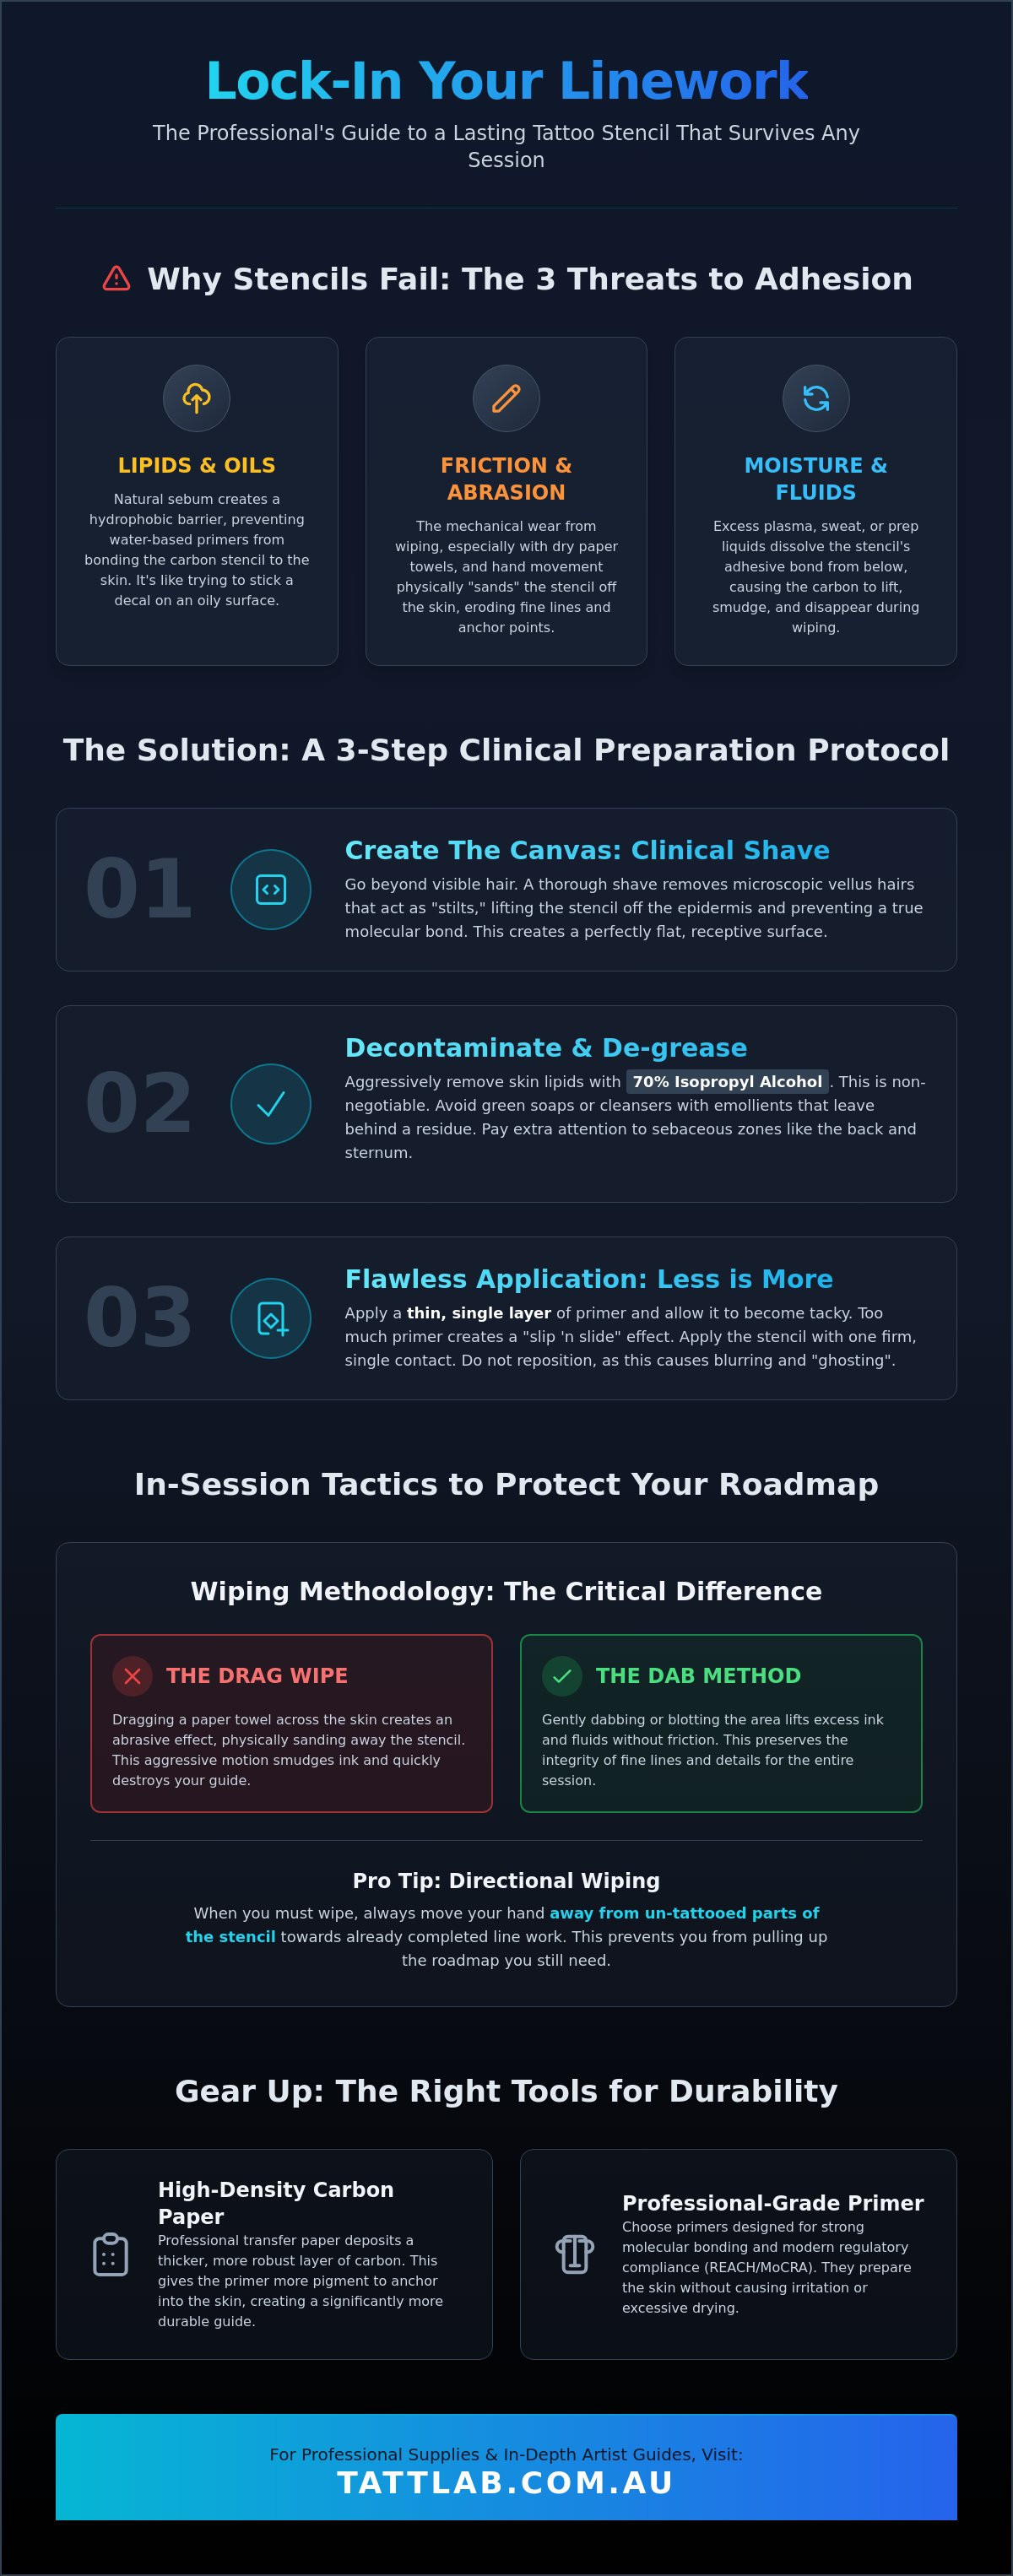
Successful stencil transfer is far more than a visual guide. It's a sophisticated molecular bond between carbon pigment and the living cells of the stratum corneum. When an artist struggles with a fading roadmap, the issue is rarely just the ink; it's a breakdown in the biological negotiation between the product and the skin surface. Understanding how to make a tattoo stencil last longer requires a deep dive into why this adhesion fails in the first place. By identifying these scientific hurdles, you can begin to implement the clinical steps necessary for how to make a tattoo stencil last longer even under the pressure of a full-day session.
The stratum corneum, the outermost layer of the epidermis, is designed to be a barrier. It's a landscape of flattened, keratinized cells that can either accept or reject the carbon transfer based on its condition. Professional-grade transfer paper provides a distinct advantage here. Unlike hobbyist alternatives, these papers feature high-density carbon coatings that deposit a thicker layer of pigment, giving the primer more material to anchor into the skin’s microscopic texture. We can categorize the failure of this bond into three primary environmental threats:
- Lipids: Natural oils that create a chemical barrier between carbon and skin.
- Friction: The physical erosion caused by the artist's hands and cleaning materials.
- Moisture: Excess plasma, sweat, or prep fluids that dissolve the adhesive bond.
The Role of Skin Lipids and Sebum
Natural body oils are the silent killers of a crisp design. Sebum acts as a hydrophobic shield, causing water-based primers to bead up rather than soak in. This chemical rejection prevents the carbon from ever reaching the skin cells. Body topography matters. Areas like the upper back or face have a higher concentration of sebaceous glands than the forearms or shins, leading to faster stencil degradation. Without neutralizing these lipids during the initial tattooing process, the stencil remains "floating" on an oil slick, ready to be wiped away at the first touch.
Friction and Mechanical Wear
Mechanical wear is an inevitable part of the procedure, but its impact can be mitigated. Every time your hand slides across the skin or a needle enters the dermis, you're applying force that can dislodge carbon particles. Dry paper towels are the most common culprit of premature fading. They create an "abrasion effect," essentially sanding the design off the skin. To preserve the roadmap, artists must focus on protecting "anchor points," which are the delicate intersections and fine details of the design, by managing the frequency and intensity of every wipe throughout the session.
Clinical Skin Preparation: Creating the Optimal Biological Canvas
To achieve a stencil that survives the entire session, you must adopt a "clean room" mentality during the initial stages of the procedure. This approach goes beyond basic hygiene; it's about ensuring the physical integrity of the skin surface. When considering how to make a tattoo stencil last longer, the preparation phase is where the battle is often won or lost. A clinical-grade shave is your first line of defense. Even microscopic vellus hairs act as structural "stilts," lifting the carbon pigment away from the epidermis and preventing a true molecular bond. Removing these micro-obstructions creates a flat, receptive landscape for the design.
Standard green soaps or commercial cleansers are often insufficient for professional-grade preparation. Many of these products contain emollients, glycerins, or fragrances that leave a microscopic film on the dermis. This residue acts as a lubricant, which is the exact opposite of what adhesion requires. A specialist follows a strict sequence of preparation: Cleanse, De-grease, and Sanitize. This logical progression ensures that you aren't just moving bacteria around, but actively stripping away the biological barriers that cause stencil failure. Adhering to FDA tattoo safety guidelines during this phase ensures that your pursuit of a long-lasting stencil never compromises the client's physical health.
Deep Cleansing and De-greasing
The use of 70% Isopropyl alcohol is a non-negotiable step for effective lipid removal. Alcohol dissolves the sebum that water-based cleaners leave behind, effectively "opening" the skin for the primer. Utilizing specialized medical supplies for tattoo artists allows you to maintain a sterile field while performing this aggressive de-greasing. Certain "problem zones," such as the center of the back, the sternum, or the back of the neck, are naturally more sebaceous. These areas often require a double de-grease to ensure the surface is truly matte and ready for transfer.
pH Balancing for Carbon Receptivity
The acidity of the skin plays a significant role in how well a primer "grabs" the carbon. While stripping oils is necessary, over-drying the skin with excessive chemicals can lead to a brittle surface. If the skin becomes too dehydrated, the stencil won't sink in; it will sit on top and flake off as the skin naturally sheds during the session. The goal is to reach a state of biological equilibrium where the skin is clean, sanitized, and slightly tacky. This specific texture allows the primer to act as a bridge between the carbon and the cells. For artists focused on how to make a tattoo stencil last longer, achieving this balanced surface is the hallmark of a master technician. Selecting the right tattoo stencils and prep solutions is the final step in securing a roadmap that stays crisp until the last wipe.
The Application Protocol: Primers, Pressure, and Setting Time
Precision in the application phase is the bridge between a clean biological canvas and a permanent guide. Once the skin is de-greased and balanced, the technical execution of the transfer determines the stencil’s ultimate resilience. Mastering how to make a tattoo stencil last longer requires a methodical approach that prioritizes the chemistry of the bond over the speed of the setup. This protocol ensures the carbon isn't just sitting on the skin, but is effectively integrated into the upper layers of the epidermis.
The process begins with the "less is more" rule for primer application. You should apply a precise volume of solution until the skin has a slight, even sheen rather than a wet, slippery appearance. Excess primer is the primary cause of line spread and "bleeding" during the transfer. Once the surface is ready, follow the "single-contact" rule. Placement must be deliberate; shifting the paper even a fraction of a millimeter after contact creates "ghosting," which compromises the clarity of your roadmap. Apply uniform pressure across the entire design using a clean, dry paper towel or a steady, gloved hand to ensure every carbon molecule finds its anchor point. Finally, peel the paper slowly from one corner, maintaining a low angle to preserve the crispness of the edges.
The most overlooked step in how to make a tattoo stencil last longer is the removal and subsequent "Set Phase." In 2026, the industry gold standard for setting time has moved to a full 20 minutes. This period allows the carrier liquids to evaporate completely, leaving only the bonded carbon and locking agents behind. Rushing this window is a guaranteed path to mid-session stencil failure.
Choosing the Right Stencil Primer
Modern professional stencil solutions are engineered with specific locking agents that create a high-tack surface without clogging the skin's pores. Gel-based primers often provide a stronger "grab" for detailed linework on oily or combination skin, while lotion-based alternatives can be more empathetic to drier skin types, preventing the "brittle" effect that leads to flaking. Regardless of the formula, always use a secondary dispensing container to avoid cross-contamination between the bottle and the client’s skin, maintaining the clinical integrity of your workstation.
The Critical Drying Phase
The drying phase is a physical transformation where the liquid primer becomes a solid adhesive bond. As the carrier liquid evaporates, the carbon pigment is pulled into the microscopic grooves of the stratum corneum. To manage client comfort during this 20-minute window, use this time for final machine calibration or a detailed consultation regarding the session flow. This patience ensures that when you finally begin the first line, the roadmap is chemically locked and ready to withstand the friction of the tattooing process.
Procedural Ergonomics: Protecting the Roadmap During the Session
Maintaining the integrity of the design during the actual procedure is a matter of physical discipline and technical ergonomics. Many artists focus solely on the preparation phase, yet the way you move during the tattoo determines whether that roadmap survives the first hour. Learning how to make a tattoo stencil last longer requires more than just a high-quality primer; it involves a clinical approach to how you physically interact with the skin. Every movement of your hand and every wipe of the towel must be deliberate and controlled to avoid the mechanical erosion of the carbon pigment.
Directional wiping is a fundamental skill for preserving design clarity. By always wiping away from the remaining stencil lines, you minimize the risk of dragging excess ink and carbon across the unworked areas of the design. This technique, combined with the "Dab vs. Drag" methodology, significantly extends the life of the transfer. Dragging a dry paper towel across the skin creates friction that acts like fine-grit sandpaper on your roadmap. Instead, dabbing with a moist towel allows you to lift excess ink and blood without compromising the stencil’s anchor points. Furthermore, managing lubrication is essential. While ointments are necessary for needle glide, over-saturated skin leads to stencil "sliding" as petroleum-based products can dissolve the primer's adhesive bond.
Workstation height and artist posture also play a silent but critical role in how to make a tattoo stencil last longer. Accidental contact from an artist’s sleeve or the side of a gloved hand often goes unnoticed until the design has been smudged beyond recognition. By optimizing your ergonomics, you ensure your body remains clear of the unworked design, protecting the physical integrity of the stencil throughout the session.
Strategic Ink Removal
Utilizing specialized tattoo aftercare washes during the session provides a gentle, surfactant-based cleaning action. This clinical approach is far more effective than dry wiping, which is a primary cause of stencil degradation and skin irritation. Implementing a "Bottom-Up" approach is equally vital. By starting your work at the lowest point of the design and moving upward, you ensure that your hand and cleaning materials are never passing over the fresh stencil as you progress through the piece.
Mid-Session Stencil Reinforcement
In long sessions or high-temperature environments where client sweat becomes a factor, you may need to reinforce the design mid-way. If a section begins to fade, surgical skin markers can be used to strengthen "lost" sections before they disappear entirely. Some specialists also utilize specialized locking sealants that can be sprayed over the stencil mid-tattoo to provide an extra layer of protection against moisture and friction. To ensure your roadmap stays crisp from start to finish, equip your studio with professional-grade tattoo stencils and application solutions.
Specialist Solutions: Professional Supplies for High-Stakes Artistry
The technical execution of a tattoo is only as reliable as the materials supporting it. While clinical prep and ergonomic wiping are essential, your choice of transfer medium serves as the final variable in the equation of durability. High-density carbon paper provides a significantly thicker pigment deposit compared to standard thermal alternatives. This increased density allows the stencil to withstand the repeated saturation of ink and cleaning fluids, providing a definitive answer for artists seeking how to make a tattoo stencil last longer. Investing in premium tattoo supplies is more than a purchase; it's a commitment to the precision and safety of your craft.
Tactile feedback is another vital factor in roadmap preservation. High-quality nitrile gloves allow for a non-abrasive touch, ensuring that your guiding hand doesn't inadvertently lift the carbon during the session. These gloves provide the sensitivity needed to stretch the skin without the aggressive friction associated with lower-grade materials. For Australian artists, Tatt Lab functions as a specialist partner, providing clinical-grade tools that bridge the gap between technical expertise and biological reality. By choosing supplies engineered for 2026 standards, you ensure that your workflow remains uninterrupted by equipment failure.
The Tatt Lab Selection: Vetted for Performance
Every product in the Tatt Lab range undergoes a rigorous, artist-owned vetting process to ensure it meets our laboratory-standard criteria. We focus on the synergy between prep solutions and transfer mediums, ensuring that the chemical bond described in earlier sections is never compromised by incompatible formulas. Freshness and storage are equally critical. Properly stored consumables maintain their chemical potency, ensuring that every application is as predictable as the last. This meticulous selection process removes the guesswork from how to make a tattoo stencil last longer, allowing you to focus entirely on the artistic narrative.
Elevating Your Studio Standards
Moving from a "making it work" mindset to a predictable, laboratory-standard workflow creates a sense of controlled progress in the studio. There is a profound psychological benefit to the artist when the roadmap is permanent and reliable. It eliminates the anxiety of losing the design, replacing uncertainty with a calm, methodical approach to the body. This confidence translates directly into the quality of the final result and the client's overall experience of transformation. We invite you to explore the Tatt Lab range to discover how professional-grade stencils and clinical supplies can elevate your artistry to new levels of physical integrity.
Securing Your Creative Precision
Mastering the permanence of your design is a fundamental shift from simple tracing to clinical execution. By prioritizing biological de-greasing and respecting the critical 20-minute drying window, you ensure the carbon pigment anchors deeply into the stratum corneum. These technical adjustments, paired with disciplined directional wiping and ergonomic awareness, provide the definitive solution for how to make a tattoo stencil last longer. Your roadmap should be a source of confidence rather than anxiety, allowing you to focus entirely on the intricate narrative of your client's transformation.
Elevating your studio standards requires tools that mirror your commitment to physical integrity. As an artist-owned and operated facility, we provide the clinical-grade medical supplies necessary for predictable, laboratory-standard results. Upgrade your studio with professional-grade stencil supplies at Tatt Lab and benefit from express nationwide shipping across Australia. Your journey toward technical mastery is a gradual progression; we're here to ensure your tools always match the precision of your vision.
Frequently Asked Questions
Why does my tattoo stencil smudge as soon as I start wiping?
Smudging usually occurs because the carrier liquid in the primer hasn't fully evaporated, leaving the carbon in a semi-liquid state. If the skin is over-saturated with product, the pigment can't anchor to the epidermis. You must apply a thin, even layer of primer and wait the recommended 20 minutes. This allows the molecular bond to solidify before any mechanical friction is applied during the session.
How long should I realistically let a tattoo stencil dry before starting?
You should realistically wait 20 minutes for the stencil to set completely. While some artists rush after 10 minutes, the full window ensures all moisture has left the surface. This patience is a key part of how to make a tattoo stencil last longer. It allows the locking agents to create a dry, friction-resistant barrier that survives the entire session without fading or spreading under your hand.
Can I use deodorant as a stencil primer like some old-school artists suggest?
Using deodorant is not recommended in a modern, clinical environment. These products aren't sterile and often contain ingredients that can irritate open skin or interfere with pigment settling. Professional stencil primers are formulated to be biocompatible. They provide superior adhesion without the safety risks associated with grocery-store toiletries, ensuring both the artist's technical success and the client's physical safety throughout the process.
Does the type of paper towel I use affect stencil longevity?
The texture of your paper towel significantly impacts the roadmap's survival. Rough, low-quality towels act like an abrasive; they physically sand the carbon off the skin with every wipe. You should opt for soft, high-absorbency towels. Prioritize a dabbing motion rather than a dragging one to preserve the design's structural integrity and minimize the mechanical wear on the delicate carbon lines during cleaning.
What is the best way to clean the skin without removing the stencil?
The most effective method is using a specialized, surfactant-based wash applied with a gentle dabbing motion. Always wipe away from the remaining lines to prevent dragging ink across the unworked stencil. This approach cleanses the area of excess blood and pigment while minimizing the mechanical friction. It keeps the surface clean without disrupting the bond between the carbon and the stratum corneum in unworked areas.
Is there a difference between hand-drawn and thermal-printed stencils for longevity?
Thermal-printed stencils typically provide better longevity because they deposit a more consistent, high-density layer of carbon. Hand-drawn stencils can vary in pigment depth depending on the pressure used during the drawing process. For complex sessions, the uniform output of a thermal printer ensures a more reliable bond across the entire design. This consistency makes it much easier to predict the stencil's performance during long shading sessions.
How do I handle stencils on areas that sweat a lot, like the lower back?
High-moisture areas require an aggressive de-greasing phase using 70% Isopropyl alcohol to remove all surface lipids. If you anticipate heavy sweating during a long session, applying a specialized locking spray after the initial transfer can provide an extra hydrophobic barrier. This helps the carbon resist being dissolved by the body's natural cooling response. It's a vital step for maintaining clarity in difficult, sebaceous zones.
What should I do if the stencil wipes off halfway through a large piece?
If you lose your roadmap mid-session, use a sterile surgical skin marker to carefully trace over the remaining faint impressions. Don't try to re-apply a wet stencil over an open wound. It's unhygienic and will likely smudge. Learning how to make a tattoo stencil last longer through proper clinical preparation is the best way to avoid this technical emergency during a large, complex piece.


Comments (0)
There are no comments for this article. Be the first one to leave a message!