

What if a client tapping out early wasn't a failure of their willpower, but a missed opportunity in your technical strategy? You likely understand the frustration of a session being cut short because of involuntary twitching or a "spicy" rib piece that compromises your ink saturation. While pain is a natural part of the process, viewing it as an unpredictable variable often leads to lower referral rates and compromised skin integrity.
This guide will help you master the science of skin sensitivity by utilizing a specialized tattoo pain chart for artists to predict and manage discomfort with clinical precision. You'll learn how to enhance client endurance and protect the dermal layer by applying the latest 2026 standards for topical anaesthetics, including the critical 4% lidocaine limit for over the counter products. We will explore anatomical nerve density, the evolution of technical pain mitigation, and the professional strategies that transform a difficult session into a controlled, high-end laboratory experience for every client.
Key Takeaways
- Demystify the biological mechanisms of discomfort by understanding how nociceptor activation in the dermal layer influences a client's involuntary twitching.
- Reference a professional tattoo pain chart for artists to strategically map sensitivity zones, allowing you to plan sessions around high-vibration areas like the sternum and shins.
- Optimize your technical setup by analyzing how needle taper and machine stroke length variables can either mitigate or exacerbate procedural skin trauma.
- Navigate the chemistry of comfort through the clinical application of topical anaesthetics that block nerve sodium channels and manage intra-session swelling.
- Extend your professional care beyond the chair by using specialized aftercare to reduce secondary inflammation and support long-term skin health.
Understanding the Biological Mechanism of Tattoo Pain
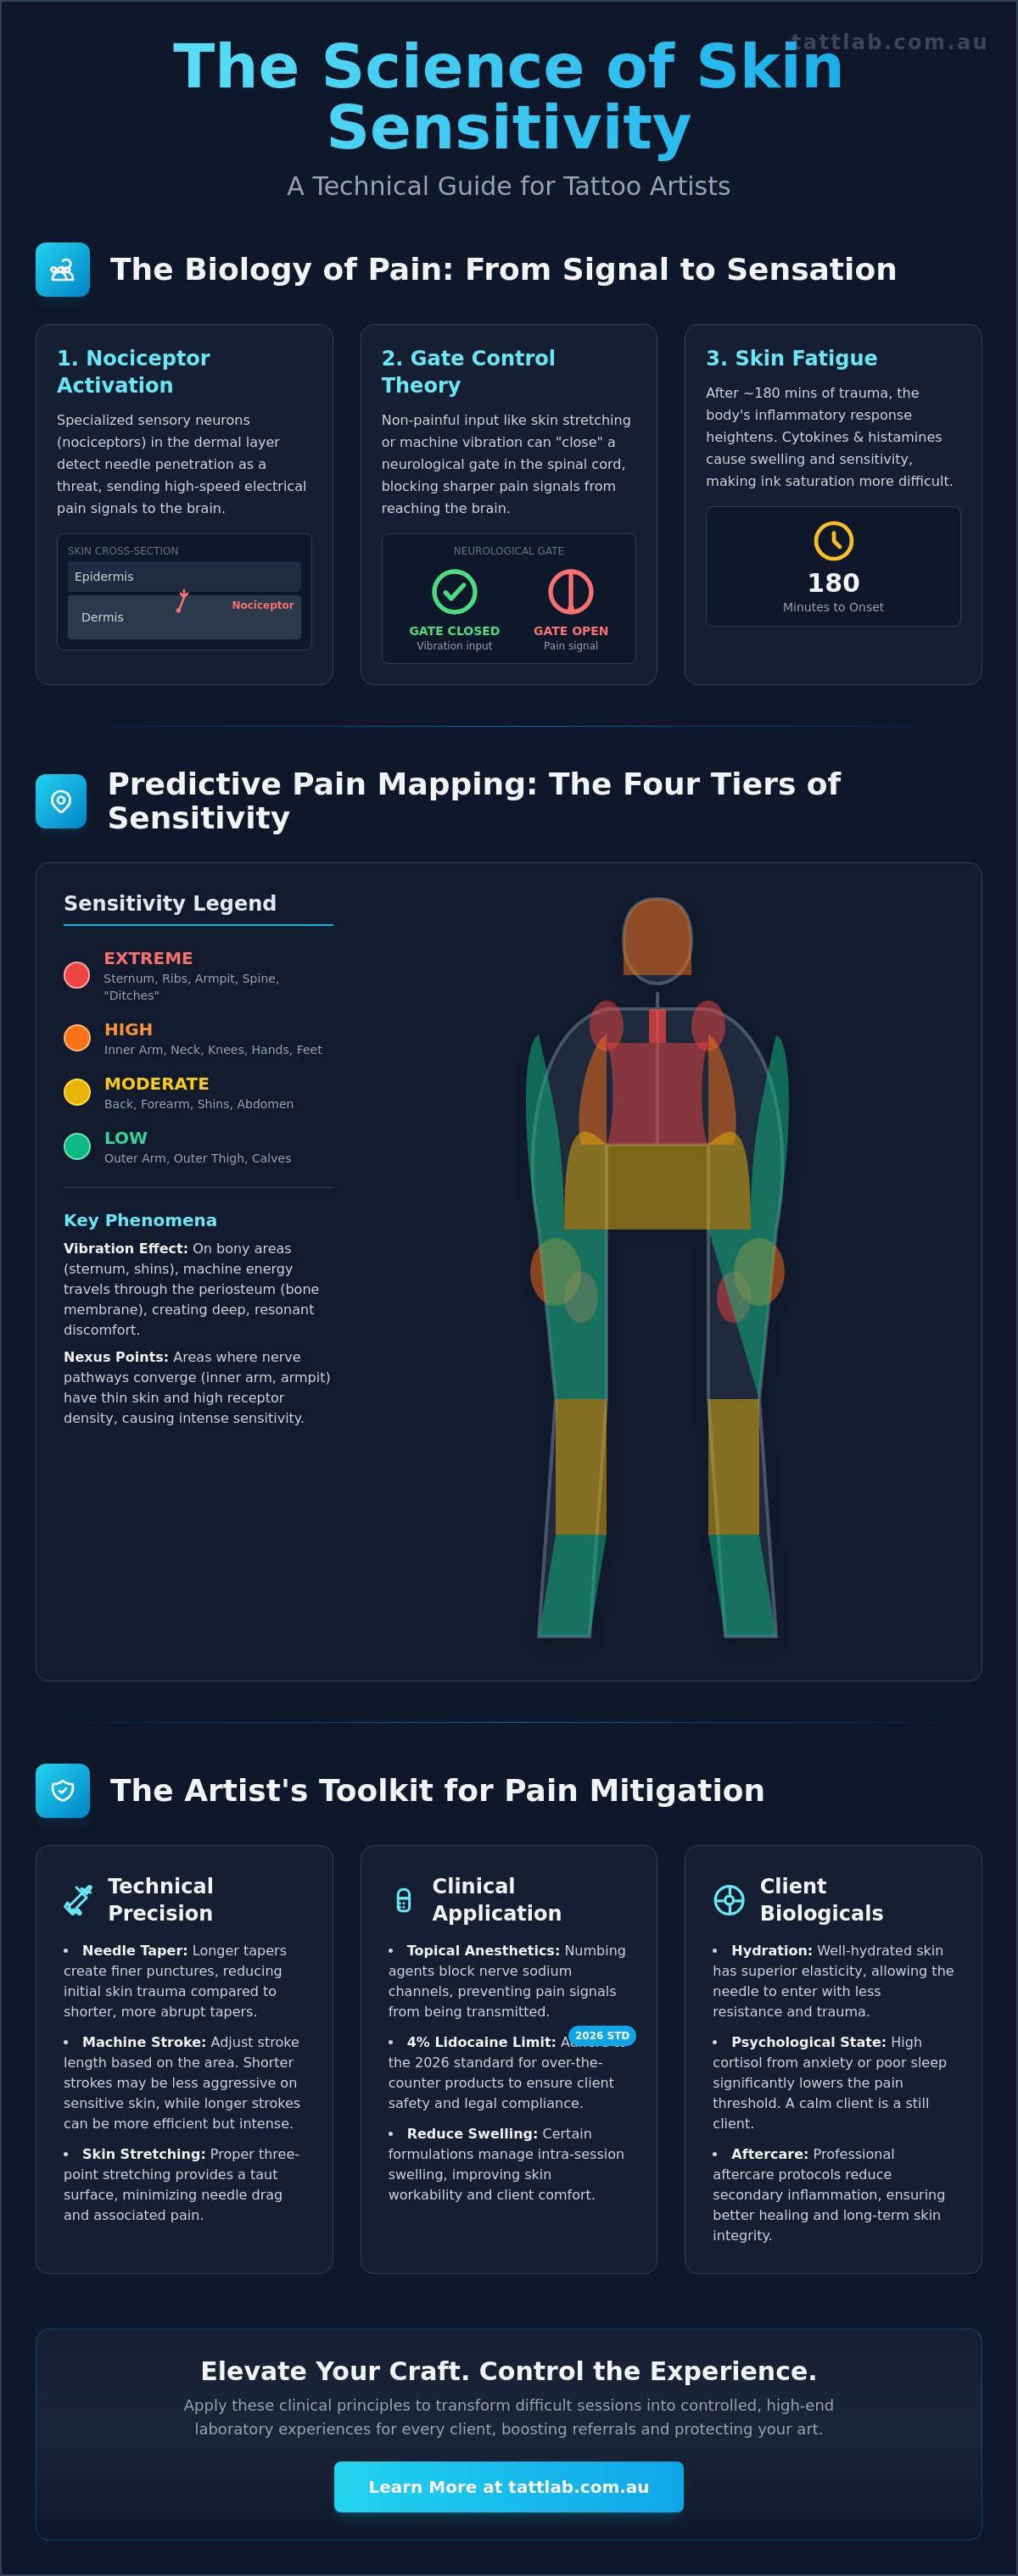
Tattooing is a precise medical intervention that involves the repetitive penetration of the skin's protective barrier. The sensation your client feels is the immediate activation of nociceptors, which are specialized sensory neurons located within the dermal layer. These receptors are designed to detect mechanical or thermal threats and transmit high-speed electrical signals to the brain. When you consult a tattoo pain chart for artists, you are essentially reviewing a map of the body's neural architecture. Areas with thinner skin or higher concentrations of these receptors will always yield a more intense physiological response.
The "Gate Control Theory" offers a scientific explanation for how we manage this discomfort. This theory suggests that the spinal cord contains a neurological "gate" that either blocks pain signals or allows them to pass through to the brain. By using techniques like skin stretching or the vibration of the machine itself, you provide non-painful sensory input that can effectively "close the gate" on the sharper nociceptor signals. Precision is vital here because skin thickness varies significantly across the body. The dermis on the eyelids might be only 0.5mm thick, while the skin on the back can reach 4mm. This variation directly affects your needle depth and the resulting pain levels.
As the session progresses, the body enters a state of "skin fatigue" characterized by a heightened inflammatory response. After approximately 180 minutes of continuous trauma, the local tissue releases a flood of cytokines and histamines. This leads to increased swelling and sensitivity, making the physiological process of tattooing more difficult as the skin begins to resist ink saturation. Understanding this biological timeline is what separates a technician from a specialist.
The Role of Nociceptors and Nerve Density
Nerve density is the primary reason why a wrist piece feels vastly different from an outer arm tattoo. Extremities like the hands and feet are packed with Meissner’s corpuscles and nociceptors, leading to intense somatic pain. In contrast, tattooing over bony areas like the ribs creates referred pain, where the vibration of the needle is felt in the skeletal structure rather than just the skin. As of 2026, clinical research defines the dermal-epidermal junction as the primary site of neuro-vascular interaction, making it the most critical zone for managing procedural sensitivity and ensuring long-term skin health.
Biological Factors: Why Every Client Responds Differently
Individual biology plays a massive role in how a tattoo pain chart for artists translates to a real-world session. Hydration levels directly impact skin elasticity; well-hydrated skin is more supple and allows the needle to enter with less resistance. The lymphatic system also plays a silent role, as it begins the process of ink fragmentation and removal the moment the first drop of pigment is deposited. Furthermore, a client's psychological state is a physical factor. High cortisol levels, often caused by anxiety or lack of sleep, can significantly lower a person's pain threshold, turning a standard session into a challenging endurance test for both the artist and the client.
The Artist’s Tattoo Pain Chart: Mapping Sensitivity Zones
Professional mapping of the body requires more than a cursory glance at a diagram. For a specialist, a tattoo pain chart for artists serves as a predictive diagnostic tool. We can categorize the human canvas into four distinct tiers of sensitivity: Low, Moderate, High, and Extreme. Each tier represents a different density of nerve clusters and a varying proximity to the skeletal structure. Understanding these zones allows you to manage client expectations and adjust your technical approach, ensuring that skin integrity remains the priority throughout the session.
The "vibration effect" is a phenomenon frequently reported in bony areas like the sternum and shins. In these regions, the mechanical energy of the machine travels through the periosteum, which is the membrane covering the bone. This creates a deep, resonant discomfort that feels more intrusive than the needle itself. This sensation is compounded at "nexus points" where major nerve pathways converge. For example, the inner arm contains the brachial plexus, making it a high-sensitivity zone where even a light touch can trigger a systemic response. Clinical research into factors influencing pain perception highlights that these physiological triggers are often exacerbated by session duration and local inflammation.
Your ability to hold fine detail is directly linked to the client's ability to remain still. In high-pain areas, involuntary micro-twitching can lead to blowouts or inconsistent line weights. By referencing a tattoo pain chart for artists during the design phase, you can strategically place high-detail elements in more stable zones while using bolder, more forgiving techniques in areas prone to movement.
The High-Intensity Zones: Nerves and Bone
The armpit and the "ditches" (inner elbow and back of the knee) are objectively the most challenging areas. These zones are characterized by thin, elastic skin and an incredibly high concentration of sensory receptors. The spine and ribs offer a unique "vibrating" pain profile that can cause involuntary muscle spasms, potentially compromising your technical precision. When managing the groin or inner thigh, professional care is paramount. These areas possess a high density of cutaneous nerves, requiring a light hand and clinical focus to prevent the client from reaching their pain threshold too early.
The Low-Intensity Zones: Muscle and Fat
The outer arm and forearm remain the gold standard for entry-level tattoos. These areas provide a stable, muscular base with fewer nerve endings, allowing for longer sessions and intricate detail. Similarly, the upper back and outer thighs are resilient zones that can handle heavy saturation with minimal trauma. However, the calves are often deceptive. While they start as a low-intensity zone, the lack of fatty tissue toward the ankle can lead to a "hard finish" as skin fatigue sets in. To maintain the best results throughout the healing journey, recommending high-quality tattoo aftercare is essential for these high-friction areas.
Technical Variables: How Equipment Choice Impacts the Pain Response
While a tattoo pain chart for artists provides a biological roadmap of sensitivity, your choice of instrumentation determines the actual intensity of the needle’s "bite." Every technical adjustment you make alters the mechanical trauma inflicted on the dermal layer. Mastering these variables allows you to mitigate the inflammatory response before it begins, preserving skin health and extending your client’s endurance. It's a clinical approach where the machine becomes an extension of your intent to minimize trauma.
Needle taper is a primary factor in procedural comfort. A long taper needle, often measuring 5.0mm or more, features a slimmer point that enters the skin with significantly less resistance than a short taper. This reduced friction means the needle glides into the dermis rather than punching through it. When you combine this with precise voltage management, you can achieve better saturation without the need for multiple passes. High voltage doesn't inherently mean more pain; if your hand speed is calibrated to a higher frequency, you can complete a line in one fluid movement. This prevents the "burning" sensation caused by overworking a single area of tissue.
The tension of the cartridge membrane also plays a subtle role in the client's experience. High-tension membranes require the machine's motor to work harder, often resulting in a more aggressive, "snappy" impact. In contrast, low-tension membranes provide a softer response that is more forgiving on sensitive zones. By selecting equipment that respects the delicate balance of the skin's barrier, you ensure a smoother journey for the client and a more stable canvas for your work.
Needle Physics and Skin Trauma
Traditional Round Liners concentrate all the machine’s force into a singular, narrow point, creating higher pressure per square millimetre than Magnums. This concentration is why lining is often cited as the most painful part of the process on any tattoo pain chart for artists. To counter this, many specialists use "pepper shading" techniques with lower frequency hits to reduce local irritation. Utilizing long taper needles further assists by decreasing the skin's resistance, allowing for deeper pigment deposit with less surface disruption.
Machine Calibration for Comfort
The debate between rotary and coil machines often centres on the "give" or the machine's ability to bounce back when it hits resistance. Modern rotary machines with adjustable give allow you to mimic the natural elasticity of the skin, preventing the needle from hitting too hard against bony landmarks. A steady hand speed is your best tool for pain management. By moving at a pace that matches your machine's cycles, you avoid the secondary inflammation that occurs when the skin is snagged or dragged. This methodical precision keeps the lymphatic system from becoming overwhelmed by unnecessary trauma during the session.
Clinical Pain Management: Numbing Agents and Procedural Techniques
Effective pain management transforms the tattooing process from an endurance test into a controlled clinical procedure. While a tattoo pain chart for artists identifies where sensitivity is highest, topical anaesthetics provide the chemical intervention necessary to manage those zones. Lidocaine, the most common agent, functions by blocking sodium channels within the nerve cell membrane. This prevents the transmission of electrical impulses to the brain, effectively silencing the nociceptors we discussed in previous sections. By stabilizing these neurons, you allow the client to remain still, which is vital for maintaining technical precision.
Epinephrine is often paired with lidocaine for its vasoconstrictive properties. By narrowing the blood vessels, it slows the systemic absorption of the anaesthetic, keeping it localized in the dermal layer for longer periods. This also significantly reduces intra-session swelling and bleeding, which helps maintain the clarity of the tattoo ink as it is deposited. Artists must be precise with their protocol. Secondary numbing agents should only be applied once the skin barrier is broken, and they must be used sparingly to avoid compromising skin texture or causing a "rubbery" surface that resists the needle. This ensures the skin remains receptive to pigment throughout the entire session.
Equip your studio with professional tattoo supplies designed to prioritize skin integrity and client comfort.
The Professional Guide to Topical Anaesthetics
In Australian studios, the use of topical anaesthetics requires a balance of safety and efficacy. Over the counter products are generally limited to a 4% lidocaine concentration to prevent systemic toxicity. Pre-numbing involves applying a cream to closed skin under occlusion for 60 to 90 minutes. In contrast, secondary numbing is a fast-acting liquid or gel used mid-session. While these tools are invaluable for extreme zones on your tattoo pain chart for artists, you must monitor for skin blanching or adverse reactions that could affect the healing journey. Excessive use can lead to localized tissue changes that make fine detail work more difficult.
Non-Chemical Pain Mitigation Techniques
Comfort isn't solely dependent on chemistry. Ergonomics and psychological management play equal roles in client endurance. Teaching a client controlled breathing, specifically exhaling during long, difficult lines, helps stabilize the core and lowers the heart rate. This reduces the systemic cortisol response that often heightens pain perception. Your workstation setup should also prioritize client positioning. If a client is straining to hold a limb in place, their muscle tension will amplify the sensation of the needle. A relaxed body is a more receptive canvas, allowing for better ink saturation and a more efficient workflow.
Beyond the Chair: Aftercare as the Final Stage of Pain Mitigation
The procedural discomfort documented in a tattoo pain chart for artists is only the initial phase of the client’s sensory experience. Once the session concludes, the body transitions into a state of acute inflammation where the sensation shifts from a sharp mechanical sting to a radiating "sunburn" heat. This is a biological milestone indicating that the immune system is flooding the site with white blood cells to begin the repair process. Managing this secondary inflammation is critical for client comfort and ensuring the long-term integrity of the work.
As the skin begins to close, clients often encounter the "healing itch," a result of histamine release and nerve regeneration within the dermal layer. While this is a positive sign of progress, uncontrolled dryness can lead to rigid scabbing. These scabs pull on the surrounding healthy tissue during movement, creating a secondary source of sharp pain. By utilizing specialized tattoo aftercare, you provide a breathable moisture barrier that keeps the tissue supple. This clinical approach to "wet healing" prevents heavy crusting and minimizes the physical tension that often leads to client distress during the first week of recovery.
Distinguishing between normal healing pain and infection is a professional necessity. While localized redness and a dull ache are expected milestones, signals of concern include spreading erythema, localized heat that increases after the third day, or purulent discharge. Providing your clients with this clinical breakdown reduces their anxiety and ensures they stay on the path toward a successful evolution of their skin.
The First 48 Hours: Managing Acute Trauma
The first 48 hours are the most volatile for the client. For tattoos located in high-motion areas like the elbow ditch or the tops of the feet, swelling can be significant due to gravity and constant skin flexion. We recommend cold compress protocols and elevation to manage this initial fluid buildup. Utilizing medical supplies such as second-skin film bandages is highly effective in these early stages. These bandages reduce friction pain against clothing and protect the sensitive dermal-epidermal junction from external irritants during its most vulnerable state.
Long-term Integrity and Comfort
Long-term recovery relies on supporting the skin's natural barrier without suffocating it. We advise clients to avoid petroleum-based products because they trap body heat and can exacerbate the burning sensation during the initial inflammatory phase. Instead, focus on formulations that support the skin's microbiome. Consistent hydration is also vital, as it assists the lymphatic system in efficiently processing the cellular debris and fragmented pigment resulting from the procedural trauma. High-quality aftercare protocols are the final step in the journey, ensuring every session preserves the "Lab" standard of skin health and aesthetic clarity.
Elevating the Standard of Procedural Comfort
Mastering client comfort requires a transition from viewing pain as an obstacle to treating it as a biological variable that can be managed with technical precision. By integrating a professional tattoo pain chart for artists into your consultation process, you transform the session into a predictable, high-end experience. This clinical approach doesn't just improve ink saturation; it builds profound trust and long-term client loyalty by respecting the body's physiological limits and the vulnerability of the skin.
Your choice of equipment and topical agents serves as the foundation for this evolution in care. As an artist-owned and operated specialist, we understand that skin health is the ultimate priority for every professional studio across the country. Equip your studio with professional-grade pain management and aftercare from Tatt Lab to ensure your technical work is supported by clinical-grade medical supplies. We offer express nationwide shipping across Australia, ensuring your workstation is always prepared for the most demanding sessions. Your commitment to these refined standards marks the beginning of a more sophisticated journey for both you and your clients.
Frequently Asked Questions
Where is the most painful place to get a tattoo according to the 2026 chart?
The armpits, inner elbow "ditch," and the ribs remain the most painful zones on the 2026 tattoo pain chart for artists. These regions are characterized by a high concentration of sensory nerves and minimal fatty tissue protection. When the needle impacts these areas, the proximity to the skeletal structure amplifies the sensation, often triggering involuntary systemic responses that require shorter sessions and precise technical management.
Does numbing cream actually affect the quality of the tattoo or ink retention?
Topical anaesthetics don't inherently damage ink retention, but excessive application can alter skin texture, making it feel "rubbery" or difficult to saturate. Using products within the Australian 4% lidocaine limit ensures safety without compromising the dermal layer's receptivity. If the skin becomes over-saturated with cream, it may swell prematurely, which can lead to patchy healing or the need for more aggressive needle pressure.
How long can a client typically endure a high-pain session before skin fatigue sets in?
Most clients reach a state of biological skin fatigue after approximately 180 to 240 minutes of continuous procedure time. At this threshold, the local inflammatory response increases significantly as the body releases histamines and cytokines. This leads to heightened sensitivity and localized swelling, which can make further ink saturation difficult. Breaking longer projects into multiple sessions preserves skin health and ensures a more comfortable journey.
What is the difference between sharp pain and the vibrating sensation in tattooing?
Sharp pain is the direct result of nociceptors in the dermal layer being triggered by the needle's mechanical entry. In contrast, the vibrating sensation occurs when the machine's energy resonates through the periosteum, which is the membrane covering your bones. This deep, resonant discomfort is common in areas like the sternum or shins and is often described as more intrusive than the actual needle bite itself.
Can the type of tattoo machine used influence how much a client feels?
The choice of machine significantly influences the client's sensory experience. Rotary machines with adjustable "give" allow the needle to retract slightly when it hits resistance, providing a softer impact that mimics skin elasticity. Traditional coil machines provide a more consistent, "punchy" hit that some clients find more intense. Modern technical variables allow artists to calibrate their equipment to match the sensitivity zones identified on a tattoo pain chart for artists.
What should an artist do if a client begins to go into shock or faints from pain?
If a client experiences signs of shock or vasovagal syncope, you must stop the session immediately and ensure they are in a safe, horizontal position. Elevate their legs above heart level to restore blood flow to the brain and offer a glucose-heavy drink or snack to stabilize blood sugar. It's vital to monitor their breathing and wait for full recovery before deciding whether it's safe to continue the session.
How does hydration affect a client’s pain threshold during a long session?
Proper hydration increases skin elasticity and significantly raises a client's pain threshold during long sessions. Well-hydrated dermal tissue is more supple and allows the needle to penetrate with less mechanical resistance, reducing the overall trauma. Conversely, dehydrated skin is more prone to inflammation and sensitivity, which can lead to premature skin fatigue and a more difficult recovery process for the client's lymphatic system.
Is it safe to use secondary numbing agents on all parts of the body?
Secondary numbing agents are generally safe for most anatomical locations when applied to broken skin, provided the artist monitors for adverse reactions. However, you should exercise caution in areas with very thin skin or high vascularity to avoid excessive blanching or systemic absorption. Always follow clinical protocols regarding application frequency to prevent localized tissue changes that could interfere with the final aesthetic outcome and the healing journey.


Comments (0)
There are no comments for this article. Be the first one to leave a message!