

A consistent tattoo rinse cup setup gives needle rinsing a defined place in your workstation and helps keep used items separate from ink and clean supplies. With the cup positioned securely and within reach, you can rinse without reaching across your work area or crowding other tasks.
A crowded bench can interrupt your workflow, so decide in advance what belongs at the rinse station and what needs to stay separate. Treat the cup as a session-specific part of your setup, and keep its area distinct from clean materials. This supports an orderly routine without adding unnecessary steps.
This guide covers what to prepare, where to position the cup, and how to reset the station after use. It also explains which items to keep separate, while leaving equipment processing and disposal to your studio’s procedures and applicable hygiene requirements. Tatt Lab is an artist-owned Australian supplier of professional tattoo and medical supplies, including needles, inks and aftercare products.
Key Takeaways
- Prepare a suitable rinse cup, water selected according to studio procedures, and any disposable barriers needed for the setup.
- Place the cup within comfortable reach, on a stable surface that doesn’t crowd the working area.
- Use a consistent sequence for preparing and checking the station.
- Keep resetting the rinse station separate from equipment sterilisation, and follow applicable state or territory guidance for disposal.
- Maintain clear boundaries between the rinse area, ink preparation and clean supplies throughout the session.
What a tattoo rinse cup does in a well-organised workstation
A tattoo rinse cup is a dedicated vessel for rinse water used to rinse a needle during tattooing. It gives this task a defined place, separate from ink preparation and clean supplies. The cup supports rinsing, but it doesn’t sterilise equipment or replace any cleaning, disinfection or sterilisation steps required by the studio’s procedures.
Keep the purpose of each item clear. Rinse water is for rinsing, not for holding, diluting or storing ink, and it isn’t drinking water. Put ink in its designated ink caps, and keep drinking water away from the work area. Clear boundaries help prevent mix-ups and make the station easier to manage while you work.
When does an artist use a rinse cup?
An artist may use the cup during a session when rinsing a needle is part of their workflow. Rinsing doesn’t make a needle sterile or remove the need to follow required equipment-processing procedures. The specific approach depends on the artist’s practice and studio protocol; this guide doesn’t prescribe a machine-specific method.
Which items should stay separate?
Keep the rinse cup in its designated area, apart from ink caps and unopened supplies. Avoid placing it among unrelated items or where a bump could spill it. This makes it easier to identify what belongs to the rinsing task and what needs to stay clean. For context on tattooing and studio hygiene, see Modern tattooing and studio hygiene.
- Rinse cup: Keep it in the designated rinsing zone.
- Ink and ink caps: Keep them in the separate area set aside for ink preparation.
- Unopened supplies: Protect them from contact with used items and splashes.
- Drinking water and unrelated items: Keep them away from the tattoo work area.
In a well-planned tattoo rinse cup setup, the cup is close enough to reach without crossing over clean supplies, obstructing your work or creating a spill risk. Treat it as one defined station within the broader workstation, not as a substitute for hygiene controls. Follow your studio safety guide for those controls, including the handling and processing of equipment. A clear layout makes each item’s role easier to recognise and supports an orderly workflow.
What to prepare before assembling a tattoo rinse cup setup
Preparation keeps the rinse area deliberate rather than crowded. Before assembling your tattoo rinse cup setup, gather a suitable cup, the rinse water specified by your studio’s procedure, and any disposable barriers needed to protect relevant work surfaces. Set everything out before the workstation is in use, so you don’t need to reach across clean supplies or search for essentials during the session.
Choose the cup and water for the session
Select a cup that sits securely on the intended work surface and suits your workflow. No single cup material or size is universally required here, so follow your studio’s procedures and any relevant product instructions. Choose rinse water according to applicable professional guidance. Don’t assume clean water is sterile or substitute a sterile solution without guidance that supports its use.
The U.S. Food and Drug Administration discusses sterile equipment, single-use ink cups and cross-contamination in its tattoo safety guidance. This is useful background, but it isn’t Australian state or territory guidance. For local requirements and procedures, follow current applicable guidance and your studio protocols rather than treating an overseas source as a rule for Australian practice.
Prepare the workstation before filling the cup
Arrange the work surface and barriers first, then put the cup in its designated area. Keep unopened supplies protected and apart from items already in use. Leave enough room to reach the cup without knocking it or disrupting your work. Use your studio safety guide for broader workstation preparation, including controls beyond the rinse station.
Use this checklist to distinguish essentials from choices that depend on your routine:
- Essential: A suitable, stable rinse cup for the session.
- Essential: Rinse water selected in line with studio procedures and applicable guidance.
- Essential when needed for the setup: Disposable barriers for relevant workstation surfaces.
- Workflow preference: The cup’s exact position within the designated work area, provided it remains accessible and doesn’t create an obstruction or spill risk.
The rinse cup and its water are for rinsing, not for holding ink or replacing ink caps. A barrier protects a surface as part of your setup; it doesn’t replace other required cleaning or equipment-processing steps. Preparing these items together helps maintain separation between clean supplies and the active work area.
Choose supplies that fit your studio’s procedures and organise them before the session begins. Tatt Lab supplies professional tattoo products, including needles, cartridges and tattoo inks, for artists planning their wider workstation.
Where to place the rinse cup in a tattoo workstation
Place the cup where it’s easy to reach without pulling it into the centre of your work. The basic principle is to position a stable cup within comfortable reach on the artist’s working side, clear of the machine, ink caps, clean supplies, cords, edges and high-traffic parts of the station. A considered tattoo rinse cup setup gives each task a defined place without forcing every artist to use the same layout.
Position the cup for comfortable access
Consider which hand will reach for the cup and how the artist moves during the session. Choose a level, stable part of the designated work surface that’s accessible without leaning over the tattoo or crossing over clean supplies. Keep the cup away from table edges, trailing cords and areas where hands or equipment pass frequently. Adapt the placement to the actual workstation.
Reachable placement: A stable surface within comfortable reach, with a clear path to the cup and enough space for working movements.
Crowded or spill-prone placement: Near an edge, under a cord, behind equipment or among items that need frequent access.
A cup that’s easy to reach but obstructs the machine’s movement is still poorly placed. A clear surface is no help if the artist has to stretch across the work area to reach it. Adjust the layout before beginning if the cup shifts, crowds another task or interrupts a natural working motion.
Keep rinse water distinct from ink and clean items
Give the rinse area, ink preparation area and clean supplies distinct positions. This makes the purpose of each item easier to recognise and helps keep the workflow orderly. It doesn’t replace other studio hygiene controls. For broader safe-work context, the CDC/NIOSH guidance on tattooing practices discusses workplace precautions. Australian artists should follow current applicable local guidance and their studio procedures.
Workstation layout, viewed from above
Artist’s working side → Rinse cup | Machine | Ink caps | Clean supplies
Illustrative arrangement only. Adapt positions to the artist, equipment and workstation.
The diagram shows separation, not a mandatory left-to-right layout. Keep the cup and its water away from ink caps, and keep unopened supplies protected rather than placing them beside items already in use. For ink preparation and handling, follow your studio’s tattoo ink guide and established procedures. The goal is to identify and reach each task area without unnecessary crossing or clutter.
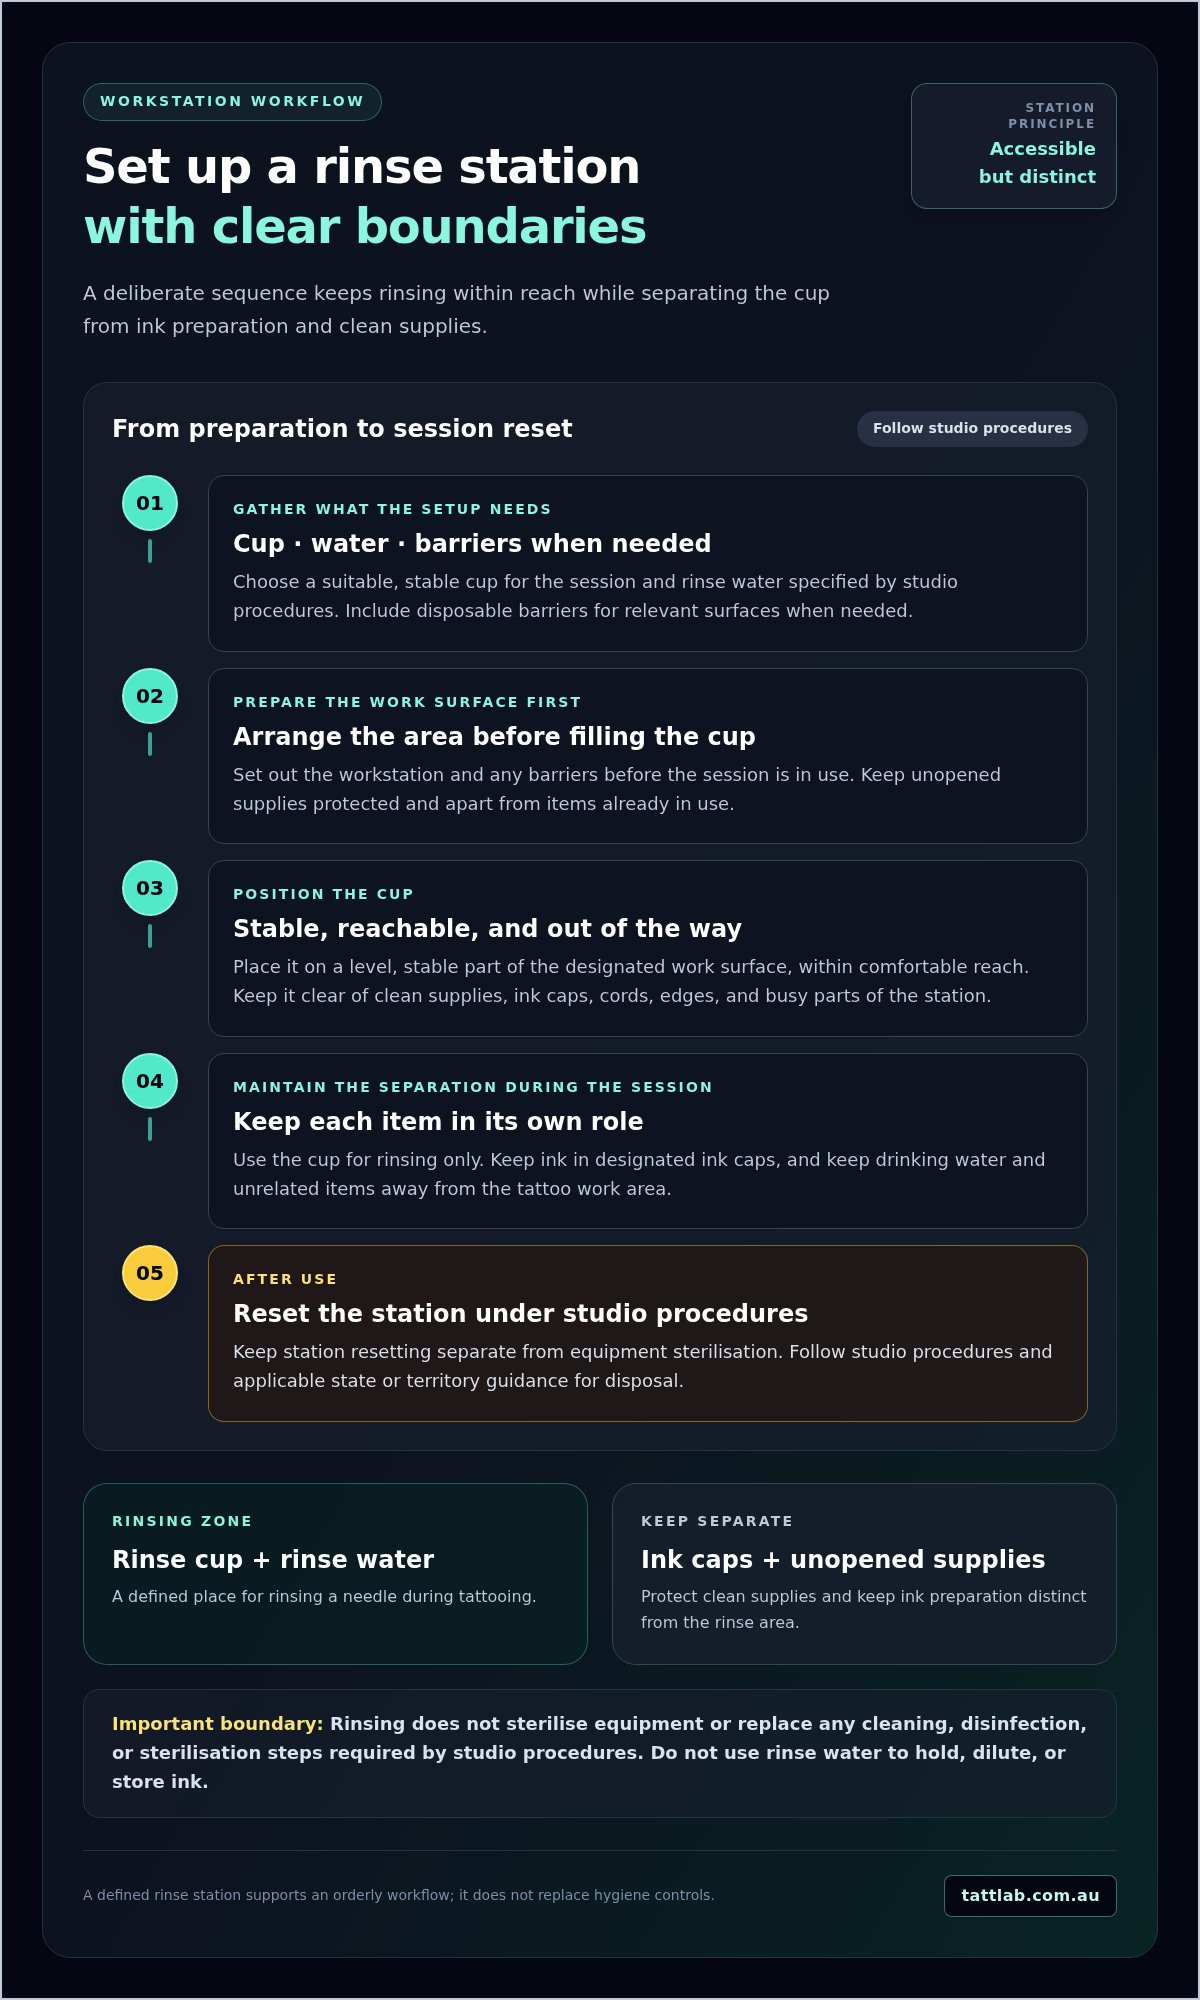
How to set up a tattoo rinse cup step by step
A repeatable sequence makes the rinse station easier to prepare and check before each session. Follow your studio’s hygiene procedures and current requirements for your Australian state or territory. These steps establish an orderly setup; they don’t replace studio protocols for equipment processing, surface hygiene or other controls.
- Review the procedure. Confirm the studio’s instructions for workstation preparation, rinse water and supply handling. Follow applicable local requirements rather than relying on a generic routine.
- Prepare the workstation. Complete the required surface cleaning and disinfection, then apply relevant disposable barriers according to the studio’s procedure.
- Perform hand hygiene. Clean your hands at the appropriate point in the preparation sequence. Use gloves when required by your studio procedure, and handle supplies according to that protocol.
- Check the cup. Set out the designated cup for the session. Make sure it suits the planned position and sits securely on the work surface.
- Position the cup. Place it in the selected rinse area, accessible to the artist but out of the way of working movements and potential knocks.
- Add the rinse water. Use water in accordance with professional guidance and studio procedures. Pour carefully to avoid splashing the surrounding surface or nearby supplies.
- Arrange the other items. Keep ink caps and clean supplies in their designated areas, separate from the rinse cup and items already in use.
- Make a final check. Look over the full station before tattooing begins. Adjust anything crowded, unstable or out of place.
Keep each step distinct. Filling the cup, for example, isn’t a reason to move ink caps or unopened supplies into the rinse area. If the cup shifts during your final check, reposition it before using the station. Don’t set a water amount or change interval based on a general guide; follow the applicable procedure for your studio and session.
Readiness check: Confirm the cup is stable and reachable, the surrounding work area is clear, and ink caps and clean supplies remain separate.
Consistency matters more than forcing every workstation into the same layout. A routine that follows applicable requirements and your studio’s procedures can make preparation more orderly from session to session. For other workstation essentials, explore professional tattoo supplies from Tatt Lab.
How to maintain and reset the rinse cup station after use
Resetting the rinse area is part of closing out a session, but it isn’t the same as cleaning, disinfecting or sterilising equipment. Each has a distinct role in the studio’s hygiene process. Follow your studio procedure for the reset, and current guidance for your Australian state or territory for handling or disposing of rinse water, the cup and other used items. Avoid relying on a universal disposal rule, as requirements can vary.
Clear and reset the station between sessions
Treat the cup and its water as session-specific. Don’t carry them casually into another session; follow studio procedures for handling them and preparing the station afresh. Complete the reset in the order your studio specifies, keeping used items separate from clean supplies as you remove them. For broader cleaning and waste context, refer to your studio safety guide and applicable local guidance.
- Follow the local procedure: Check applicable state or territory guidance for disposal requirements, then apply your studio’s process.
- Remove used items appropriately: Handle the cup, water and associated disposables according to that process, rather than assuming they all belong in the same waste stream.
- Reset the work area: Carry out required surface cleaning and disinfection, and replace barriers as directed by studio procedures.
- Prepare for the next session: Keep clean supplies protected while clearing the used station, then establish the rinse area again as a separate task.
This reset doesn’t sterilise reusable equipment. Follow the separate cleaning, disinfection or sterilisation process required for each item. Keeping these actions distinct helps prevent a tidy-looking station from being mistaken for a fully processed one.
Troubleshoot common setup problems
If rinse water spills, pause and follow the studio’s established clean-up procedure before continuing. Don’t improvise a response or resume work while the affected area remains unresolved. If the station becomes cluttered, stop and rearrange it so the rinse area, ink materials and clean supplies are clearly organised again. A brief reset can restore a more controlled workflow.
Use the same approach if the cup shifts or an item ends up in the wrong area: pause, follow studio procedures and restore the intended separation before proceeding. If you’re uncertain about waste handling, consult current state or territory guidance and the studio safety guide rather than guessing. A repeatable reset preserves clear task boundaries and leaves the workstation ready for its next preparation cycle.
A consistent tattoo rinse cup setup includes a clear end-of-session routine, not just a well-placed cup at the start. Tatt Lab supplies professional tattoo and medical products for artists and studios. Explore professional tattoo supplies to support your wider studio workflow.
Make your workstation routine your own
A rinse station works best when its arrangement suits the way you tattoo. As your setup or workflow changes, check whether the cup remains easy to reach and the work area stays clear. A brief pre-session check can make your tattoo rinse cup setup a consistent habit, rather than an arrangement you need to rethink each time.
For wider workstation planning, Tatt Lab supplies professional tattoo and medical products to artists and studios, with online shopping and wholesale purchasing for registered professional studios and medical clinics. Explore professional tattoo supplies to find products that support your studio routine.
Small, deliberate adjustments can make the working environment more organised and predictable. Keep refining your process in line with studio procedures, and build a setup that lets you focus on your work with confidence.
Frequently Asked Questions
Does a tattoo rinse cup need to be sterile?
Follow your studio’s procedure and applicable state or territory guidance rather than assuming every rinse cup must meet the same sterility standard. Use and discard a single-use cup according to its instructions and local requirements. A reusable item needs the processing specified by studio protocols. A cup that looks clean isn’t necessarily sterile, and rinsing equipment in it doesn’t sterilise that equipment.
Can I reuse rinse water during a tattoo session?
Use rinse water only as directed by your studio’s procedure, and don’t carry it over to another client or session. If it becomes visibly soiled, is splashed or the cup is disturbed, pause and follow the studio’s process for replacing it and managing the affected area. Avoid setting a universal change interval without guidance; the appropriate procedure depends on applicable requirements and the supplies being used.
Should I use distilled water in a tattoo rinse cup?
Not by default. Choose water according to your studio’s procedures, applicable professional guidance and relevant product instructions. Distilled water isn’t automatically sterile, so “distilled” alone doesn’t prove it meets a sterility requirement. If your studio specifies a particular water type or solution, follow that instruction consistently rather than switching based on assumption.
Where should a rinse cup sit on a tattoo workstation?
Place it on a stable surface the artist can reach without leaning across the client or interrupting hand movements. If reaching toward the cup means crossing over ink caps or clean materials, adjust the layout before starting. Keep it clear of the workstation edge and cords, and make sure it doesn’t restrict the space needed to move the machine or other equipment.
Can one rinse cup be used for more than one client?
No. Treat the cup and its water as designated for a single client session, then follow studio procedures and local guidance for handling and disposal. Don’t top up the same cup or carry it forward to the next client. Preparing a fresh rinse station for each session gives the workstation a clear reset point and helps prevent supplies from being mixed between sessions.
What should I do if rinse water spills?
Pause work and follow your studio’s established spill clean-up procedure before continuing. Keep hands and supplies away from the affected area while you assess what needs attention, and manage any items contacted by the spill according to studio protocols. Don’t simply wipe the surface with whatever is nearby or resume while it’s still wet. If the next step is unclear, use the studio safety guide.
Can I leave rinse water in the cup overnight?
Don’t leave it for use in a later session. At the end of the session, handle the cup and remaining water according to your studio procedure and current state or territory disposal guidance. Reset the station separately from processing reusable equipment. Before the next client, prepare the rinse area afresh rather than relying on water left from the previous day.


Comments (0)
There are no comments for this article. Be the first one to leave a message!