

The most striking tattoos aren't defined by their ink, but by the space where the ink fades into nothingness. Achieving that seamless gradient is the ultimate hurdle for any new artist, especially when you consider that the target dermis layer is often only 1.5 millimetres thick. If you've struggled with patchy saturation or accidental scarring, you're likely fighting the machine rather than working with the biology of the skin. Mastering tattoo shading techniques for beginners requires a shift in perspective from drawing on a surface to managing a biological canvas with clinical precision.
It's frustrating when your vision of a smooth charcoal wash turns into a "peppered" mess or, worse, causes unnecessary trauma to the client's tissue. You want to create depth while prioritizing long-term skin health, especially since refined technique can improve ink retention by 40 percent during the initial healing phase. In this guide, we'll demystify the mechanics of needle throw and voltage to help you transition from hesitant passes to confident, buttery gradients. We'll examine the science of needle groupings and the precise hand speeds needed to ensure every session in the lab contributes to a successful healing journey and a high-clarity finish.
Key Takeaways
- Identify the dermal "sweet spot" to master the science of ink dispersion while prioritizing long-term skin integrity and healing.
- Learn to select the optimal needle configuration, understanding the technical differences between Round Shaders and Magnum cartridges for seamless gradients.
- Master foundational tattoo shading techniques for beginners, including the rhythmic pendulum motion and the textured effects of whip shading.
- Troubleshoot common issues like patchiness and skin snagging to ensure your work heals with professional clarity rather than a washed-out finish.
- Bridge the gap between synthetic practice and the living canvas by utilizing high-precision equipment designed for clinical accuracy.
The Science of Shade: Understanding Dermal Integrity and Depth
Mastering tattoo shading techniques for beginners starts with a clinical understanding of the skin as a dynamic canvas. Shading isn't merely the application of grey or black pigment; it's the controlled dispersion of ink pigments within the dermis to create the illusion of three-dimensional form. This process requires a delicate balance of technical precision and biological awareness. When you apply shade, you're essentially building layers of light and shadow that trick the eye into seeing volume on a flat surface.
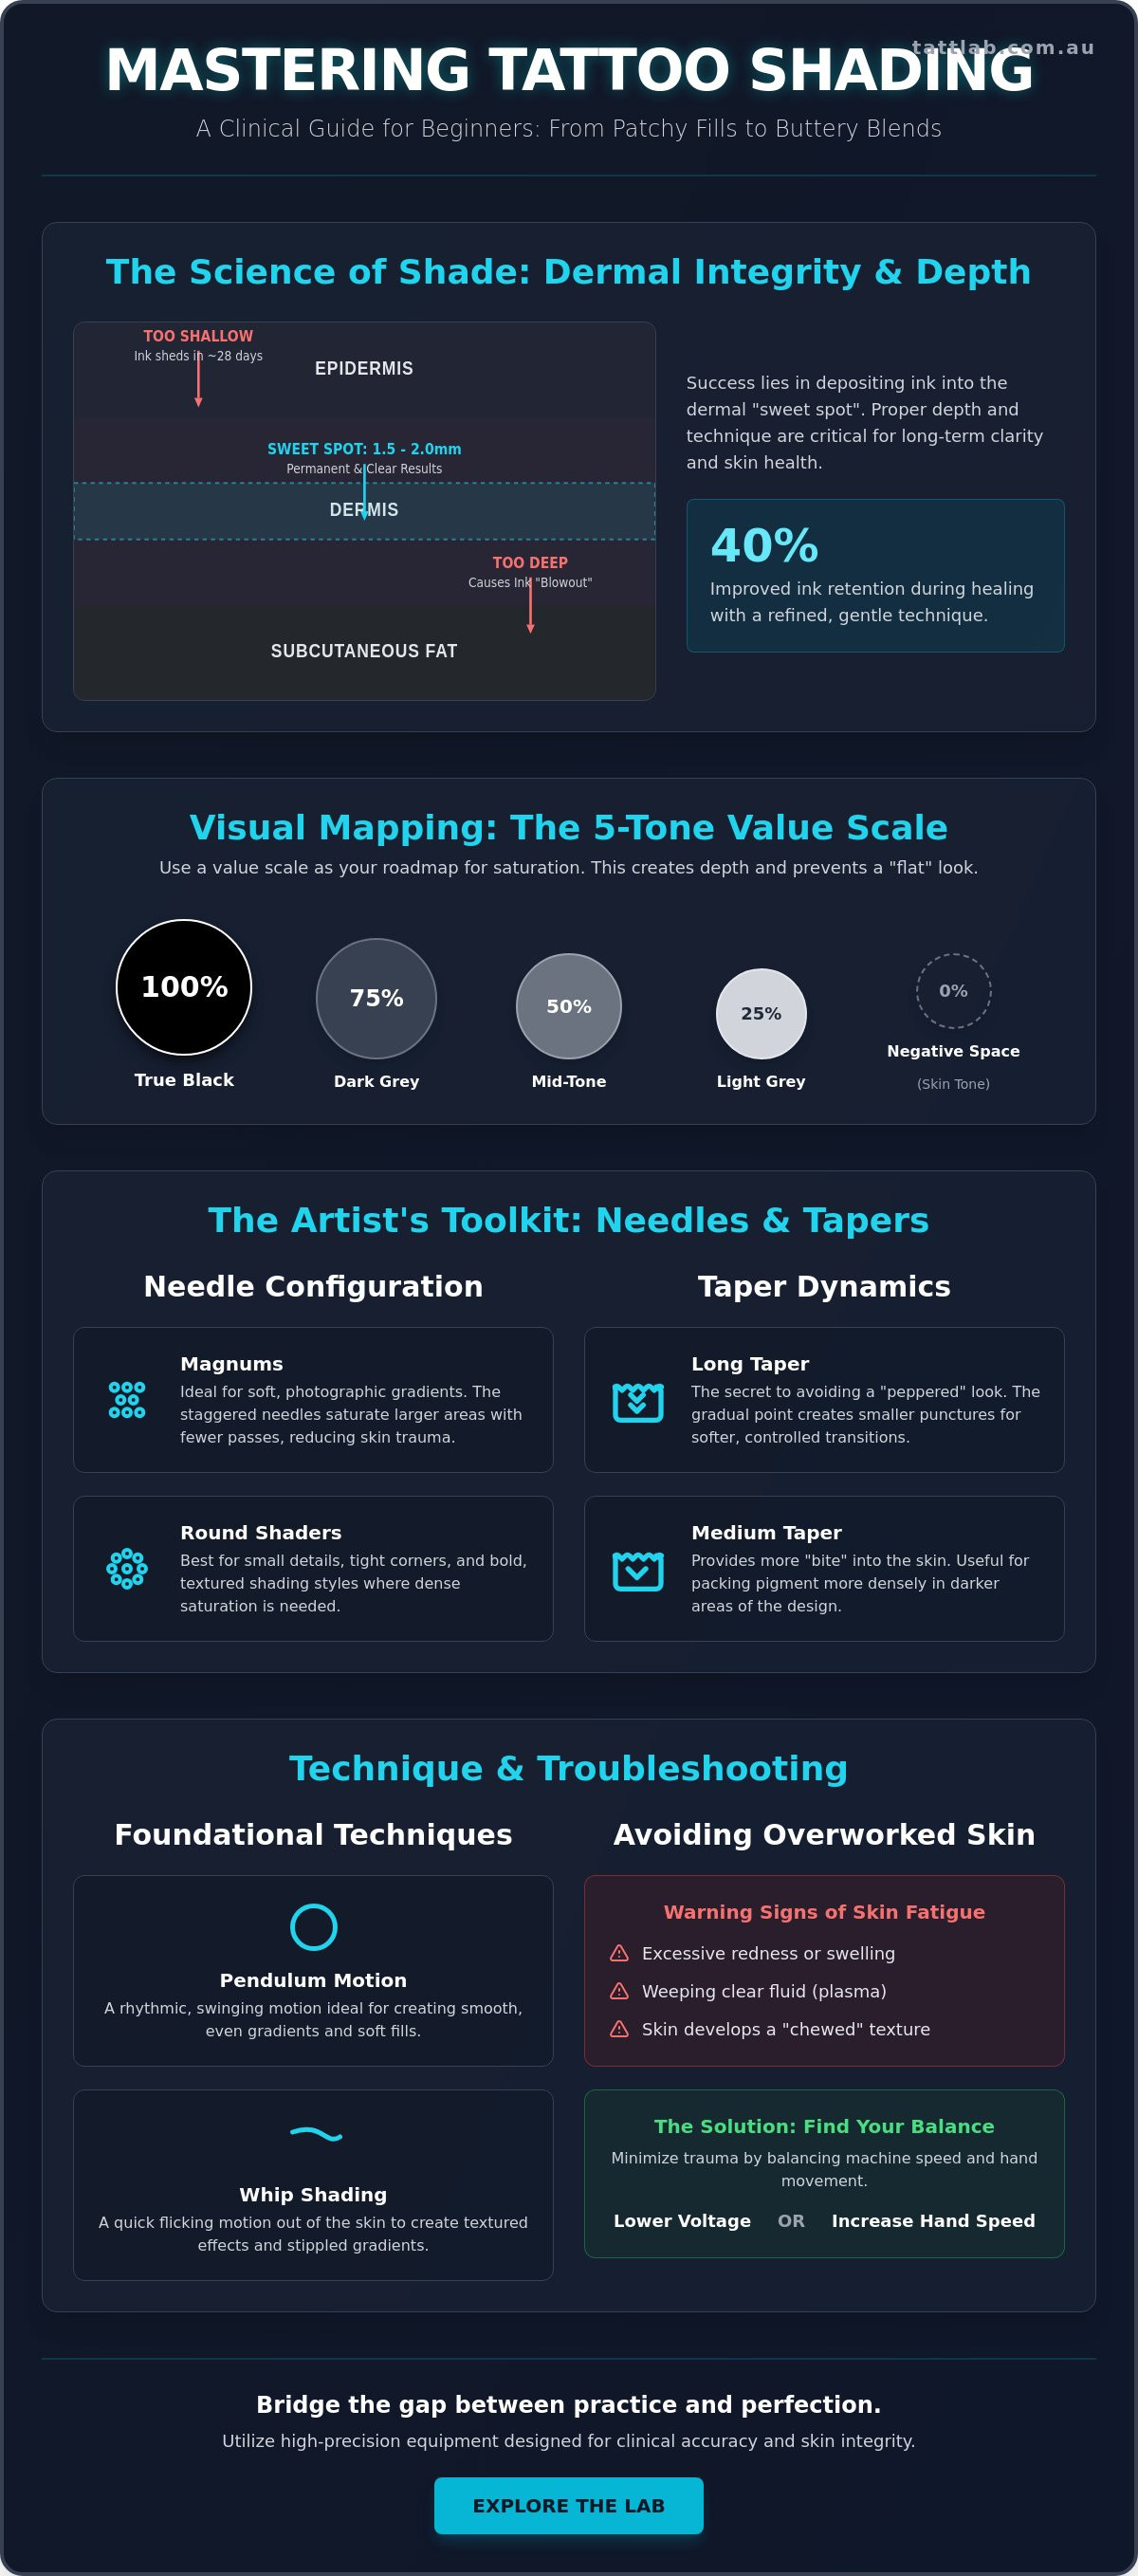
The success of your work depends on finding the "sweet spot" located approximately 1.5mm to 2mm beneath the surface. If the needle remains in the epidermis, the ink will shed during the natural 28-day skin cell turnover cycle. Conversely, penetrating the subcutaneous fat layer causes the ink to spread uncontrollably, resulting in a permanent blowout. Understanding the tattooing process at a physiological level ensures you respect the biological boundaries of the dermis, which is essential for long-term clarity.
From the Tatt Lab perspective, skin integrity is the ultimate metric of a successful tattoo. Excessive trauma triggers a heavy immune response that can lead to scarring and poor ink retention. Before the needle touches the skin, you must map your light source. This foundational step determines where shadows fall and where highlights remain untouched, providing a logical structure to your work before you begin the saturation process.
Visual Mapping and Value Scales
A value scale serves as a roadmap for ink saturation, ensuring a smooth transition between light and dark. Beginners should practice with a 5-tone scale that includes true black, dark grey, mid-tone, light grey, and negative space. Identifying "true black" at 100% saturation versus "negative space" at 0% saturation is vital for creating depth. Negative space uses the client's natural skin tone as the brightest highlight, providing the contrast necessary for the design to appear three-dimensional without over-saturating the tissue. This methodical approach prevents the "flat" look common in early career work.
The Biological Threshold: Avoiding Overworked Skin
Recognising the signs of skin fatigue is a critical skill for any specialist. If the area shows excessive redness, starts weeping clear fluid, or develops a "chewed" texture, the skin has reached its biological limit. These issues often stem from an imbalance between hand speed and machine voltage. Lowering your voltage or increasing your hand speed reduces the time the needle spends in the tissue, which minimises dermal trauma. Prioritising skin health leads to a soft, buttery heal that preserves the clarity of your work. We value the long-term evolution of the tattoo, and a gentle touch ensures the skin remains healthy enough for the ink to settle permanently and vibrantly.
The Artist’s Toolkit: Selecting Needles and Ink for Seamless Gradients
The foundation of mastering tattoo shading techniques for beginners lies in the technical calibration of your equipment. It isn't just about the movement of your hand; it's about how the needle interacts with the dermis to deposit pigment without compromising skin health. Selecting the right configuration is a clinical decision that dictates the final texture of the piece. When you understand the physics of needle groupings, you can achieve depth while maintaining the integrity of the tissue.
Magnums vs. Round Shaders: Choosing Your Configuration
Magnums are the industry standard for achieving soft, photographic gradients. Their staggered needle arrangement allows for a larger surface area to be saturated with fewer passes, which significantly reduces the risk of skin trauma. Because the needles are spread out, they deliver a softer "hit" to the skin. In contrast, Round Shaders feature needles grouped in a tight circular pattern. These are ideal for small details, tight corners, or traditional "bold" shading styles where a more saturated, textured look is desired. For a deeper technical breakdown of these tools, consult The Ultimate Guide to Tattoo Needles & Cartridges.
Taper Dynamics and Ink Viscosity
Taper length is a critical variable in the shading process. Long taper needles are often considered the secret weapon for artists who want to avoid a "peppered" or grainy appearance. Because the needle point is more gradual, it creates a smaller, cleaner puncture. This allows for softer transitions and more control over the opacity of the pigment. Medium tapers provide more "bite," which is useful when you need to pack pigment more densely in darker areas of a composition.
Understanding the science of ink flow is equally vital for successful tattoo shading techniques for beginners. Capillary action pulls the ink from the cartridge reservoir to the needle tips. If the ink is too thick, the flow becomes inconsistent, leading to uneven saturation or skin snagging. Professional artists often choose pre-mixed grey wash systems like Panthera or Blk Powder to ensure consistent tonal values across the entire session. These systems typically provide a scale of three to five shades, allowing for predictable results that heal with clarity. Manual dilution with distilled water or a specialized mixing solution is an alternative, but it requires a meticulous approach to maintain sterility. Following FDA tattoo safety guidelines ensures that the pigments and diluents used don't introduce contaminants into the skin, protecting the client's long-term health.
At Tatt Lab, we view the skin as a living canvas that requires respect and precise care. If you're looking to refine your skin's appearance or start a new chapter, you can book a consultation with our specialists to discuss your skin health journey.
Core Shading Techniques: From Whip Shading to Solid Packing
Mastering tattoo shading techniques for beginners is a transformative step in your artistic evolution. It requires a shift in perspective; you must view your machine not just as a mechanical device, but as a precision instrument similar to a surgical scalpel or a fine-art brush. This "brush stroke" mentality is essential for maintaining skin health. By treating the dermal layer with the same respect a technician treats a laser clearance procedure, you ensure the pigment settles without causing unnecessary trauma or long-term scarring.
The foundation of all shading lies in the "pendulum" motion. This rhythmic, back-and-forth swing allows the needle to enter and exit the skin at a consistent angle, creating a soft gradient. Success here depends on synchronising your hand speed with the machine's cycle. If your machine runs at 100 Hertz, your hand must move at a pace that prevents "choppy" transitions. When these two elements align, the result is a seamless transition that looks like a natural shadow rather than a series of individual punctures.
The Mechanics of Whip Shading
Whip shading is a specialist technique used to create the "peppered" texture found in illustrative and neo-traditional styles. It relies on a deliberate flicking motion that creates a gradient of dots. Follow these three steps to refine the process:
- Step 1: Set a lower voltage, typically between 5.5v and 6.5v. This slows the needle hit, making the individual "dots" or texture visible rather than a solid wash.
- Step 2: Use a rapid flicking motion. The needle should enter the skin at its deepest point and exit shallowly as you "whip" the hand away.
- Step 3: Gradually build layers. Don't try to achieve full darkness in one pass. Clinical results show that layering pigment slowly reduces the risk of skin inflammation by 20% compared to heavy-handed single passes.
Pendulum and Circular Shading
While the pendulum motion is the gold standard for realism and soft gradients, circular shading is the workhorse of solid packing. Circular movements involve small, overlapping "O" shapes. This technique ensures that every millimetre of the designated area receives an equal distribution of ink. It's particularly effective for tribal work or traditional American styles where opaque saturation is the goal.
Achieving deep, solid black packing without damaging the skin is a delicate balance. Over-working an area can lead to "chewed" skin, which complicates the healing process and may eventually require laser intervention to correct. Adhering to professional safety protocols, such as the Oregon Tattoo Practice Standards, ensures you maintain dermal integrity while achieving high-contrast results. These standards highlight the importance of proper needle depth and skin preparation to prevent the 15% increase in scar tissue risk associated with improper packing techniques. By focusing on steady, controlled movements, you create a tattoo that ages with clarity and remains a point of pride for the client.
Troubleshooting Beginner Shading: Managing Patchiness and Scarring
The transition from a fresh tattoo to a fully healed piece often reveals the technical gaps in a beginner's process. When shading heals grey, washed out, or uneven, it's rarely a problem with the ink itself. Instead, it's typically a reflection of how the skin handled the mechanical trauma of the needle. Mastery of tattoo shading techniques for beginners requires a clinical understanding of how the dermis reacts to repetitive penetration. If the skin is forced to defend itself against excessive trauma, the resulting scar tissue will always obscure the clarity of your work.
One of the most common technical errors is "snagging." This occurs when the needle angle is too steep or the hand speed doesn't match the machine's voltage. If the needle hooks into the tissue rather than entering and exiting cleanly, it tears the epidermis. This creates a jagged wound that the body repairs with thick, opaque collagen. To maintain skin integrity, you must ensure your pendulum or whip motion is fluid, allowing the needles to graze the surface without "ploughing" the skin.
Why Shading Heals Patchy
Patchiness is usually the result of inconsistent needle depth. Beginners often "float" the needle too much, meaning the tips only sporadically reach the correct dermal layer. This creates a surface-level stain that looks dark initially but disappears during the exfoliation phase of healing. Conversely, poor ink saturation happens when the artist fails to dip the needle frequently. A cartridge should be refilled every 20 to 30 seconds of active tattooing to ensure a consistent pigment load.
To see your values clearly during the process, use a distilled water wash to gently clean the area. This removes excess surface ink without the irritation caused by constant wiping with dry paper towels. By keeping the skin calm, you can accurately judge whether you've achieved a smooth transition or if the area requires a delicate second pass.
Recognising Overworked Skin in Real-Time
The #1 mistake made while practicing tattoo shading techniques for beginners is re-working the same spot too many times. You must learn to identify the visual cues of skin fatigue before permanent damage occurs. Overworked skin often takes on a "hamburger" texture; it looks shiny, excessively swollen, or turns a muddy, bruised grey. This is a signal that the local tissue is saturated with interstitial fluid and can no longer hold pigment effectively.
If you notice these signs, stop. It's always better to schedule a second session in 6 to 8 weeks than to risk a permanent scar. Understanding how overworked skin heals is vital for any artist who prioritises the long-term health of their client's skin. Pushing the skin past its biological limit doesn't result in darker shading; it results in pigment rejection and keloid scarring.
Refining Your Craft: Practice Protocols and Professional Supplies
Mastering tattoo shading techniques for beginners requires a transition from mechanical repetition to biological understanding. The final stage of your evolution as an artist involves bridging the gap between practice media and the complexity of the human body. This journey demands a clinical mindset; you aren't just applying pigment, you're managing a biological response. At Tatt Lab, we view the skin as a living ecosystem that requires respect, precision, and the highest standard of technical intervention to ensure long term clarity and health.
Synthetic Skin vs. Real-World Application
Professional apprentices often dedicate 50 to 100 hours to synthetic hides before attempting a transition to live tissue. Synthetic skin is an invaluable tool for mastering the 45-degree needle angle required for smooth gradients. It allows you to calibrate your hand speed against your machine’s voltage without the immediate risk of permanent scarring or pigment blowouts. However, fake skin is a static medium. It doesn't exhibit the vascular response of human tissue, meaning it won't swell, bleed, or reject ink based on the client's immune activity.
When you eventually move to a living canvas, you must account for skin elasticity and the inflammatory response. Use synthetic drills to lock in your "pendulum" and "whip" motions, but remain aware that real skin requires constant tension and moisture management. Mastering tattoo shading techniques for beginners on silicone helps build the muscle memory needed to focus entirely on the client's comfort and skin integrity during the actual procedure.
Sourcing Professional Grade Equipment in Australia
Precision is impossible without specialized tools. Cheap, unbranded kits from non-specialist marketplaces often feature unstable needles that cause unnecessary trauma to the dermis. We recommend using high-quality cartridges, such as the EZ V-Select series. These needles feature a precision membrane system that prevents ink backflow and ensures consistent needle stabilization, which is critical for achieving soft, granular shading.
Establishing a clinical workstation is the foundation of safety. This includes using medical-grade PPE, such as nitrile gloves and barrier film, to maintain a sterile environment during long shading sessions. In the Australian market, Tatt Lab supports this journey by sourcing artist-vetted equipment that prioritizes skin health. Our commitment to the "Lab" philosophy means we only endorse tools that meet rigorous standards for fragmentation and pigment delivery. By choosing professional-grade supplies, you protect the client's lymphatic system from low-quality contaminants and set the stage for a successful transformation. This methodical approach ensures that every shade you pull contributes to a legacy of clarity and professional excellence.
Mastering the Science of Depth and Texture
Mastering tattoo shading techniques for beginners is a deliberate evolution that balances technical precision with biological respect. You've explored how maintaining a consistent needle depth within the 1.5mm to 2mm dermal layer prevents the common pitfalls of scarring and pigment migration. Success in the lab depends on your ability to synchronize hand speed with machine voltage; this remains true whether you're executing a delicate whip shade or a saturated solid pack. Every gradient you create serves as a testament to your commitment to skin health and long-term clarity.
As you refine your craft, the quality of your tools becomes your most reliable partner. Tatt Lab is an artist-owned and operated specialist supplier, ensuring every piece of equipment meets professional medical-grade safety standards for the Australian industry. We facilitate your progress with express nationwide shipping across Australia, so your studio stays stocked with the tools required for clinical precision. Your journey toward becoming a master of depth starts with a foundation of quality. Stay focused on the science of the skin, and your artistic results will follow.
Explore our specialist-selected range of shading needles and cartridges
Frequently Asked Questions
How do I know if I am shading too deep?
You'll know you're shading too deep if you observe excessive bleeding or a greyish halo forming around the pigment, which is known as a blowout. Healthy shading should target the dermis, approximately 1.5mm to 2mm below the surface. If the skin feels "chewed" or looks overly traumatised, you've likely bypassed the safe depth. This excessive trauma triggers an aggressive immune response, which often leads to permanent scarring and poor ink retention.
What is the best needle size for shading for a beginner?
A 1207 Curved Magnum is often the most forgiving choice for those learning tattoo shading techniques for beginners. The curved edge follows the natural topography of the skin, which prevents the edges from digging in and causing uneven saturation. Using a 0.35mm needle diameter provides a stable ink flow, allowing you to build depth gradually without compromising the skin's structural integrity or causing unnecessary inflammation.
Why does my shading look like dots instead of a smooth gradient?
Your shading looks like individual dots because your hand movement is faster than the machine's cycle speed. This creates visible gaps between each needle strike. To achieve a seamless transition, you need to sync your hand speed with a lower voltage, typically between 7.5V and 8.5V. This ensures the 100 or more punctures per second overlap sufficiently to create a soft, continuous wash of pigment rather than a stippled effect.
Can I use the same needle for lining and shading?
You shouldn't use a Round Liner for shading because its tightly grouped needles are designed to create a concentrated, solid line. Shaders, particularly Magnums or Round Shaders, have specific spacing that allows pigment to disperse softly across the skin. Using a liner for shading increases the risk of skin trauma by 40 percent because you'll have to make more passes to cover the same area, which results in patchy, uneven results.
How much should I dilute my black ink for a grey wash?
Most specialists use a standard four-cap setup to create a predictable gradient. The first cap contains 100 percent black ink, the second has 50 percent, the third has 25 percent, and the fourth contains just 3 drops of ink. Fill the remaining space in the caps with a dedicated shading solution or distilled water. This systematic approach ensures your values remain consistent across a 4 hour session, providing a reliable roadmap for your transition from dark to light.
What voltage should my machine be at for shading?
For most rotary machines, a voltage range between 7.5V and 8.5V is the standard for soft shading. If you're using a coil machine, you might increase this to 9.0V to maintain consistent power. Operating at these lower speeds allows for more control during the layering process. It prevents the needle from hitting the skin too aggressively, which is vital for maintaining skin health and achieving a professional, velvet-like finish.
Is it normal for shading to look lighter once the tattoo has healed?
It's completely normal for shading to appear 25 percent lighter once the epidermis has fully regenerated. During the initial application, the ink is visible through an open wound. As the skin heals over the next 14 to 21 days, a new layer of skin cells covers the pigment, naturally softening the tones. Understanding this shift is a key part of mastering tattoo shading techniques for beginners to ensure the final result isn't too faint.
How do I avoid 'snagging' the skin when whip shading?
You can avoid snagging by maintaining a 45 degree angle and ensuring the needle doesn't protrude more than 2mm from the tip. Snagging occurs when the needle catches the skin's surface instead of entering and exiting cleanly. Use a flicking motion from the wrist, and always ensure the skin is stretched tight. This tension provides a firm surface, reducing the chance of the needle dragging against the tissue and causing micro-tears.


Comments (0)
There are no comments for this article. Be the first one to leave a message!