
A stencil isn’t automatically the more reassuring choice. In freehand tattooing, the artist draws directly on your skin with permanent coloured markers, adapting the design to your body’s contours rather than transferring a stencil. Building confidence in freehand tattooing starts with understanding this difference and knowing how much the process relies on trust in the artist.
It’s natural to want a clear sense of what you’re agreeing to, especially when a design is being drawn on your body. Freehand work involves the artist drawing directly on your skin, so discussing your preferences beforehand may help you feel more involved as the design takes shape. This guide explains how freehand tattooing compares with stencils, how thoughtful artist guidance can help you feel informed, and how the experience may support self-esteem. You’ll also learn why freehand designs are individual rather than exact copies, and how exploring a few ideas can help you recognise what feels right.
Key Takeaways
- Understand how drawing directly on skin can help a design follow body contours, and why a stencil may not suit every area.
- Explore design ideas before committing so you can recognise what feels personal and build trust in the creative process.
- Use focused drawing and hand-control exercises to develop steadier movement and greater confidence in your lines.
- Practise freehand designs away from live skin first, then choose tattoo equipment and aftercare that support your work.
Emotional empowerment and self-esteem
A freehand tattoo asks for trust because the artist draws directly on your skin. The design takes shape directly on your skin, so the process asks for trust. That can feel exposing, particularly if you’re unsure how the finished piece will suit you. Building confidence in freehand tattooing begins with recognising that trust is part of the process, not a demand to ignore your preferences. Discuss the idea, placement and boundaries before the drawing starts. Clear expectations can make the experience feel more considered.
Start with a few design ideas, then notice what attracts you to each one. A fine-line botanical shape, for example, may feel more personal than a bold geometric motif. This isn’t a test of artistic judgement. It helps you describe your taste and gives the artist useful direction. Consider how the design relates to an existing tattoo, your preferred placement and the overall look you want. The artist’s interpretation remains central, but your preferences give the collaboration a meaningful starting point.
Freehand work can also add details in blank space around an existing tattoo. For example, an artist might draw connecting features that make separate elements feel more cohesive. Seeing the design mapped onto your body can help you assess its relationship to your shape and existing ink. This visual process may feel affirming because it treats your body as part of the composition, rather than a flat surface. Its value is personal, not a guaranteed change in self-esteem.
Keep the decision grounded in your own reasons. Before the session, write down what you want the tattoo to represent, such as a personal milestone or a visual style you’ve consistently enjoyed. During the drawing stage, consider whether the placement and direction align with that intention. A respectful exchange leaves room to express uncertainty and refine the concept. Confidence can come from making a deliberate choice and having your preferences taken seriously, not from surrendering control or expecting the tattoo to resolve wider insecurities.
Freehand tattooing compared with stencils
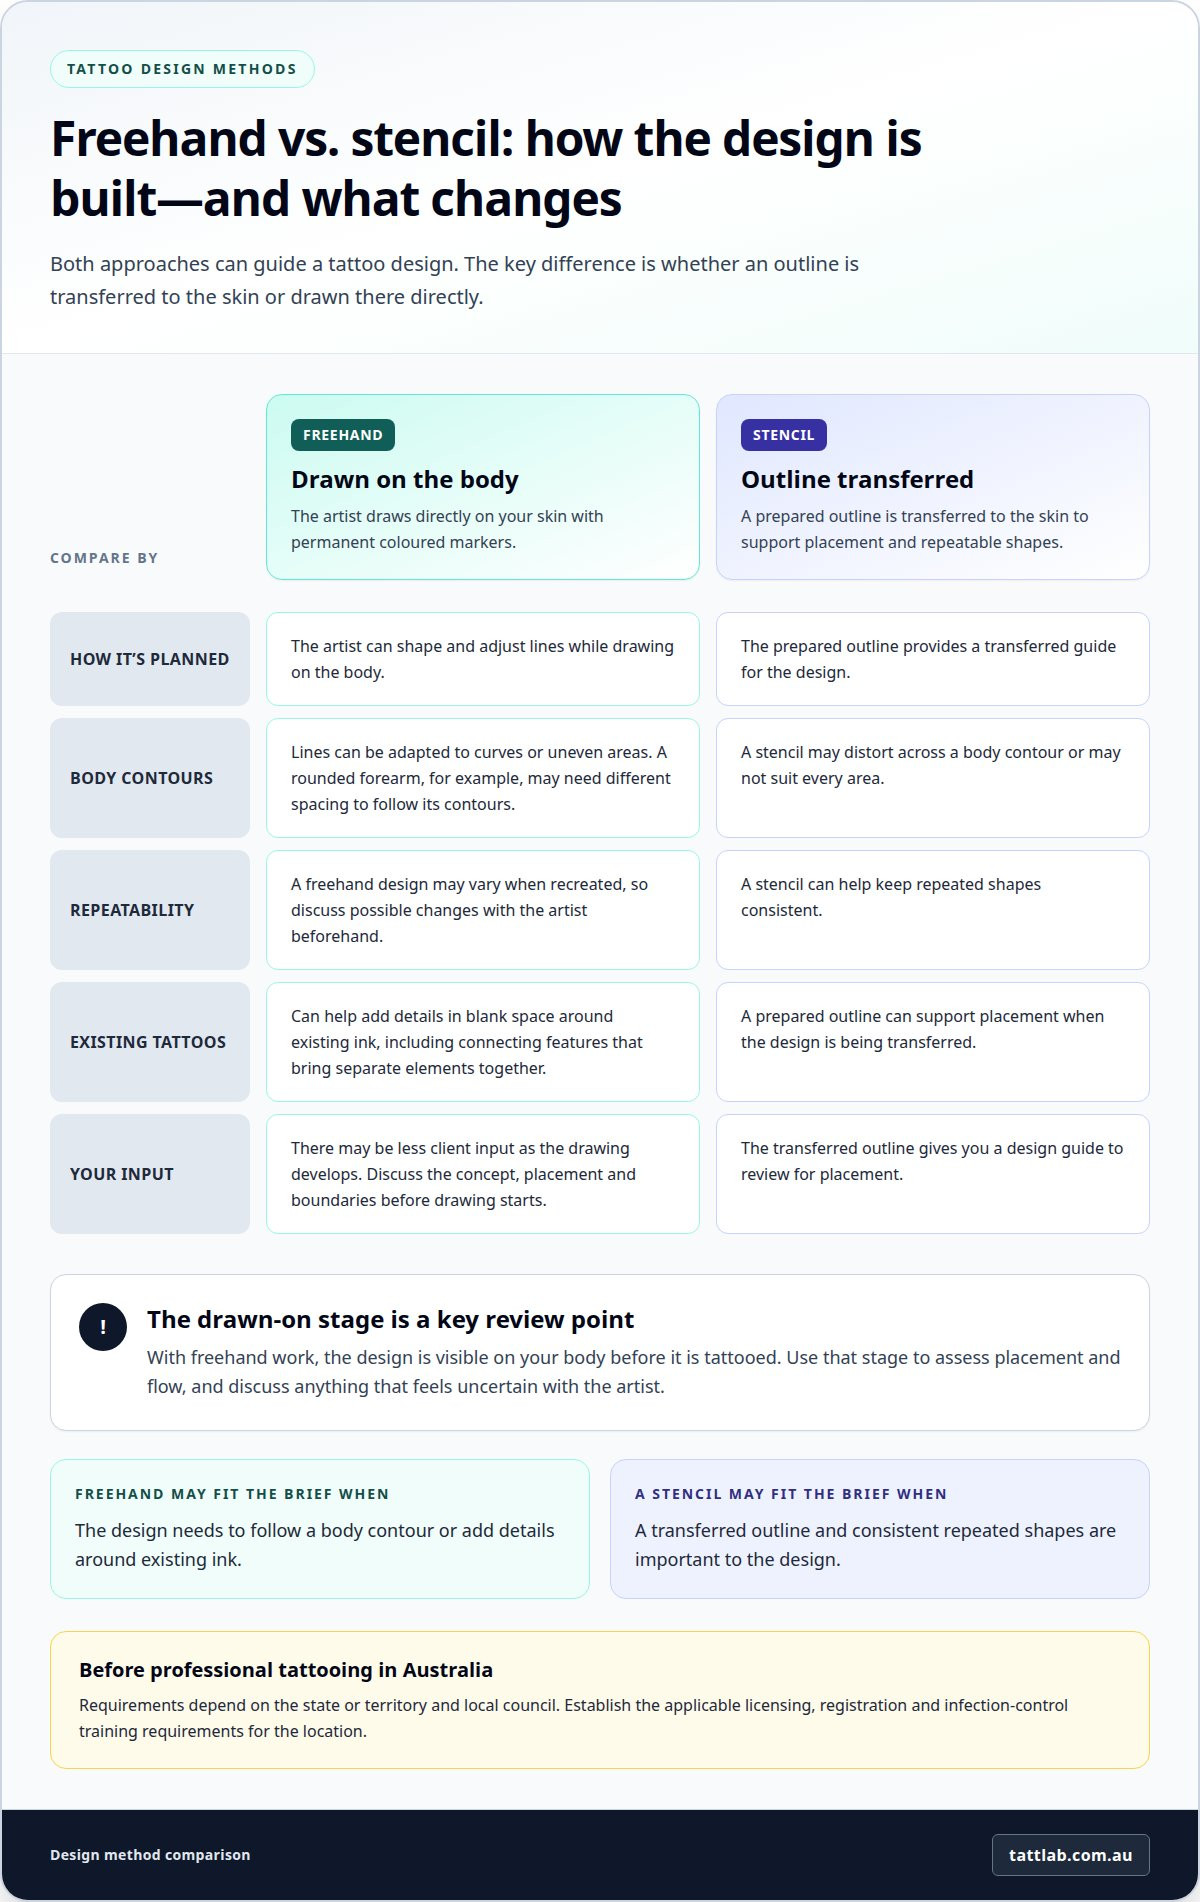
A stencil can transfer a prepared outline to the skin, while freehand work involves drawing the design directly on the body. This changes how the design is planned. A stencil can keep repeated shapes consistent, while freehand drawing lets the artist adjust lines to a curved shoulder or uneven area. For example, a motif placed over a rounded forearm may need different spacing to follow its contours. Drawing on the skin makes these adjustments visible before tattooing begins.
Freehand is useful when a stencil might distort across a body contour or when details need to fill blank space around existing ink. The trade-off is less client input as the drawing develops, so discuss the concept and boundaries beforehand. Freehand designs may vary when recreated, so discuss any changes with the artist beforehand. That makes the drawn-on stage important: it lets you assess placement and flow before the design is tattooed.
In Australia, tattooing requirements depend on the state or territory and local council. Before tattooing professionally, establish the applicable licensing, registration and infection-control training requirements for the location. Training should prepare artists to manage hygiene alongside design and equipment skills.
Training and practice-equipment costs vary with course content and included tools. Your budget depends on whether training supplies practice materials and whether you purchase equipment separately. Compare what each course covers, such as drawing exercises, machine control and hygiene procedures, rather than relying on the headline fee alone.
Synthetic skin lets artists rehearse lines and hand movements without puncturing a person’s skin, but it doesn’t behave exactly like living tissue. Practising on real skin can expose a person to infection and injury risks, so it isn’t a casual substitute for a practice surface. Synthetic material also can’t reproduce every contour or response found on a moving body.
For stencil work, a prepared outline can support placement and repeatable shapes; freehand work gives the artist more room to adapt the design directly. Reviewing tattoo stencils can help clarify how a transferred outline differs from a drawn-on design.
What drawing and hand-control exercises improve freehand tattoo skills?
Begin with slow, continuous lines on paper. Draw straight paths, shallow curves and circles without lifting your pen. Keep your forearm supported, then repeat each shape while moving your hand from the elbow. Notice how different movements affect line flow. Add parallel lines beside each path to practise even spacing. If a line wavers, note where control changed, such as at a tight turn or after a sudden increase in speed. This gives your next practice session a clear focus.
Use simple forms to practise consistent transitions. Sketch leaves, waves and spirals, connecting each shape without abrupt stops. For a leaf, draw the outer curve, then add a central vein and smaller branches. For a spiral, keep the gap between each turn steady. These exercises build awareness of direction, spacing and pressure. Trace the same design in reverse, too. Changing direction reveals whether your grip or posture limits movement along a particular curve.
Practise hand stability with a relaxed grip and deliberate breathing. Rest your drawing hand lightly, then draw a row of small arcs while keeping your shoulder loose. If your fingers tense, pause and reset before continuing. Don’t force a line through a difficult angle. Instead, rotate the paper to find a more natural wrist position. Drawing a curved leaf across rotated paper can reveal how body position affects your hand’s path.
Bring the exercises together through short design studies. Draw a small botanical motif, a flowing wave and a geometric outline, each on a separate sheet. Compare line starts, joins and spacing instead of judging the artwork as a whole. Circle one controlled section, then redraw a difficult section more slowly. Keep earlier attempts beside later ones. This visual record helps you identify specific improvements, such as smoother curves or cleaner intersections, and gives your next practice session a practical goal.
Start with a few tattoo designs to learn what suits you. Drawing a design directly on the skin helps adapt it to body contours where a stencil may distort.
How do tattoo artists practise freehand designs safely before tattooing skin?
Artists can develop a freehand design away from a person’s skin first. They might sketch the concept on paper, then draw it onto synthetic practice skin. This allows them to assess line direction, spacing and composition without making a tattoo. For example, they can test a curved botanical design across a practice surface to spot awkward joins, then revise those areas before considering a live session. Practice material supports rehearsal, but it doesn’t behave exactly like human skin.
A useful rehearsal follows the intended design process. First, the artist maps the main shapes with a skin-safe marker on practice material. Next, they check how the elements connect and whether the layout feels balanced. For instance, a leaf cluster can be adjusted if its stems crowd the central feature. The artist can then practise the planned movements with their equipment on the synthetic surface. This separates design decisions from the pressure of working on a person.
Preparation matters, too. Artists should organise their work area and equipment before practice, then follow appropriate hygiene procedures throughout. Keep practice surfaces separate from materials intended for client work to help prevent cross-contamination between rehearsal and tattooing. A marked practice sheet can record which design version was tested, while a clean setup supports consistent habits. Repeating the same preparation sequence helps make safe working practices part of the routine, rather than an afterthought.
Synthetic skin has limits. It doesn’t move, stretch or respond like a person’s skin, so it can’t reproduce every challenge of tattooing a curved or mobile area. Practising on a person just to test a design carries avoidable risks, including skin injury and infection. Build technical familiarity on practice material, then apply professional judgement before any client session. For drawing layouts, explore tattoo stencils as another way to study how design placement can be planned before tattooing.
Tatt Lab
Tatt Lab supplies tattoo artists with products for developing and delivering their work. As your freehand practice progresses, the right tools can support different stages, from selecting needles and cartridges to choosing inks for a design. Tattoo stencils are also available when a transferred outline better suits the artwork. Tattoo Aftercare supports care once a tattoo is complete. These products complement the skills covered here; they don’t replace drawing practice, careful preparation or professional judgement. Choose supplies according to your work and the tools your process requires. If you’re refining your freehand approach and need supplies for practice or studio work, explore Tatt Lab’s tattoo supplies.
Let your next practice session build on the last
Progress comes from making deliberate choices, then giving yourself room to refine them. A design doesn’t need to feel perfect on the first attempt. Each considered adjustment can help you understand your hand, style and creative boundaries. That steady process is at the heart of building confidence in freehand tattooing.
When you’re preparing for studio work, Tatt Lab offers Traditional Needles, Tattoo Catridges and Tattoo Aftercare. These supplies support different stages of tattoo practice and care, while your technique continues to develop through focused work. For guidance about equipment and supplies that fit your tattooing needs, contact Tatt Lab to discuss your tattoo.
Keep practising with patience and intention. Confidence grows through thoughtful choices, one design at a time.
Frequently Asked Questions
How can beginners build confidence in freehand tattooing?
Beginners can build confidence by setting a small, observable goal for each practice session. For example, focus on clean line starts rather than completing an elaborate design. Photograph each attempt from the same angle, then compare line consistency and spacing over time. Ask an experienced artist to identify one area to improve next. Specific feedback makes progress easier to recognise and gives practice a clear direction.
How does freehand tattooing compare with using a stencil?
Freehand tattooing gives the artist flexibility to shape a design during placement, while a stencil provides a transferred guide to follow. For example, lettering that needs consistent alignment may benefit from a prepared outline; an organic design that responds to an irregular space may suit direct drawing. The choice depends on the artwork’s structure and placement. Either method still requires a clear design plan and careful agreement before tattooing begins.
What are common freehand tattooing mistakes and how can they be avoided?
Common issues include wavering lines, uneven spacing and abrupt joins. Practise slow, continuous lines and simple shapes on paper or synthetic skin, keep your grip relaxed, and revise awkward areas before working on a person.


Comments (0)
There are no comments for this article. Be the first one to leave a message!