
The defining feature is the grouping, not simply the name. Curved magnum tattoo needles are formed in two staggered rows with a gentle arch across the edge, rather than a straight, flat arrangement. In traditional hand-soldered construction, 17 needles could be arranged in a single row before being formed into two staggered rows.
When choosing a magnum, it’s natural to focus on needle count. But count alone doesn’t explain how a grouping will shade, blend colour or cover an area. The needle-edge shape and wire gauge also affect the contact span and how the grouping meets the skin.
This guide explains how curved magnums are formed, how their arched edge differs from a flat magnum, and what to consider when choosing a configuration for different tattooing tasks. It also covers how needle count and gauge work together, helping you make a more informed choice based on the coverage and finish you want.
Key Takeaways
- The gentle arch across a staggered, two-row formation is what distinguishes a curved magnum from a flat mag.
- Bugpin wire measures 0.25 mm for a #8 needle, offering a finer option for detailed shading and blending work.
- Flat mags suit straight-edged shapes and bold lines, while an arched edge supports softer transitions across curved areas.
- An 11CM in #10 Standard gauge is a practical entry point; choose other configurations according to the coverage and control you need.
- Needle count alone doesn’t determine contact span: wire gauge also affects how much area the grouping covers.
Bugpin curved mag needles
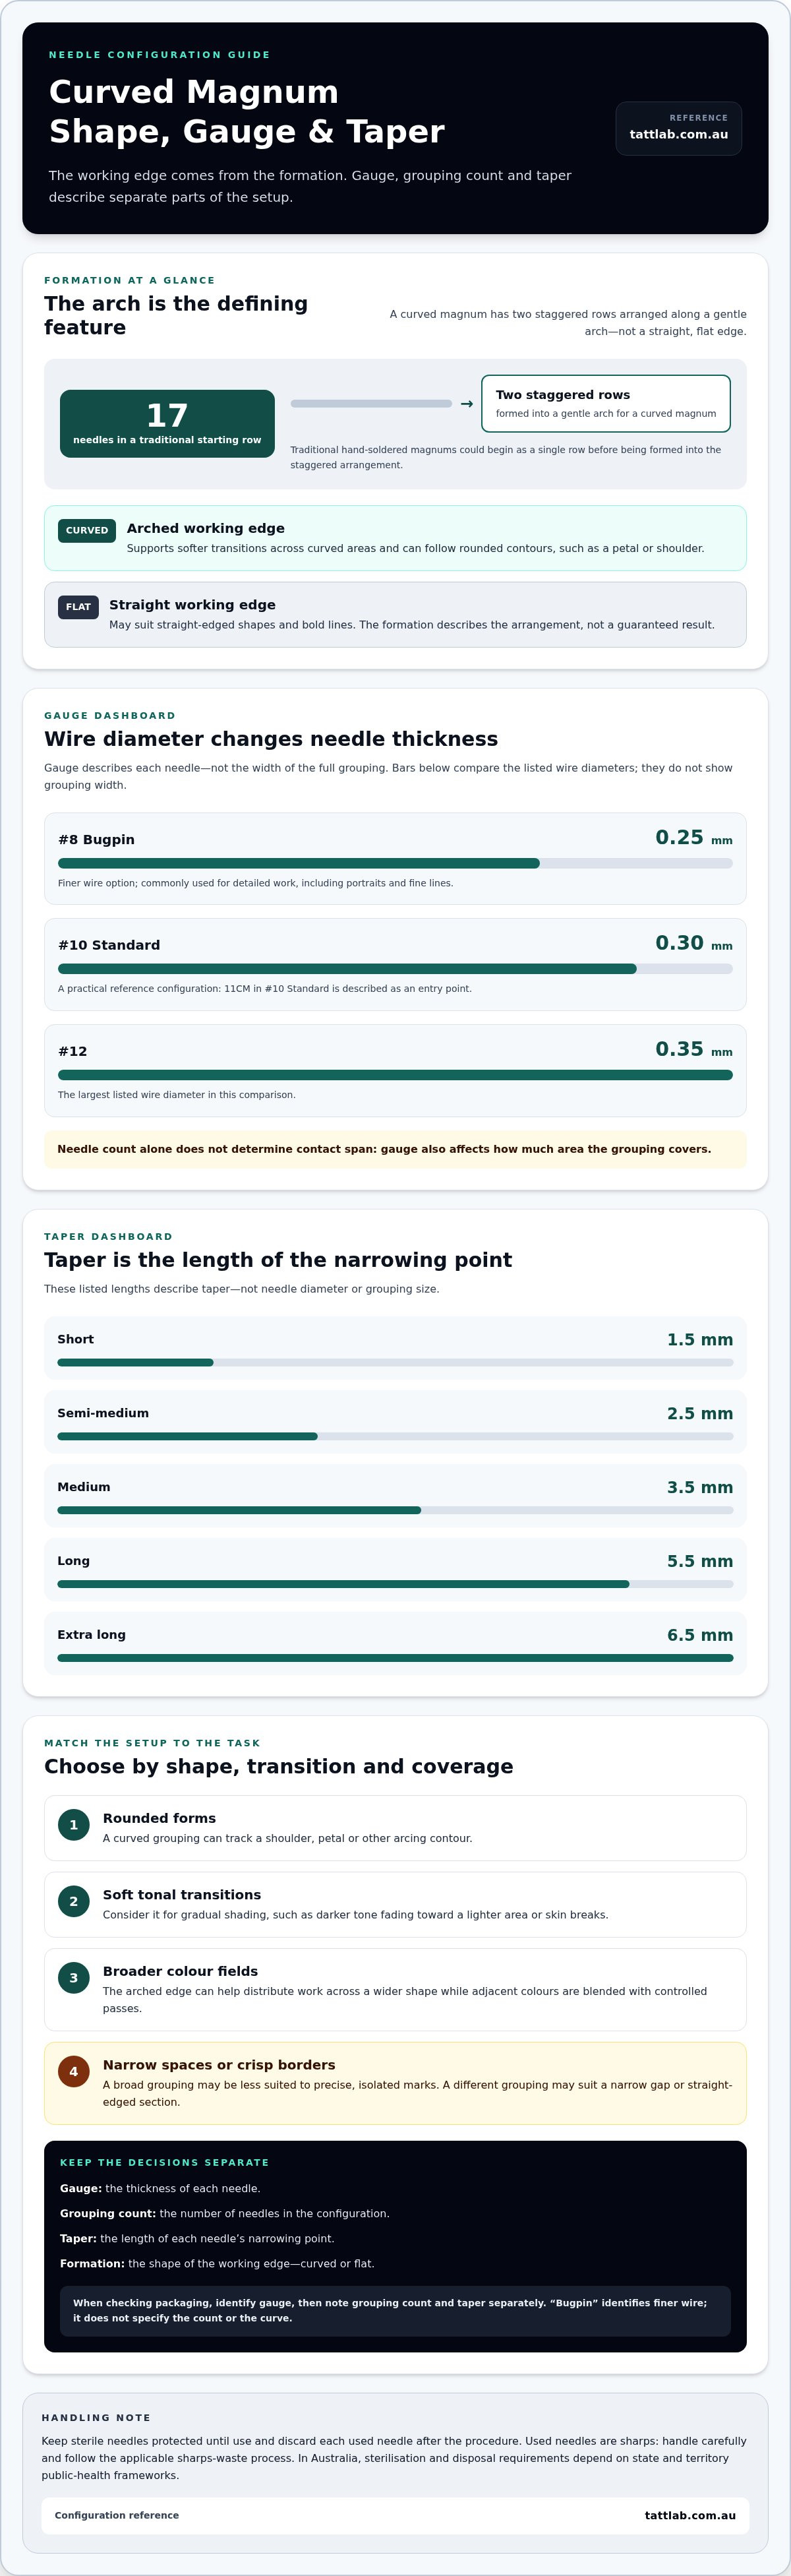
Bugpin identifies a finer wire diameter, not a separate needle arrangement. A #8 Bugpin tattoo needle has a wire diameter of 0.25 mm. A #10 Standard needle measures 0.30 mm, while a #12 needle measures 0.35 mm. Gauge describes each needle’s thickness, not the width of the full grouping. A magnum’s two rows hold more needles and pack more ink than a single-row formation.
Traditional hand-soldered magnums could begin with 17 needles arranged in one row. The needles were then formed into two staggered rows. In a curved magnum, that arrangement follows a gentle arch instead of a flat edge. The bugpin gauge changes the thickness of the individual needles, while the curved formation determines the shape of the grouping’s working edge.
Taper is another selection detail. It describes the length of the needle’s narrowing point, and different lengths create different working characteristics. Listed options include a short taper of 1.5 mm, a semi-medium taper of 2.5 mm, and a medium taper of 3.5 mm. A long taper measures 5.5 mm, while an extra long taper measures 6.5 mm. These figures describe taper length, not needle diameter or grouping size.
Bugpin needles are commonly used for detailed work, including portraits and fine lines. A finer wire can support controlled, detailed passes, while the magnum’s two-row formation distributes needles across a wider edge. That makes gauge and configuration separate decisions. For example, a #8 Bugpin curved mag can suit detail-led shading, while a broader gauge may better match a different coverage goal. The design, skin area, and artist’s established technique all inform the choice.
For practical selection, compare the marking on the packaging with the task. First, identify the gauge, such as #8 Bugpin. Then note the grouping count and taper separately. Don’t assume “Bugpin” tells you the needle count or the curve. Those details describe different parts of the configuration, and each affects how the grouping is used.
In Australia, tattoo hygiene requirements are set through state and territory public-health frameworks, so sterilisation and disposal procedures depend on local rules. Used needles are sharps: handle them carefully and dispose of them through the applicable sharps-waste process, rather than placing them loose in general rubbish.
Keep sterile needles protected until use, and discard each used needle after the procedure. For consistent work, match the gauge and taper to the design, then keep those specifications consistent across comparable passes. Recording the configuration makes it easier to assess how a setup performs on later pieces.
Curved magnum shading and colour blending uses
A curved magnum is suited to shading and colour work that calls for a broad, gradual transition. Its staggered rows contain more needles than a single-row grouping, while its arched edge changes how the needles meet the working area. This makes it useful for building tone across larger shapes, rather than relying on a narrow point alone.
Imagine a rounded flower petal with a dark centre fading towards a lighter edge. The curved formation can follow the petal’s contour as the artist works across it. In a portrait, it can help apply graduated tone across a cheek or forehead. The grouping doesn’t create the blend by itself: hand movement, angle, depth and the artist’s control all contribute to the result.
Colour blending works on the same principle. An artist may move from a saturated colour towards a lighter neighbouring tone, using controlled passes to soften the boundary. A red-to-orange transition in a flame design, for example, requires deliberate overlap between colours. The curved edge can help distribute the work across a wider area, while the artist adjusts their movement to suit the shape and intended finish.
Use the design’s geometry to guide the choice:
- Rounded forms: A curved grouping can track a shoulder, petal, or other arcing contour.
- Soft transitions: Choose it for gradual tonal movement, such as dark shading fading into skin breaks.
- Colour fields: Consider it when blending adjacent colours across a broader shape.
- Small detail: A broad grouping may be less suited to narrow spaces requiring precise, isolated marks.
Before starting a pass, map the transition. Identify the darkest zone, the lightest zone and the middle value connecting them, then align the grouping’s movement with the form. On a curved forearm design, that may mean following the contour rather than sweeping across it. Planning the sequence helps keep shading coherent across connected areas.
Needle count and gauge also matter. A larger grouping covers a broader contact area, while wire diameter affects the span created by the needles. Don’t choose by count alone: match the configuration to the available space, desired coverage and level of control the design needs. A portrait cheek and a large background fade call for different working areas.
For artists comparing setups, reviewing curved magnum options can help connect the intended shading task with a suitable grouping. The useful question is not simply which needle is popular. Consider whether the design needs smooth tonal movement, colour transitions, or broad coverage, then choose a configuration that supports that specific work.
Curved magnums aren’t the right choice for every pass. A narrow gap, crisp border or straight-edged section may call for another grouping. Within one design, an artist can use a curved magnum for a fade, then change configurations for adjoining details. Dividing the tasks this way matches the tool to the mark being made.
Curved versus flat magnum needle formation
A curved magnum has two staggered rows arranged along a gentle arch, forming a curved rather than straight working edge. This changes how the grouping meets the skin during a pass. For example, an artist shading a rounded shoulder can orient the arch to follow the body’s contour. The formation describes the needle arrangement, not a guaranteed result.
A flat magnum also has a grouped edge, but its needles sit in a straight line. This straight grouping may suit work that calls for bold, clear lines. Flat needles can also shade straight-edged shapes, such as a geometric panel or rectangular colour block. Their straight edge is a practical match for designs that call for defined, linear coverage.
Compare the formations with the shape being tattooed. A curved edge may suit a rounded petal, while a flat edge can align with a straight border. On a circular design, consider how each pass will follow the curve. On a sharp-edged geometric design, a straight grouping may follow the boundary more directly. Let the design’s outline guide the choice.
Neither configuration is automatically better for every task. Curved magnum tattoo needles may suit shading across contoured areas, while flat mags suit straight forms and bold lines. For a design that combines both, an artist may use different groupings for separate sections: a curved pass to soften a rounded transition, followed by a flat grouping for a crisp adjoining edge.
Like any tattoo needle, a curved magnum can contribute to skin trauma if pressure is excessive, passes are repeated unnecessarily or the setup is poorly matched to the area. Infection risk is associated with contaminated equipment or inadequate hygiene, not the curved formation itself. Sterile equipment and careful handling remain important throughout the procedure.
Use these practical checks to match the formation to the design:
- Trace the outline: Mark curved sections, such as a petal or shoulder contour.
- Identify straight edges: Note borders that need a direct, linear pass.
- Separate the tasks: Decide where shading, colour coverage, or bold lines belong.
- Match the grouping: Select the edge shape that supports each section’s movement.
Before starting, plan the direction of each pass in relation to the design’s contours. For a curved leaf, follow its arc rather than forcing a straight sweep across it. For a square panel, align the edge with the intended boundary. This helps the artist choose deliberately instead of treating curved and flat mags as interchangeable.
Formation is only one part of the decision. Needle count, gauge, taper, working angle and the artist’s technique also affect performance. A curved edge doesn’t eliminate the need for controlled application, and a flat edge doesn’t restrict every design to lines. Match the grouping to the mark required in each area.
Choosing a curved magnum configuration
Start with the area you need to cover, then choose a grouping that suits it. Curved magnum configurations typically begin with 5 needles and can extend beyond 35 or 45 needles. Common odd-numbered options include 7, 9, 11, 13, and 15 needles. A smaller grouping gives the artist a narrower working edge; a larger one covers more area.
For an entry point, the page recommends an 11CM in #10 Standard gauge. Treat that as a practical starting configuration, not a universal setting for every design. An 11CM identifies the grouping, while #10 Standard identifies the needle gauge. Keeping those details separate makes comparisons clearer when choosing for shading, blending, or coverage.
Use the tattoo’s scale and the level of control required to narrow your options:
- Small shaded region: Consider a lower needle count when space limits the working edge.
- Broad colour area: A higher count may suit coverage across a larger shape.
- Fine transitions: Match the grouping to the width of the fade and adjacent detail.
- Mixed design: Plan separate configurations for broad shading and narrow sections.
Gauge also influences the configuration’s contact span, so count alone doesn’t tell the whole story. For example, the comparison between 11CM in #10 Standard and another grouping should account for both needle count and wire diameter. Consider the intended coverage, the contour, and the artist’s controlled working movement together. This helps avoid selecting a wide grouping for a narrow passage.
A safe setup starts with a sterile, intact needle configuration and equipment used according to the manufacturer’s instructions. Maintain the studio’s infection-control workflow during setup and tattooing: careful handling matters as much as choosing the right grouping.
Use this sequence to make the choice:
- Map the work area. Mark the broadest shaded section and the tightest detail.
- Choose the grouping. Compare the available count with the width of each planned pass.
- Read the full specification. Confirm grouping, gauge, and taper rather than relying on one label.
- Prepare the setup. Check equipment compatibility and follow the relevant manufacturer’s instructions.
- Work with control. Keep movement suited to the contour, then reassess before changing areas.
A 13-needle grouping may suit a broader pass than a 7-needle option, but the design remains decisive. For example, a shaded panel with tight borders may need more control than its overall size suggests. Compare the working edge with the actual shape, then choose the configuration that fits the pass rather than selecting by count alone.
Contact span and coverage
Needle count alone doesn’t tell you how wide a magnum contacts the skin. Wire gauge also matters. A #8 Bugpin needle has a 0.25 mm wire diameter. A #10 Standard needle measures 0.30 mm, and a #12 measures 0.35 mm. Thinner needles can allow more needles across a similar span. So two groupings with different counts may cover comparable widths.
Consider this comparison: a 15-needle curved magnum made with #8 wire has almost the same contact span as a 13-needle grouping made with #10 wire. The 15-needle option contains more individual needles, but each is finer. The 13-needle option has fewer needles, each with a greater diameter. Their overall contact spans are nearly alike, not identical by definition.
A second comparison shows the same principle in reverse. An 11-needle curved magnum made with #12 wire has nearly the same contact span as a 13-needle grouping made with #10 wire. The thicker #12 needles occupy more space individually. That difference helps explain why counting needles without reading the gauge can mislead when estimating coverage.
- 15 needles, #8 wire: Almost the same contact span as 13 needles in #10.
- 13 needles, #10 wire: A useful reference point for comparing these configurations.
- 11 needles, #12 wire: Nearly the same contact span as 13 needles in #10.
Use contact span to compare the grouping’s working width, then relate it to the area being tattooed. A broad shaded section may accommodate a wider span. A narrow transition beside a border may call for a configuration that fits that space. For example, compare the 15-needle #8 option with the 13-needle #10 option by span, not count alone. Then consider which gauge and grouping best suit the artist’s technique.
Before choosing, read the full configuration marking. Distinguish the needle count from the gauge, then compare both with the coverage required. Consider taper as a separate specification: it describes needle-point length, not the grouping’s contact span. Treating count, gauge and taper as distinct details makes comparisons more useful.
For a practical comparison, sketch the intended pass width beside the design area. Compare the planned coverage with the contact spans described above. An artist can then choose between a finer, higher-count grouping and a thicker, lower-count one according to the work. This gives a clearer basis for selection than needle count alone.
If you’re comparing configurations for a specific coverage goal, explore curved magnum options and assess count alongside gauge.
Tatt Lab: Tattoo Aftercare
Tatt Lab offers Tattoo Aftercare alongside equipment for professional tattooing. After selecting a curved magnum configuration, artists can consider aftercare as part of the broader process, supporting thoughtful preparation for clients beyond the tattoo session. Tatt Lab also offers Traditional Needles, Tattoo Catridges, and Tattoo Inks, helping artists source related studio essentials in one place. Choose Tattoo Aftercare when planning the care materials that accompany finished work, or explore the needle and ink categories when reviewing supplies for upcoming designs. Each choice serves a different stage of the tattooing process, from setup to aftercare. For a straightforward next step, visit tattlab.com.au.
Make your next setup a deliberate one
Your next tattoo setup is an opportunity to match equipment choices to the design’s intended finish. Before starting, define the transition, coverage or texture you want, then decide how the configuration supports that goal. Treat each choice as part of a considered workflow, not a shortcut to a particular result. With curved magnum tattoo needles, a clear purpose for the pass can guide your selection and keep the process focused.
Tatt Lab offers Tattoo Aftercare, Traditional Needles, and Tattoo Catridges for artists planning their studio supplies. If you’re ready to explore equipment for upcoming work, contact Tatt Lab for needle advice. A thoughtful next step can help you move into your next project with greater clarity and confidence.
Frequently Asked Questions
How Are Curved Magnum Tattoo Needles Made?
Traditional hand-soldered magnums could begin with 17 needles arranged in one row, then form into two staggered rows. For a curved configuration, the rows create a gently arched edge. This construction shapes the grouping; the selected gauge and taper remain separate specifications. In cartridge designs, the needles sit within a housing, so check the configuration marking to distinguish the needle arrangement from the cartridge format.
What are curved magnum tattoo needles used for?
Artists use curved magnums for shading, gradual tonal transitions, colour blending and broader coverage. A design with a soft shadow fading into a lighter area, for example, may call for a grouping suited to that transition. The tool doesn’t determine the finish on its own: the artist plans movement and coverage around the design. A narrow border or isolated detail may need a different grouping for precision.
How do curved magnum needles differ from standard magnum and round shader needles?
A curved magnum has an arched edge, while a standard flat magnum places its needles along a straight edge. Flat configurations can create bold, clear lines and shade straight-edged shapes. Round shaders have a circular arrangement, with more spacing between needles than round liners, and are suited to shading. For a geometric border, a flat magnum may align more directly; a round shader has a different, circular working pattern.
What curved magnum needle sizes and configurations are available?
Configurations can start at 5 needles and extend beyond 35 or 45. Common odd-numbered counts include 7, 9, 11, 13, and 15. Gauge options include #8 Bugpin at 0.25 mm, #10 Standard at 0.30 mm, and #12 at 0.35 mm. An 11CM in #10 Standard is a suggested entry point. Read count and gauge as distinct parts of the specification.
How do you choose a curved magnum needle for shading, colour packing, and skin type?
First match the configuration to the design’s working area and intended finish. A broad colour section may need different coverage from a narrow gradient beside fine detail. Skin type alone doesn’t determine the ideal grouping: the artist also considers the tattoo area, design and established technique. A compact transition calls for control in a smaller working space, while a larger area prioritises coverage.


Comments (0)
There are no comments for this article. Be the first one to leave a message!