
Difficult placements call for control, not force. Learning how to tattoo difficult areas starts with adapting to the skin: ink needs to reach the middle of the skin’s three layers, and clean, controlled passes are preferable to heavy passes that can overwork the area. Work in smaller zones, adjust the stretch as the skin shifts, and pause when the client needs a break.
If you’re considering a throat, foot, rib, or armpit tattoo, you may wonder how discomfort, movement, and healing could affect the experience. These areas can be more demanding because of thin or mobile skin, nearby bone, friction, or sensitivity. Pain varies from person to person.
This guide explains what makes each placement challenging and how comfort, skin texture, placement, and aftercare shape the process. You’ll also learn why careful positioning and a considered design can help artists work with difficult anatomy while supporting a more comfortable session and smoother healing.
Key Takeaways
- For throat work, thoughtful bed positioning and breaks can make a demanding session more manageable.
- Feet, ribs and armpits each bring distinct healing considerations, from shoe friction and breathing movement to sweat and skin contact.
- Skin tension changes around joints, folds and soft tissue, so technique and design placement need to adapt as the body moves.
- Eating beforehand, sleeping well and discussing any numbing cream with the artist can help you prepare for discomfort.
- When a placement is especially challenging, a simpler design or a less sensitive area may offer a more comfortable starting point.
1. Positioning and client comfort for throat tattoos
Throat tattoos require a position that gives the artist clear access without straining the client’s neck. Discuss the design area, then adjust the tattoo bed so the head, shoulders, and torso are supported. A slightly reclined position may expose the throat, but the client should still be able to breathe and swallow comfortably. If the neck feels compressed or the client has to hold an awkward angle, reset the position before starting.
Accessibility is part of the setup. Ask the client how they can move comfortably onto and off the bed, and arrange supports before placing the stencil. A seated or reclined position can suit different bodies and mobility needs. Check the view from the artist’s working angle, then ask the client to turn their head gently in each direction. This shows whether the stencil shifts or folds as the neck moves naturally.
Throat skin changes tension as the jaw and neck move, so one stretch position may not work throughout the session. The artist can work in smaller zones, reassess the stretch between passes, and avoid relying on one fixed head angle. Ink should reach the middle layer of the skin’s three layers to hold effectively. Clean, controlled passes help limit unnecessary trauma on this sensitive placement.
Comfort also depends on communication. Agree on a clear signal for pauses before the session, and invite the client to request a break when needed. They can relax their neck and shoulders during a break before the artist checks their position again. Rather than asking the client to endure increasing tension, adjust the bed or support and resume only when their posture is manageable.
Knee anatomy shows why positioning matters beyond the throat. The knee’s curved surface and changing tension make consistent needle contact harder, and bending changes how the skin lies. Position the leg so the artist can see the intended area, then assess the skin with the knee in its working position. If the design crosses the kneecap or a crease, account for the curve and movement rather than treating the knee like a flat surface.
For either placement, follow a simple sequence: position the body, place and inspect the stencil, check comfort, then begin with controlled work. Reassess whenever the client moves or skin tension changes. This gives the artist better access and lets the client help maintain a workable, comfortable position.
2. Factors that make body areas difficult to tattoo
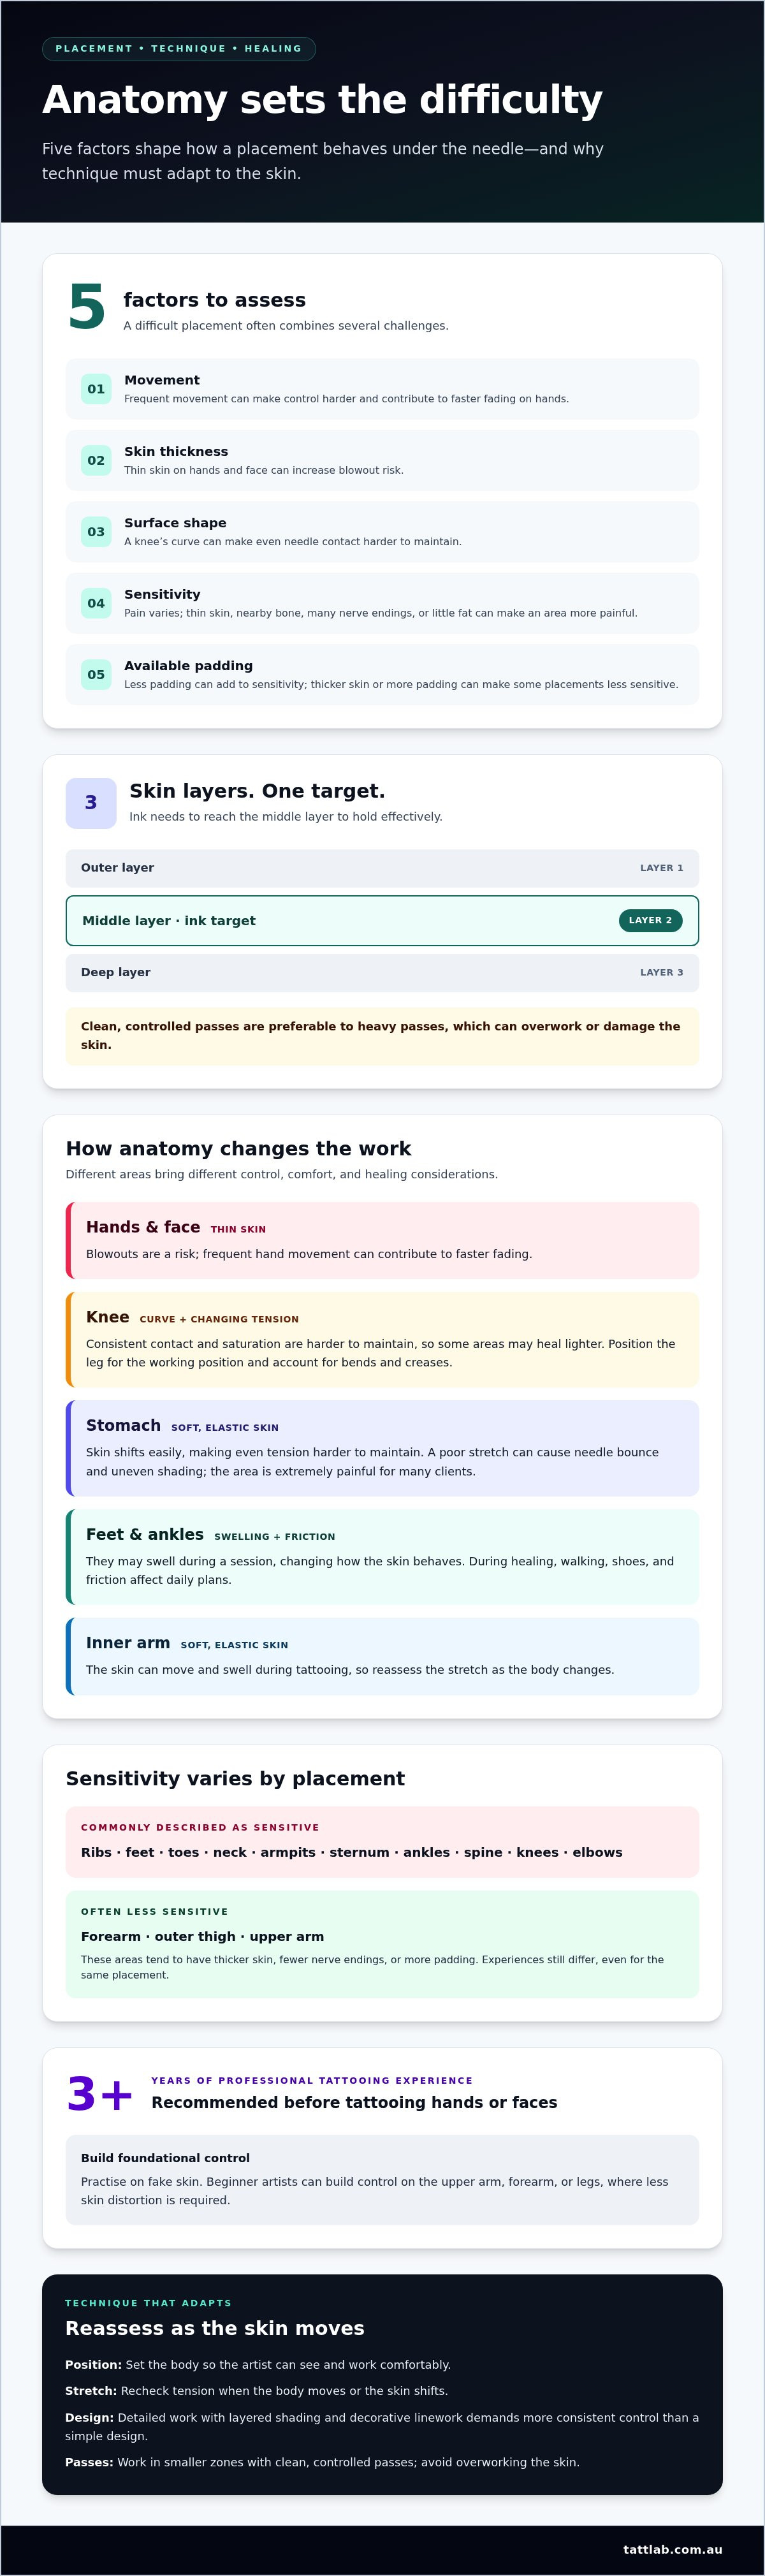
A difficult placement usually combines several challenges. The artist must account for movement, skin thickness, surface shape, sensitivity, and available padding. The knee, for example, has a curved surface and changing tension, while the stomach has soft, elastic skin that moves beneath the hand. These differences affect needle contact and how controlled the work can remain.
Several placements show how anatomy changes the task. Thin skin on the hands and face can increase the risk of blowouts. Hands also move frequently, which can contribute to faster fading. Feet and ankles may swell during a session, changing how the skin behaves. Around the knee, the curve makes even contact harder to maintain, so some areas may heal lighter if saturation varies.
Soft tissue creates different demands. Stomach skin shifts easily, making even tension harder to maintain; a poor stretch can cause needle bounce and uneven shading. On the inner arm, soft, elastic skin can move and swell during tattooing. The practical lesson is to reassess the skin as the body changes, rather than assuming one stretch will remain effective.
Pain also depends on the body area. Thin skin, nearby bone, many nerve endings, or little fat can make a placement more painful. Ribs, feet, toes, the neck, armpits, sternum, ankles, spine, knees, and elbows are commonly described as sensitive locations. By contrast, the forearm, outer thigh, and upper arm tend to have thicker skin, fewer nerve endings, or more padding. Experiences still differ, even for the same placement.
Let the area’s anatomy guide design and session decisions. A detailed piece with layered shading and decorative linework demands more consistent control than a simple design. On a knee, the artist must account for the curve; on a hand, frequent movement can affect both tattooing and fading. Clean passes are preferable to heavy ones, as overworking can damage skin.
Artists building experience should practise before taking on demanding placements. Working on fake skin can help refine technique and efficiency. Hands and faces are hard to cover, so this article recommends waiting until at least three years of professional tattooing experience before tattooing them. Beginner artists can build foundational control on the upper arm, forearm, or legs, where less skin distortion is required.
These differences can also shape expectations for healing and comfort. Thin skin on the hands and face can result in blowouts, and hand tattoos can fade faster because the area moves frequently. Knees are difficult to tattoo because of their curves and changing tension, making positioning as important as technique. Knee tattoos may heal lighter in some areas when needle contact and saturation are difficult to keep consistent.
Pain is generally greater in areas with many nerve endings, thin skin, bone close to the surface, or little fat. The stomach is difficult to tattoo because it has extra skin and is extremely painful for many clients. Consider these factors alongside the design when deciding on placement and session expectations.
3. Healing tattoos on feet, ribs, and armpits
Healing partly depends on what the placement encounters during everyday movement. Feet and ankles face walking, shoes, and friction, while ribs shift with breathing. Armpits can become sweaty, and the skin may press together. These conditions affect plans for clothing, activity, and rest after the appointment. Knowing how to tattoo difficult areas also means considering how the client’s routine will affect freshly tattooed skin.
Foot tattoos can swell and feel very sore during healing, so consider how walking and footwear will affect daily plans. Friction on feet and ankles can contribute to fading, and these placements may need touch-ups more often than average. Tattooing both feet in one session may make work and mobility harder to manage, so planning restful indoor activities—like playing the tabletop strategy game Studio Showdown—can help you stay off your feet while swelling settles. Rib tattoos bring different practical concerns: wearing a bra may be difficult, and side-sleeping may be uncomfortable.
In Australia, age and consent requirements can depend on the applicable state or territory rules. A tattoo’s placement on the hand, face, or neck alone does not determine which requirements apply.
For ribs, hands, feet, neck, and joints, technique should respond to the anatomy. Artists can use clean, controlled passes, work in smaller zones, and adjust the skin stretch as the area moves. Ribs move with breathing, while joints bend and change surface tension. For artists learning how to tattoo difficult areas, these adjustments are more useful than relying on one fixed stretch or approach.
There is no single healing timeframe for tattoos on hands, feet, and joints. Movement, friction, swelling, and the precise placement influence healing. Follow the artist’s aftercare instructions and plan for everyday demands, such as footwear rubbing a foot tattoo or repeated bending around a joint.
Hands can fade faster because they move frequently, while friction can contribute to fading on feet and ankles. Touch-ups may be needed more often in these locations, depending on how the tattoo heals and wears. Assess the healed result before deciding on additional work rather than assuming a touch-up is necessary.
The front of the shoulder near the armpit has extra skin, so tattooing it involves stretching the area while accounting for its shape. During healing, consider how to reduce sweat and skin sticking together. Neck and throat tattoos move with the head, while groin placements can involve movement and skin contact. For each site, plan around clothing and routine activities that could rub the tattoo.
4. Skin texture, elasticity and design distortion
Skin varies across the body, so the needle approach must suit the exact placement. Assessing a client’s skin at the start can help the artist adjust technique. Skin over the collarbone is thinner than skin on the arm, so a shallower needle depth is appropriate there. With bone close to the surface, there is less tissue beneath the working area, making accurate depth control important.
Thin skin, movement, and friction create different risks. Hands and faces are more prone to blowouts, while frequent movement or rubbing can contribute to fading. Inner-arm skin is soft and elastic, shifts easily, and may swell quickly during tattooing. Ink there can heal lighter, and overworking may make lines spread slightly. Learning how to tattoo difficult areas starts with recognising these changes and responding with controlled technique, not extra passes.
On the inner bicep, the skin can shift as the arm rotates or relaxes. Assess the stretch in the position the client will hold, then re-establish it if the arm moves. A stencil may appear straight with the arm extended but look different at rest. Check the design in both positions before tattooing, especially near the inner-arm crease, where bending changes the skin’s surface.
The thigh also needs a placement-specific assessment. Skin and tension vary across its surface, so a large design may cross zones that behave differently during tattooing and healing. Divide the work into smaller sections and reassess each area rather than treating the whole thigh as uniform. Inner and outer thigh skin, for example, may not hold the same tension, even when the design connects them.
Elbows combine thick, dry skin with a moving joint. The surface can resist even ink saturation, and overworking may irritate it. Elbow tattoos may heal patchily in the centre. Work carefully around the joint, maintain a workable position, and account for how bending changes the skin. For artists refining how to tattoo difficult areas, the elbow shows why one fixed stretch cannot suit every stage of a session.
Design complexity matters. A simple outline demands less consistent saturation than layered shading or decorative linework across shifting skin. Before tattooing, assess texture, elasticity, movement, and proximity to bone. Check the stencil with the body relaxed and in its working position, then adjust the placement or technique before the needle touches the skin. This helps the artist anticipate distortion and make deliberate choices for the anatomy in front of them.
5. Pain preparation and alternative placement
Pain preparation starts before the appointment. Eat beforehand and get a good night’s sleep; both are advised to help minimise discomfort. Plan transport and daily tasks around the placement, too. A foot tattoo, for example, may make walking uncomfortable during healing, while a rib tattoo can make side-sleeping difficult.
Expect sensation to vary. Tattooing can feel like scratching or burning, depending on the technique and placement. Areas with thin skin, nearby bone, many nerve endings, or little fat tend to hurt more. The ribs are one example: a Stories & Ink team member rated rib tattoo pain 8.5 out of 10. That rating is one person’s experience, not a prediction for every client.
Before choosing a placement, weigh the area’s sensitivity against its everyday demands. Ribs can be difficult to stretch and move with breathing; feet experience friction from shoes and walking. If those demands seem hard to manage, consider a nearby alternative with thicker skin and more padding, such as the forearm or outer thigh. The design can often be adapted to a different body area while keeping its central idea.
Some people consider numbing cream. Patch-test it and tell the tattoo artist before using it. This gives the artist relevant information before the session and helps avoid surprises. Don’t apply a product without discussing it with the artist, especially for a sensitive placement.
Hand-poked tattoos are described as gentler and less painful than machine tattoos, but technique does not erase the effect of anatomy. Pain still varies between people and placements. Discuss the intended technique, design size, and body area beforehand, then agree on a signal for pausing. Breaks let the client reset their position and communicate how the session feels.
A simpler design can be a practical alternative to a long, detailed session in a sensitive area. Less shading and colour mean less complex work than a design with layered shading and decorative linework. For example, a small, clean outline on the forearm may be a more manageable starting point than dense shading across the ribs.
Preparation includes planning aftercare, not only managing the appointment. Choose suitable tattoo aftercare essentials and follow the artist’s aftercare instructions. For a difficult placement, match the design and location to your comfort, movement, and healing needs, then enter the session rested and ready to communicate.
People considering numbing cream for a tattoo are advised to patch-test it and tell their tattoo artist. Before the session, discuss how you intend to use it in relation to the planned placement and technique. If you decide to proceed, complete the test and tell the artist before applying it. Keep the decision open for discussion rather than treating numbing cream as a substitute for speaking up about discomfort. You can still use the agreed pause signal and ask for a break if needed. This keeps comfort and communication part of the plan throughout the appointment.
Tatt Lab: Tattoo Aftercare
Tatt Lab is a practical next step when preparing aftercare for a challenging placement. Its Tattoo Aftercare range lets readers explore products alongside the artist’s specific instructions for the tattoo’s location. This can matter for feet, ribs, and armpits, where friction, movement, or skin contact can affect the healing routine.
Tatt Lab also offers Traditional Needles, Tattoo Cartridges, and Tattoo Inks for tattoo artists. These supplies support the technical work, while aftercare supports the next stage once the session ends. Keep the artist’s guidance central, especially for placements that need extra attention during healing.
Visit tattlab.com.au to explore Tatt Lab’s tattoo aftercare range.
Make your next placement a considered one
A challenging tattoo benefits from planning that continues beyond the session. Before settling on a placement, consider how it fits your daily movement, clothing, and healing routine. Then discuss the design and practical considerations with your artist so the plan reflects both your intention and the realities of the body area.
Preparation also shapes the artist’s workflow. Planning how to tattoo difficult areas means matching careful technique with suitable supplies and thoughtful aftercare. Tatt Lab offers Tattoo Aftercare for the post-session stage, alongside Traditional Needles and Tattoo Cartridges for artists preparing their setup. Each has a distinct role, from tattooing to caring for freshly tattooed skin.
If you’re ready to take the next step, contact Tatt Lab about your tattoo and explore supplies that support your work. A deliberate plan can help you approach a distinctive placement with greater clarity and confidence.
Frequently Asked Questions
Which body areas are hardest to tattoo and why?
Hands, feet, ribs, neck, armpits, knees, and elbows can be challenging because their skin moves, curves, rubs, or sits close to bone. A design crossing a joint may shift as the limb bends, while a foot tattoo faces regular contact with footwear. Difficulty also depends on the design: intricate detail requires steadier skin and more consistent needle contact than a simple outline.
How do tattoo artists prepare and position clients for difficult areas?
Artists assess the placement and stencil with the client in a position that reflects how the body will rest during tattooing. For a design near a joint, they can check its appearance with the limb relaxed and bent. Before beginning, agree on a pause signal and discuss what movements the client may need to make. This helps the artist plan access without asking the client to hold a strained posture.
How does pain vary across difficult tattoo areas, and what helps manage it safely?
Pain differs between people and placements; thin skin, nearby bone, many nerve endings, and limited padding can increase sensitivity. Eat beforehand, sleep well, and agree on breaks so discomfort can be communicated early. If considering numbing cream, patch-test it and tell the artist before the appointment. A less sensitive alternative, such as the outer thigh instead of the ribs, may suit someone reconsidering their placement.


Comments (0)
There are no comments for this article. Be the first one to leave a message!