

A full sleeve or backpiece isn't simply an extended aesthetic procedure; it is a major biological event that demands clinical precision. When you're healing a large scale tattoo project, recovery extends far beyond the surface of your skin. You're forced to manage systemic fatigue and acute inflammation while navigating the delicate challenge of fresh, weeping dermis resting directly beside peeling, settling stages from previous sessions.
It's entirely natural to feel overwhelmed by the physical toll. Between disrupted sleep, clothing friction, and the constant fear of scabbing over extensive craftsmanship, extensive dermal coverage rapidly depletes your body's energy reserves. We're here to help you master the step-by-step recovery process for multi-session tattoos with scientific certainty and optimal pigment retention. In this guide, you'll discover a structured recovery protocol covering immune support, dressing selections, and predictable barrier maintenance to protect your skin from the first session to the final settle.
Key Takeaways
- Understand that healing a large scale tattoo project triggers a whole-body immune response, requiring targeted systemic recovery to support cellular repair and lymphatic clearance.
- Learn how to choose between semi-permeable adhesive films and traditional absorbent dressings based on joint mobility, plasma exudate levels, and anatomical placement.
- Navigate the multi-week biological timeline safely, tracking deep dermal pigment stabilization well past the initial surface-peeling stage.
- Implement daily friction-control protocols, including strategic sleep positioning and textile choices that prevent fabric shearing across vulnerable dermal barriers.
- Differentiate healthy, reactive inflammation from emerging contact dermatitis or bacterial complications early to safeguard skin integrity and tattoo longevity.
The Physiology of Extensive Tattoo Healing: Understanding Systemic Dermal Recovery
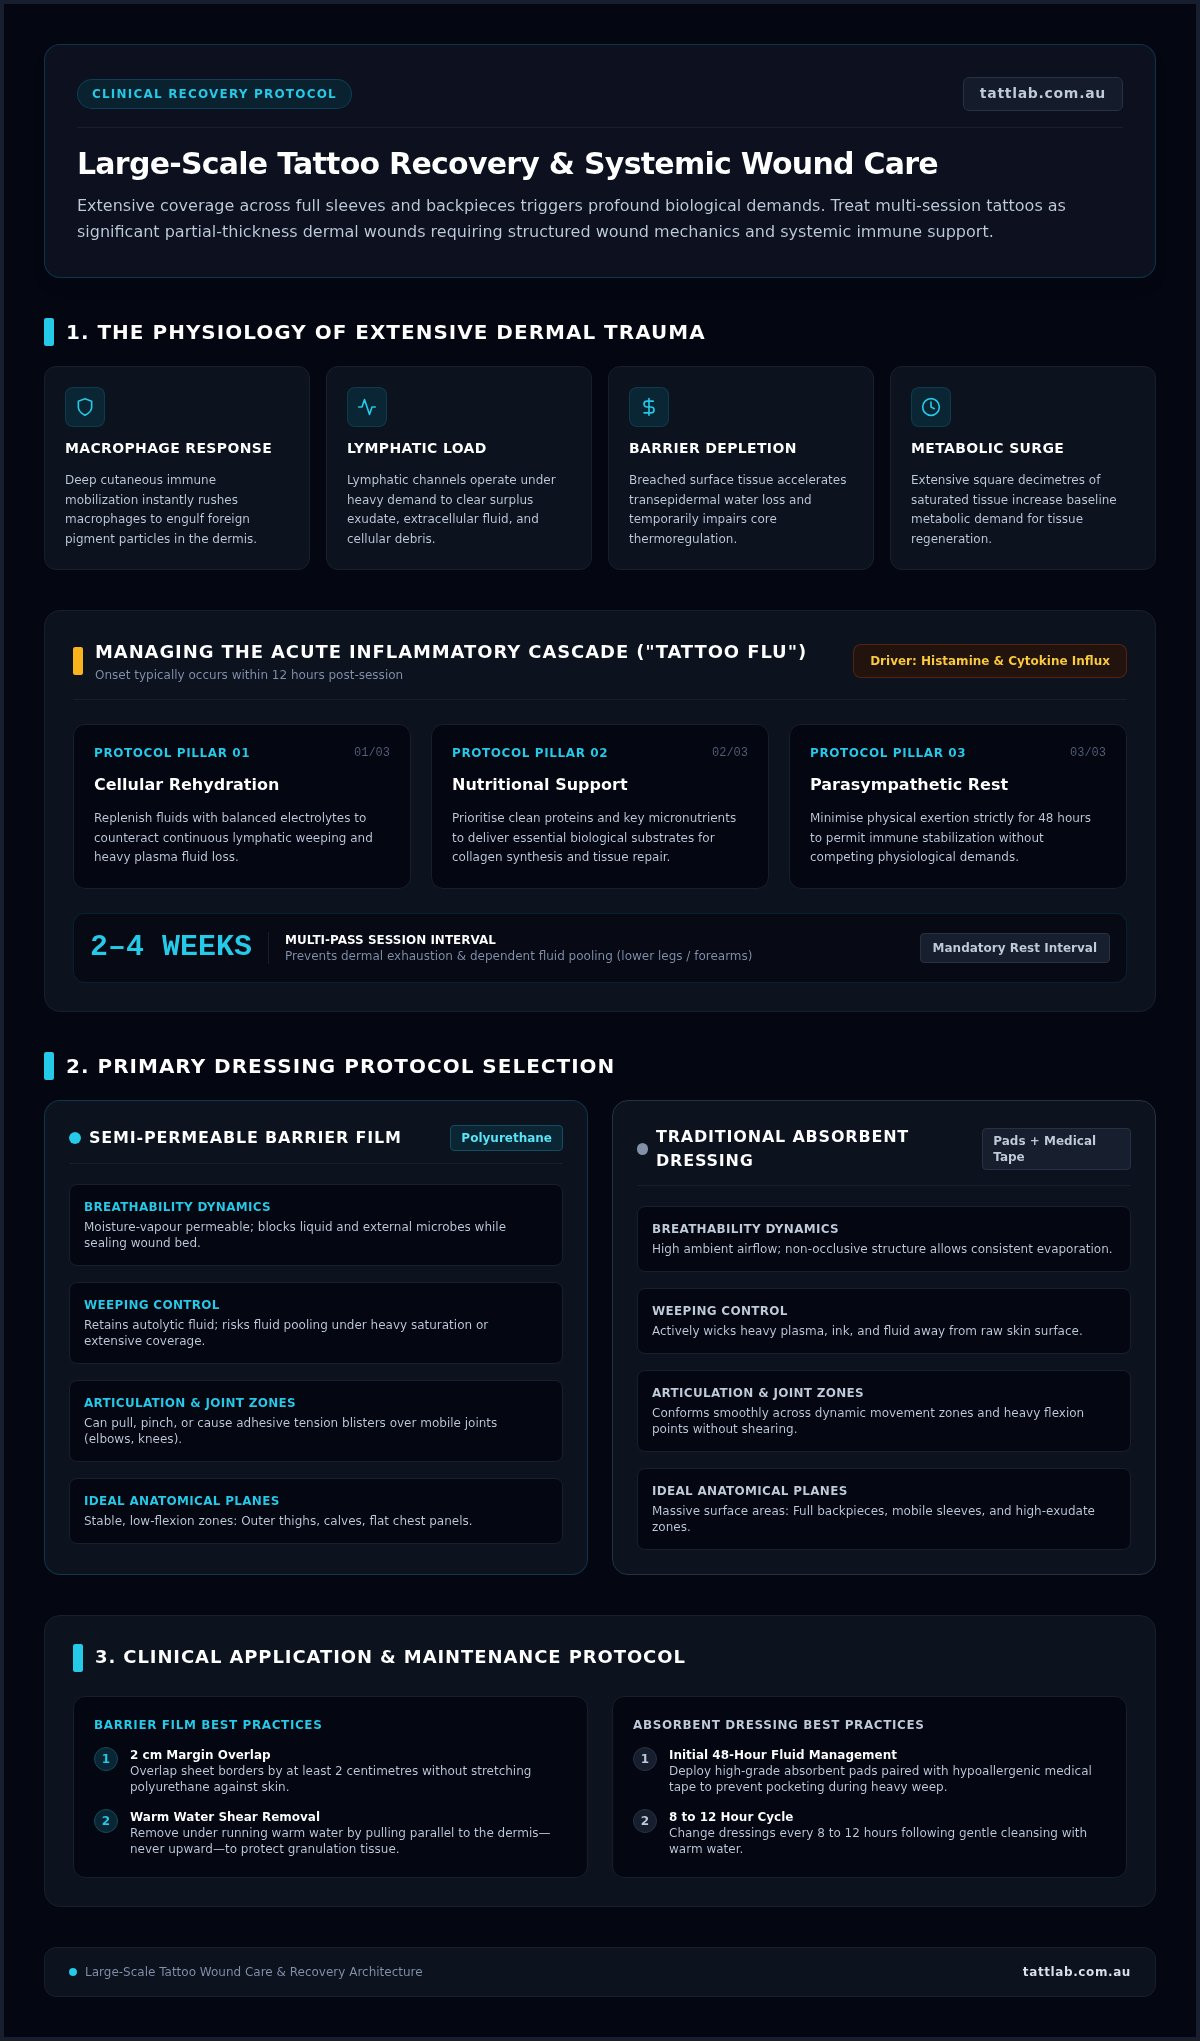
Healing a large scale tattoo project requires shifting your perspective from basic cosmetic skin maintenance to clinical wound management. When an artist saturates extensive square decimetres of tissue across a sleeve or full backpiece, your body registers the trauma as a significant, partial-thickness dermal wound. In the deeper cutaneous layers, the immune response mobilises instantly. Macrophages rush to engulf foreign pigment particles, while your lymphatic channels clear surplus fluid and cellular debris. Looking closely at the physiological process of tattooing demonstrates why extensive surface coverage affects your entire constitution. A breached dermal barrier dramatically accelerates transepidermal water loss, increases baseline metabolic demand, and temporarily impairs your body's natural thermoregulation.
Managing the Systemic Inflammatory Cascade and Tattoo Flu
Hours of continuous needle passes flood the bloodstream with histamines and pro-inflammatory cytokines. This sudden cascade often triggers the acute physiological fatigue colloquially known as "tattoo flu." Collectors regularly report sensations of low-grade shivering, joint stiffness, and profound physical exhaustion within twelve hours of finishing a sitting. These symptoms don't stem from an external infection; they reflect an intense internal immune activation. Managing this cascade requires a focused recovery protocol:
- Cellular rehydration: Replenish fluids with balanced electrolytes to offset continuous lymphatic weep and heavy plasma loss.
- Nutritional support: Prioritise clean proteins and micronutrients to supply the biological building blocks needed for collagen synthesis and tissue regeneration.
- Parasympathetic rest: Minimise physical exertion for forty-eight hours to let your immune system stabilise without competing physiological demands.
The Compounding Trauma of Multi-Pass Consecutive Sessions
Consecutive appointments present a distinct biological challenge. Fresh needle passes are introduced directly alongside tissue that is already navigating early cellular repair and re-epithelialisation. This compounding trauma forces your vascular system to redirect blood flow, frequently causing substantial fluid pooling in dependent anatomical zones like the lower legs and forearms. When healing a large scale tattoo project across multiple sittings, respect natural tissue limits. Spacing heavy sessions by two to four weeks prevents dermal exhaustion, reduces excessive plasma buildup, and gives compromised skin the structural stability it needs to retain delicate ink deposits.
Wound Care Protocols: Breathable Adhesive Film vs. Traditional Absorbent Dressings
Selecting the right primary dressing dictates whether healing a large scale tattoo project proceeds smoothly or triggers severe dermal stress. Semi-permeable polyurethane films offer exceptional mechanical protection by locking in endogenous fluids, but they aren't universally superior across extensive surface areas. Articulating joints, such as elbows, knees, and armpits, present intense shear stress. Movement often compromises the film's peripheral seal, leading to external fluid leaks or localized adhesive tension blisters along stretched margins. When managing high-volume exudate across broad anatomical zones, standard clinical tattoo aftercare instructions suggest weighing the precise moisture dynamics of each dressing format:
| Feature | Semi-Permeable Barrier Film | Traditional Absorbent Dressing |
|---|---|---|
| Breathability | Moisture-vapour permeable; blocks liquid and microbes. | High ambient airflow; non-occlusive. |
| Weeping Control | Retains autolytic fluid; risks pooling under heavy saturation. | Actively wicks heavy plasma away from the skin surface. |
| Articulation Comfort | Can pull, pinch, or blister over mobile joints. | Conforms smoothly across dynamic movement zones. |
Indications and Best Practices for Breathable Barrier Films
Adhesive films excel across stable, low-flexion planes like the outer thighs, calves, and chest panels. When applying sheets, overlap borders by at least two centimetres without stretching the polyurethane against the skin. Remove the film under running warm water by pulling parallel to the dermis, never upward. This gentle shear technique protects freshly established granulation tissue from mechanical trauma.
Traditional Medical Absorbent Dressings for Heavy Exudation
Massive coverage areas like full backpieces weep significant volumes of plasma, ink, and blood within the initial forty-eight hours. Polyurethane sheets can easily detach under this sheer fluid volume, creating messy pocketing. High-grade absorbent pads paired with hypoallergenic medical tape provide a structured alternative, wicking away discharge without adhering to raw skin layers. Change these dressings every eight to twelve hours after gentle cleansing with warm water. By implementing purposeful tattoo aftercare methods during these early phases, you prevent heavy linen friction while safeguarding fragile pigment retention. For reliable medical-grade supplies that maintain dermal integrity during extensive work, explore the curated studio solutions at tattlab.com.au.
Step-by-Step Multi-Week Healing Timeline for Large Scale Projects
A multi-session collection requires an evolving recovery framework rather than static maintenance. While visible surface repair wraps up in two to four weeks, the deep dermal architecture takes four to six months to fully remodel and permanently trap suspended ink particles. Tracking these biological phases ensures you don't compromise underlying tissue structure ahead of subsequent studio sessions. Aligning with clinical, dermatologist-approved tattoo aftercare protocols creates predictable regenerative results across every square inch.
Phase 1: Haemostasis, Exudate Control, and Barrier Defense (Days 1-3)
The initial seventy-two hours demand rigorous hygiene to halt opportunistic pathogen entry without stripping delicate cellular matrices.
- Step 1: Rinse exudate: Wash the area using lukewarm water to dissolve dried lymph, residual pigment, and clotting biological fluids.
- Step 2: Apply neutral cleansers: Use an unscented, mild liquid cleanser with clean hands; avoid abrasive loofahs or coarse washcloths.
- Step 3: Dry with lint-free towelling: Pat the dermis dry exclusively using clean, single-use paper towels to avoid fibrous lint contamination.
- Step 4: Regulate surface exposure: Allow clean air contact for ten to fifteen minutes before applying a paper-thin layer of dedicated aftercare balm.
Phase 2: Cellular Proliferation and Managing Peeling Surfaces (Days 4-14)
Keratinocytes rapidly proliferate during this stage to reseal the compromised stratum corneum, creating widespread epidermal desquamation.
- Step 5: Pivot hydration products: Transition from richer barrier preparations to lightweight, non-comedogenic hydration lotions that keep tissue supple.
- Step 6: Protect shedding sheets: Never pull, scratch, or peel flaking sheets; premature detachment strips trapped pigment from the upper dermis.
- Step 7: Modulate mechanical pruritus: Combat sudden histaminic itching waves by applying dry, cool compresses over clean cotton clothing rather than scratching.
Phase 3: Dermal Maturation, Silver Skin, and Re-Booking (Weeks 3-8)
Entering the third week, your skin reveals "silver skin." This cloudy, shiny micro-layer is immature re-epithelialised tissue, not trapped plasma or pigment fallout.
- Step 8: Track visual clarity: Monitor the milky sheen as it gradually transitions back to normal skin refractivity over subsequent weeks.
- Step 9: Reinforce lipid balance: Apply gentle, fragrance-free moisturisers once daily to support the maturing stratum corneum's natural lipid mantle.
- Step 10: Clear tissue for subsequent trauma: Never needle adjacent zones while skin exhibits a glassy shine, raised contours, or persistent pink tones. Wait four to six weeks between major passes to ensure the underlying vascular beds and structural collagen fully recover.
If you encounter spreading erythema past day four, pinpoint pustules, or localised heat accompanied by throbbing pain, progression has stalled. Pause your routine immediately and consult your tattooist or a medical practitioner for clinical evaluation.
Daily Practical Management: Sleep, Clothing, Mobility, and Infection Control
Managing ambient friction and domestic exposure is where theoretical recovery meets daily reality. Healing a large scale tattoo project requires deliberate control over your physical environment, because mechanical shearing from rough fabrics and opportunistic pathogens from unwashed surfaces can instantly undermine fragile tissue repair. Minimising friction, preventing shearing across mobile joints, and maintaining high home hygiene standards preserve the integrity of your fresh dermal work.
Nighttime Protection and Managing Bedding Friction
Sleep positions must be planned around the anatomical location of your ink. For backpieces and posterior thighs, sleep prone; use contoured body pillows to support your hips and relieve spinal strain. When healing leg sleeves, elevate the limb on a firm bolster to prevent gravity-induced nocturnal fluid pooling. Prepare your sleeping quarters with dedicated, dark 100% cotton sheets that have been freshly laundered in hypoallergenic, fragrance-free detergent.
- Select non-shearing textiles: Wear loose, tightly woven cotton garments that let skin breathe without snagging settling tissue or releasing airborne lint into raw dermal pockets.
- Modify joint movement: Avoid hyper-extending the elbows or knees during the initial week to prevent micro-tears across freshly seeded line work.
- Free adhered fabric safely: If clothing or sheets stick to weeping skin overnight, do not pull or rip them free. Walk directly into the shower and saturate the stuck fabric with lukewarm water until the fibres slide away effortlessly without dislodging developing scabs.
Aseptic Technique for Product Application in the Home
Treating your body like an outpatient surgical site keeps common bacterial vectors at bay. Always scrub your hands with warm water and antibacterial soap for twenty seconds before touching healing skin. Never double-dip fingers into open ointment containers, as this transfers household microbes into the balm and creates a breeding ground for staphylococcal colonies. Instead, dispense topicals using a clean wooden spatula, a single-use wooden tongue depressor, or a clean applicator.
Maintaining studio-grade protocols at home mirrors the exacting standards of professional medical supplies for tattoo artists. Treat every application as a controlled procedure to keep your developing artwork completely free from contamination. To secure high-grade balms and skin barrier essentials engineered specifically for heavy coverage, explore professional aftercare products at tattlab.com.au.
Complication Management: Identifying Adverse Reactions and Protecting Skin Longevity
When healing a large scale tattoo project, distinguishing standard tissue recovery from clinical complications is paramount. Broad coverage presents multiple vectors for contact sensitivities, follicular disruption, and bacterial ingress. Over-saturating compromised tissue with thick occlusive salves often suffocates hair follicles, resulting in red, pinpoint folliculitis or milky micro-papules. Knowing how to read your skin's visual signals lets you intervene before minor irritations compromise extensive artwork.
Clinical Differentiation: Healing Reaction vs. Infection
Reactive erythema and dull swelling peak within forty-eight to seventy-two hours, gradually receding as cellular repair takes over. By contrast, bacterial infection presents distinct clinical markers that demand immediate medical attention:
- Spreading erythema: Redness that expands outward beyond the tattoo borders after day three, especially with streaking edges.
- Radiating heat and throbbing: Skin that feels feverish to the touch and throbs with escalating intensity rather than settling.
- Purulent exudate: Thick, opaque, yellow or greenish discharge weeping from deep dermal punctures, often accompanied by an unpleasant odour.
- Systemic pyrexia: High fever, body chills, or nausea occurring several days after your sitting.
Contact dermatitis triggered by acrylic film adhesives presents differently. It appears as an intensely itchy, bumpy red border outlining the exact perimeter of the dressing. If true infection symptoms develop, consult a medical doctor promptly for topical or oral intervention. Notify your artist immediately so they can update your session notes and modify upcoming appointment dates.
Long-Term Dermal Preservation and Future Session Preparation
Once the stratum corneum completely reseals, protecting pigment brilliance becomes an enduring discipline. Ultraviolet radiation fragments suspended ink particles and breaks down the dermal collagen matrix, causing crisp linework to blur and saturate tones to fade prematurely. Apply high-SPF broad-spectrum mineral sunscreen across mature ink before any sun exposure to preserve edge definition.
Maintaining daily skin suppleness with balanced lotions keeps the dermis pliable and hydrated. Well-conditioned tissue facilitates smoother needle glide and cleaner pigment implantation during upcoming multi-pass appointments. Securing specialized aftercare essentials from trusted Australian suppliers safeguards your physical investment, keeping your skin resilient from early outlines through to fully realised coverage.
Protecting Your Dermal Investment for the Long Term
Successfully healing a large scale tattoo project demands that you respect your body's biological limits as deeply as the artistic process itself. By actively managing your systemic inflammatory response, matching your dressing protocols to anatomical movement, and adhering to strict home hygiene, you protect both your physical wellbeing and your skin's visual clarity. Healing extensive coverage isn't merely about waiting out surface peeling; it's about methodically supporting deep dermal remodeling across every square centimetre.
Your discipline during these foundational weeks ensures crisp contours and dense pigments settle into permanent, resilient artwork. To support every stage of your recovery with artist-tested tattoo aftercare engineered for superior dermal regeneration, rely on trusted medical-grade supplies serving professional studios nationwide across Australia. Explore professional tattoo supplies and aftercare solutions at Tatt Lab to give your extensive bodywork the clinical care it deserves, ensuring your skin remains healthy, comfortable, and prepared for your next session.
Frequently Asked Questions
How long does a large scale tattoo project take to heal completely?
Surface epithelial healing usually finishes within two to four weeks, but complete dermal recovery and pigment stabilization require four to six months. When healing a large scale tattoo project, your immune cells work continuously beneath the surface to encapsulate ink particles and remodel compromised collagen. Even after peeling ceases and the glossy silver skin settles, the deep dermis remains active. Full structural recovery must conclude before the skin is completely stabilized.
Can you take time off work to heal an extensive backpiece or full sleeve?
Taking two to three days off work is highly advisable, particularly if your job involves physical labour, repetitive movement, or unsterile environments. The immediate recovery window involves intense inflammatory fatigue, systemic soreness, and active plasma weeping. Resting at home lets you control ambient exposure, avoid stiff work garments that cause friction, and maintain sterile hygiene. If desk work is unavoidable, schedule appointments ahead of a quiet weekend.
What should you do if your clothes stick to a fresh large tattoo overnight?
Never rip or force dried fabric away from your skin, as doing so tears away delicate epithelial cells and pulls trapped pigment. Head straight to the bathroom and run lukewarm water directly over the stuck textile. Allow the moisture to thoroughly soften dried lymph and plasma until the fabric detaches freely under its own weight. Once loosened, gently cleanse the area, pat dry, and rehydrate lightly.
Is it normal to feel sick or feverish after an intense, multi-hour tattoo session?
Yes, experiencing mild shivering, lethargy, and body aches, often called the tattoo flu, is a normal physiological response to extensive body trauma. Sustained needle work floods your circulation with inflammatory cytokines and histamines as your immune system reacts to square decimetres of open tissue. This systemic reaction generally peaks within twenty-four hours. However, if true fever, spreading redness, or severe chills persist past day three, seek medical advice promptly.
Can you exercise or go to the gym while healing a large tattoo?
You should avoid strenuous workouts, heavy weightlifting, and commercial gym environments for at least seven to ten days. When healing a large scale tattoo project, heavy sweating increases the risk of bacterial contamination and causes prickly irritation under settling skin layers. Gym equipment is notoriously rife with bacteria. Furthermore, vigorous muscular flexing and mechanical skin stretching can pull apart delicate new tissue, resulting in scabbing and ink fallout.
What is the best way to shower when you have a massive open tattoo?
Keep showers brief, lukewarm, and indirect, avoiding direct high-pressure spray against raw dermal tissue. Never submerge your tattoo in a bath, hot tub, or pool during recovery. Let gentle water stream indirectly over the area to rinse away dried exudate. Wash carefully using clean hands and a neutral cleanser, avoiding textured sponges. Once finished, immediately pat the skin dry with single-use, lint-free paper towels.
How many weeks should you wait between sessions on the same tattoo project?
You should wait a minimum of four to six weeks before tattooing adjoining or overlapping areas on the same project. While your outer epidermis appears recovered after three weeks, the underlying vascular networks and dermal collagen beds require several additional weeks to regain baseline strength. Rushing consecutive passes too quickly compounds tissue trauma, increases scarring risks, and compromises pigment saturation across your finished piece.


Comments (0)
There are no comments for this article. Be the first one to leave a message!