

The difference between a muddy, patchy heal and a buttery-smooth gradient isn't just in your hand movement; it's in the precise chemistry of your ink caps. You've likely felt that frustration when a piece looks perfect on the skin only to return weeks later with inconsistent tones or dark spots that shouldn't be there. Relying on guesswork for your dilutions compromises your artistic integrity and your client's results. Learning how to make a grey wash set that is both sterile and mathematically consistent is the only way to ensure your black and grey work heals exactly as you intended.
This guide moves beyond simple "drops of water" methods to provide a professional, lab-grade approach to pigment suspension. We'll explore the science of how carriers interact with skin cells and why sterile mixing solutions are non-negotiable under current MoCRA and REACH safety standards. By the end of this article, you'll have a repeatable system for creating a custom 4-stage set that delivers predictable, high-contrast gradients every time. We'll break down the exact ratios, the equipment required for a clinical setup, and the biological factors that influence how your grey wash settles into the dermis.
Key Takeaways
- Master the relationship between pigment particle size and dermal suspension to achieve gradients that heal without patchiness or unwanted texture.
- Establish a medical-grade workstation using sterile mixing solutions and single-use disposables to uphold the highest standards of safety and professional integrity.
- Implement a precise, drop-based formula for how to make a grey wash set that ensures your light, medium, and dark tones remain identical from one session to the next.
- Identify why grey wash tones transition during the healing process and how to adjust your application to prevent the final result from appearing too light or overly saturated.
- Evaluate the practical trade-offs between custom DIY mixing and laboratory-prepared sets to find the most efficient solution for your specific artistic style and client volume.
The Science of Grey Wash: Understanding Pigment Dilution
Grey wash is a spectrum of carbon-based pigment densities rather than a specific color. It relies on the suspension of black particles in a carrier fluid. When you understand the physics of how tattoos work, you realize that the dermis acts as a biological filter. Smaller particles and lower densities allow the natural skin tone to radiate through the pigment, creating the illusion of grey. In Australia, artists must also consider AICIS (Australian Industrial Chemicals Introduction Scheme) standards to ensure their base pigments are compliant and safe for long-term dermal health. This regulatory framework ensures that the industrial chemicals used in pigments meet rigorous safety benchmarks before they ever touch a client's skin.
Choosing the right base is the first step in learning how to make a grey wash set. Many beginners reach for lining blacks because of their high pigment concentration. However, lining blacks often contain high concentrations of acrylic binders and large particle sizes designed to stay exactly where they are placed. When diluted, these heavy molecules can become "grainy" or heal with a textured, "peppered" look that ruins the look of soft realism. Shading blacks are typically formulated with a finer pigment grind and a more forgiving carrier, allowing for the buttery transitions and "smoke" effects required for professional-grade work. Using a shading black ensures that the suspension remains stable even at extreme dilution levels.
Pigment Density vs. Visual Gradient
Your wash will always appear darker in the ink cap than it does in the skin. This discrepancy occurs because of the Tyndall effect, where light scatters as it passes through the translucent layers of the epidermis. The carbon particles don't sit on the surface; they're suspended beneath a biological veil. This scattering shifts the perceived value of the pigment, making it look softer and cooler once healed. Mastering the science of dilution means anticipating this shift rather than reacting to it mid-session. A clinical understanding of how light interacts with these suspended particles allows you to build depth without over-saturating the tissue.
Base Inks: Selecting the Right Foundation
The chemistry of your tattoo ink foundation dictates the smoothness of the final gradient. Glycerin-based inks generally offer a more fluid, "wet" feel that is ideal for soft shading, while acrylic-heavy bases might dry faster and require more frequent dipping. You should also consider the undertone of your black. Some blacks lean toward a cool blue or purple base, while others are neutral or warm. Selecting a base that complements your client's skin undertone is essential when you decide how to make a grey wash set that looks natural and vibrant over time. High-quality, professional-grade inks ensure that these undertones remain consistent through the dilution process, providing a reliable foundation for every custom blend.
Sterile Setup: Essential Supplies for Mixing Grey Wash
Mixing a custom set requires more than just a clean table; it demands a controlled, clinical environment. Airborne pathogens and surface bacteria can easily compromise an open ink cap, leading to complications that occur long after the client leaves your chair. When you're learning how to make a grey wash set, your first priority is maintaining a medical-grade barrier between the environment and your pigments. Every surface must be disinfected with a hospital-grade solution and covered in barrier film to ensure a non-porous, sterile field. This methodical approach protects the physical integrity of your work and the health of your client.
One of the most dangerous mistakes an artist can make is using tap or even "filtered" water for dilution. Tap water contains minerals, chlorine, and potential microorganisms that can cause severe infections once introduced into the dermis. This risk is so significant that the FDA guidance on tattoo ink safety explicitly warns against the use of non-sterile water in ink manufacturing and mixing. Only use pharmaceutical-grade distilled water or professional mixing solutions to keep your set safe. Organizing your ink caps in a logical, linear sequence from darkest to lightest will also help you maintain a clean workflow and prevent accidental cross-contamination between different pigment densities.
The Professional Mixing Toolkit
Precision is the hallmark of a specialist. Using sterile medical supplies for tattoo artists, such as powder-free nitrile gloves and single-use eye droppers, prevents cross-contamination during the measurement phase. While some artists prefer the traditional "shaking" method, professional ink mixers provide a more homogenous suspension. This ensures the carbon particles are evenly distributed throughout the diluent, which is vital for achieving a smooth, predictable heal. Choosing high-quality tattoo cartridges can also help you maintain the purity of your washes by preventing backflow into your machine.
Dilution Solutions: Beyond Distilled Water
While distilled water is a standard base, many professionals prefer dedicated mixing solutions. These products often contain witch hazel for its astringent properties, which can help soothe the skin during long sessions, or vegetable glycerin to manage the "tackiness" and drying time of the ink. In Australia, any solution you introduce into the skin must be AICIS compliant. This ensures the chemical profile is approved for use in the local industry and meets modern safety standards. Using a compliant solution provides the peace of mind that your custom blends won't cause adverse reactions or compromise the long-term aesthetic of the tattoo. Mastering how to make a grey wash set starts with these high-end, laboratory-standard components.
Mixing Ratios: A Step-by-Step Guide to Custom Sets
Consistency is the bridge between a singular successful session and a legendary portfolio. When you master how to make a grey wash set, you aren't just mixing ink; you're creating a predictable roadmap for your shading. This mathematical approach eliminates the anxiety of eyeballing your ratios mid-session, a practice that often leads to patchy gradients. To ensure total repeatability, always use a master bottle of your chosen black and a consistent dropper. Variations in drop size from different bottles can lead to significant shifts in pigment density, which ultimately results in an uneven heal. By standardizing your mixing process, you protect the physical integrity of your work and provide your clients with a result that ages with grace.
Before you begin the tattooing process, testing your values on professional-grade paper is a critical clinical check. Swatching allows you to see how the pigment disperses and helps you identify if a specific cap needs a minor adjustment. Labeling your caps or placing them in a dedicated, numbered holder also prevents value confusion during long, fatiguing sessions. Under artificial studio lighting, a 50 percent wash and a 75 percent wash can look deceptively similar in the cap. Clear organization ensures that your hand always reaches for the correct density, maintaining the logical progression of your shading from deep shadows to ethereal highlights.
The Standard 4-Cap System
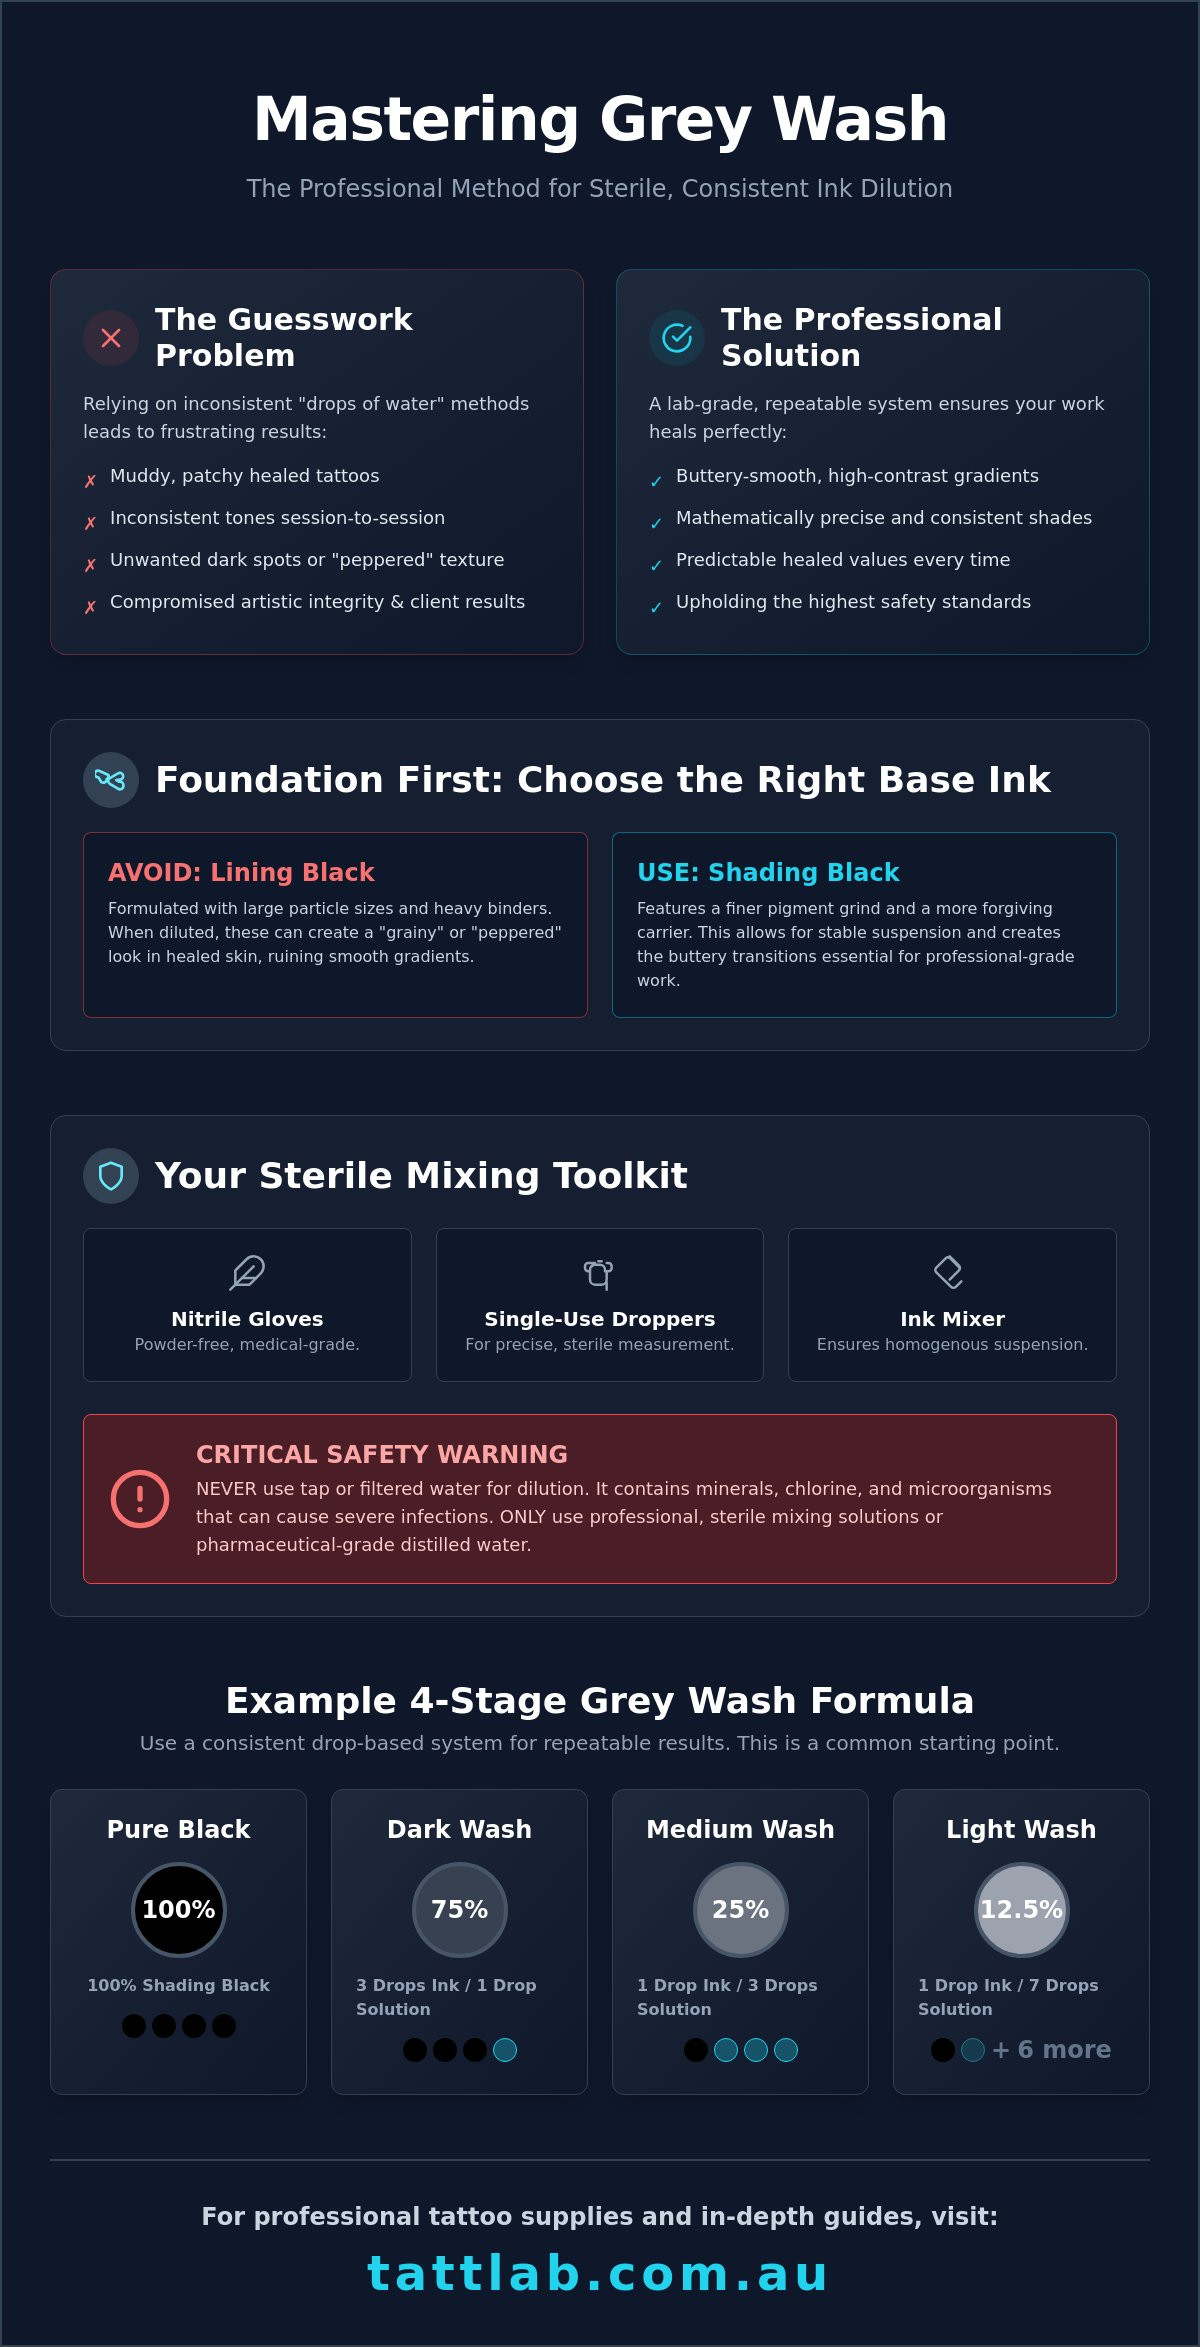
For most black and grey projects, a 4-cap system provides the necessary range for a professional finish. This setup allows for a clear distinction between core shadows and soft transitions. Follow these steps to establish your baseline:
- Step 1: Align four large, sterile ink caps on your prepared workstation.
- Step 2: Cap 1 (Dark): Fill with 75% ink and 25% diluent. This is your foundation for deep, high-contrast shadows.
- Step 3: Cap 2 (Medium): Use a 50/50 ratio of ink to diluent. This serves as your primary mid-tone for building volume.
- Step 4: Cap 3 (Light): Fill with 25% ink and 75% diluent. This cap is designed for soft edges and subtle depth within the lighter areas of the piece.
- Step 5: Cap 4 (Wash): Add only 1 to 3 drops of ink and fill the rest with diluent. These ghost tones are essential for the most delicate transitions into the natural skin tone.
Advanced 5-Cap and 7-Cap Variations
Realism specialists often expand this setup to a 7-cap system to achieve microscopic value shifts. These transitional caps bridge the gap between mid-tones and highlights, allowing for a level of detail that mimics the complexity of natural light. When you decide how to make a grey wash set for specific tools, consider your needle choice. Large magnums often deposit pigment more efficiently than round shaders, meaning you might need to lean toward lighter ratios to prevent over-saturation. Adjusting your set based on the needle's skin contact ensures that your softest washes remain smooth and transparent, even when covering large surface areas.
Troubleshooting Gradients: Consistency and Healing Factors
A fresh tattoo is a masterpiece in flux. The visual intensity you see immediately after the session is often deceptive, as the body's inflammatory response and increased blood flow create a temporary saturation. When you're refining how to make a grey wash set, you must account for the biological "settling" that occurs over the first 14 to 21 days. During this phase, the epidermis regenerates and the pigment particles find their permanent home within the dermis. This transition often causes light grey washes to appear significantly lighter than they did on the day of the procedure. Understanding this shift is vital for artists who want to avoid the common mistake of over-saturating light areas in an attempt to make them "pop" while the skin is still open.
The smoothness of your whip shading or soft gradients also depends heavily on the client's internal environment. Dehydrated skin behaves like a dry sponge; it absorbs pigment unevenly and can lead to "pepper shading" where the individual dots of ink are too visible. In Australia, ensuring your base and diluents are AICIS compliant is a critical step in predicting how the carbon will interact with the immune system's response. Compliant solutions contain stabilizers that prevent the pigment from clumping, ensuring a homogenous distribution even in the lightest "ghost" washes. Proper tattoo aftercare further protects these delicate tones by maintaining the skin's moisture barrier, preventing the "milky" or dull appearance that occurs when the skin becomes overly dry during the peeling phase.
Preventing Patchy Heals
Achieving a seamless transition requires a "wet-on-wet" approach, where you blend your values while the skin is still receptive and hydrated. Over-working a specific area with light washes is a common cause of scarring and muddy tones; once the skin reaches its saturation point, additional passes only cause trauma without depositing more pigment. Glycerin-heavy washes act as a lubricant, reducing friction and minimizing epidermal trauma during the shading process. This methodical care ensures that the physical integrity of the tissue remains intact, allowing the light to reflect off the healed pigment with maximum clarity. To ensure your tools are as precise as your pigment ratios, consider upgrading your setup with professional tattoo cartridges designed for smooth ink flow.
Consistency Across Sessions
For large-scale realism or multi-session pieces, your "shop bible" is an indispensable tool. Recording the exact ratios you used when learning how to make a grey wash set for a specific client ensures that the work you do in month three matches the work from month one. Environmental factors like studio temperature and humidity can subtly change the viscosity of your ink in the cap, making it feel "thicker" or "thinner" as the day progresses. Never "top up" your caps mid-session with undiluted ink or diluent without measuring. This practice destroys your established ratios and leads to inconsistent healing across different sections of the same tattoo. Maintaining this clinical discipline is what separates the trusted specialist from the hobbyist.
Professional Efficiency: DIY Mixing vs. Pre-Made Grey Wash Sets
Every artist eventually faces the decision between the laboratory-like precision of custom mixing and the standardized reliability of factory-produced sets. While learning how to make a grey wash set is a foundational skill that grants you total control over pigment density, the time-cost in a high-volume studio can be significant. Top-tier realism specialists often prefer custom mixes because it allows them to tailor the suspension to their specific hand speed and needle stroke. This bespoke approach ensures that the "signature" look of their work remains unique. However, the manual process requires a level of clinical discipline that can be difficult to maintain during a back-to-back booking schedule.
The alternative is the use of pre-made sets, which offer a "safety net" of absolute value consistency. These sets are engineered in controlled environments to ensure that the pigment-to-carrier ratio is identical in every bottle. For the artist, this means the mid-tone used on a client's shoulder today will perfectly match the mid-tone used on their forearm six months from now. Integrating both approaches into your professional workflow is often the most sophisticated solution. You might choose to mix custom washes for unique, single-session portraits while relying on standardized sets for large-scale Japanese or black and grey sleeves where long-term continuity is the priority.
When to Use Pre-Made Sets
Reliability is the primary benefit of pre-mixed sets from established brands like Panthera or Dynamic. These products arrive factory-sealed, which significantly reduces the risk of microbial contamination compared to open-cap mixing in a busy studio. When you use a pre-made set, you eliminate the minor human errors that occur when counting drops or measuring diluents. This level of standardization is particularly reassuring for clients who value a predictable, high-end result. It allows you to focus entirely on the artistic application rather than the underlying chemistry of the suspension.
Scaling Your Studio Supplies
As your practice grows, managing your inventory becomes as important as the work itself. Bulk purchasing high-quality black ink and sterile diluents is a cost-effective way to maintain your custom mixing station. It's essential to source these tattoo supplies from trusted Australian distributors who provide AICIS-compliant products. This ensures your studio stays aligned with modern safety protocols while maintaining a high performance standard. Our final recommendation for the evolving artist is to master how to make a grey wash set early in your career to develop your "eye" for values. Once you have a deep understanding of these gradients, transitioning to professional pre-made sets can streamline your production without compromising the aesthetic excellence of your portfolio.
Elevating Your Black and Grey Artistry
Mastering the technical nuances of pigment dilution is a transformative step for any dedicated artist. By moving away from guesswork and adopting a clinical approach to your ratios, you ensure that every gradient heals with the soft, predictable clarity your clients deserve. We've explored the biological factors of ink suspension and the vital importance of maintaining a sterile environment to protect both skin integrity and your professional reputation. Whether you're refining how to make a grey wash set for a custom portrait or scaling your studio's efficiency with pre-made solutions, your commitment to precision is what builds long-term trust and artistic authority.
As an artist-owned and operated specialist, we understand that your work requires the highest medical-grade safety standards. We provide the tools you need to maintain that rigor, from high-performance pigments to sterile mixing supplies. Explore our range of professional tattoo inks and mixing supplies and enjoy express nationwide shipping across Australia. Your journey toward flawless transitions starts with the right foundation; we're here to support your progression as you master the science of shading.
Frequently Asked Questions
Can I use tap water to make a grey wash?
No, you should never use tap water to dilute tattoo ink. Tap water contains minerals, chlorine, and potential microorganisms that can lead to severe dermal infections. When learning how to make a grey wash set, you must prioritize clinical safety by using only pharmaceutical-grade distilled water or professional-grade mixing solutions. This ensures your custom blends remain sterile and safe for the client's body.
Is it better to mix grey wash in a large bottle or individual caps?
Mixing in individual caps is the standard for single sessions; however, large-bottle sets offer superior consistency for multi-session projects. If you're working on a large-scale realism piece that requires months to complete, mixing a larger master set ensures the values remain identical across every sitting. For daily variety and small-scale work, mixing directly into caps allows for a more bespoke approach to each client's specific skin tone.
How many caps should be in a standard grey wash set?
A standard grey wash set typically consists of four caps ranging from a deep shadow to an ethereal ghost wash. This configuration provides enough tonal variety to cover the majority of black and grey shading requirements. While some realism specialists expand to a seven-cap system for ultra-fine transitions, the four-cap foundation remains the most efficient and repeatable system for professional studio environments.
What is the best black ink for making a grey wash?
The best black ink for dilution is a high-quality shading black with a fine carbon grind and a fluid carrier. Unlike lining blacks, which often contain heavy acrylic binders, shading blacks are engineered to disperse evenly when mixed with a diluent. This molecular structure allows you to achieve the buttery gradients and soft smoke effects that define professional-grade realism without the risk of a grainy or textured heal.
Does grey wash expire once it is mixed?
Yes, grey wash mixed in-cap must be discarded immediately after the session to prevent cross-contamination. If you're mixing larger quantities in sterile bottles, the shelf life depends on the diluent and the storage environment. Most professional mixing solutions contain stabilizers to extend longevity, but custom DIY blends using distilled water lack preservatives and should be used within a few days to maintain their chemical integrity and sterility.
Why does my grey wash look blue or purple after it heals?
A blue or purple heal typically occurs due to the undertones of the base black ink or the way light scatters through the skin. Some carbon pigments have a cooler bias that becomes more apparent once diluted. This effect is often amplified by the Tyndall effect, where light scattering through the epidermis shifts the perceived color. Choosing a neutral or warm-based black can help counteract this shift on cooler skin tones.
Can I use white ink to make a grey wash instead of diluting black?
You should use dilution to create a true grey wash rather than adding white ink to black. Mixing white and black creates an opaque grey that sits differently in the skin and lacks the transparent, layered quality of a traditional wash. True grey wash relies on the skin's natural tone to provide the light, whereas opaque greys cover the skin entirely, which can lead to a flatter, less vibrant result over time.
Is witch hazel safe to use as a diluent in Australia?
Witch hazel is safe and commonly used as a diluent in Australia, provided the product is AICIS compliant. Many artists value its astringent properties, which can help soothe the skin and reduce redness during long shading sessions. When you're determining how to make a grey wash set that meets local standards, always ensure your witch hazel is pharmaceutical grade and sourced from a reputable distributor to guarantee its purity and safety.

Comments (0)
There are no comments for this article. Be the first one to leave a message!