
Your new tattoo is a precision-engineered dermal wound that demands the same clinical rigor as a medical procedure. Learning how to wrap a new tattoo correctly is the most critical step in protecting your physical integrity and ensuring long-term ink retention. It's natural to feel a sense of vulnerability when you see plasma pooling under a film or worry about your skin bonding to your bedsheets overnight. This confusion often stems from the shift between traditional methods and modern dermal adhesives, leaving many clients uncertain about the best path forward.
We're here to replace that anxiety with a grounded, results-oriented protocol. This guide masters the clinical standards for wrapping to prevent microbial contamination while facilitating essential skin respiration. You'll learn the exact science behind moisture management, the precise timing for wrap removal, and how to transition into a professional aftercare routine using fragrance-free, gentle solutions. By following this methodical approach, you'll ensure your journey from the studio to a fully healed masterpiece is a controlled, predictable progression toward total self-assurance.
Key Takeaways
- Understand why a new tattoo is medically classified as a clinical wound and how a synthetic barrier preserves the body's natural biological integrity.
- Master the essential sanitization and application protocols for how to wrap a new tattoo correctly to prevent infection and ensure perfect ink retention.
- Learn to differentiate between short-term transit wraps and breathable dermal films to choose the most effective protection for your healing environment.
- Gain the confidence to manage the "ink sack" phenomenon and identify the precise biological markers for your first wrap change.
- Discover why professional-grade supplies are superior to household alternatives for maintaining the long-term aesthetic quality of your skin.
The Science of the Biological Barrier: Why Wrapping a New Tattoo is Essential
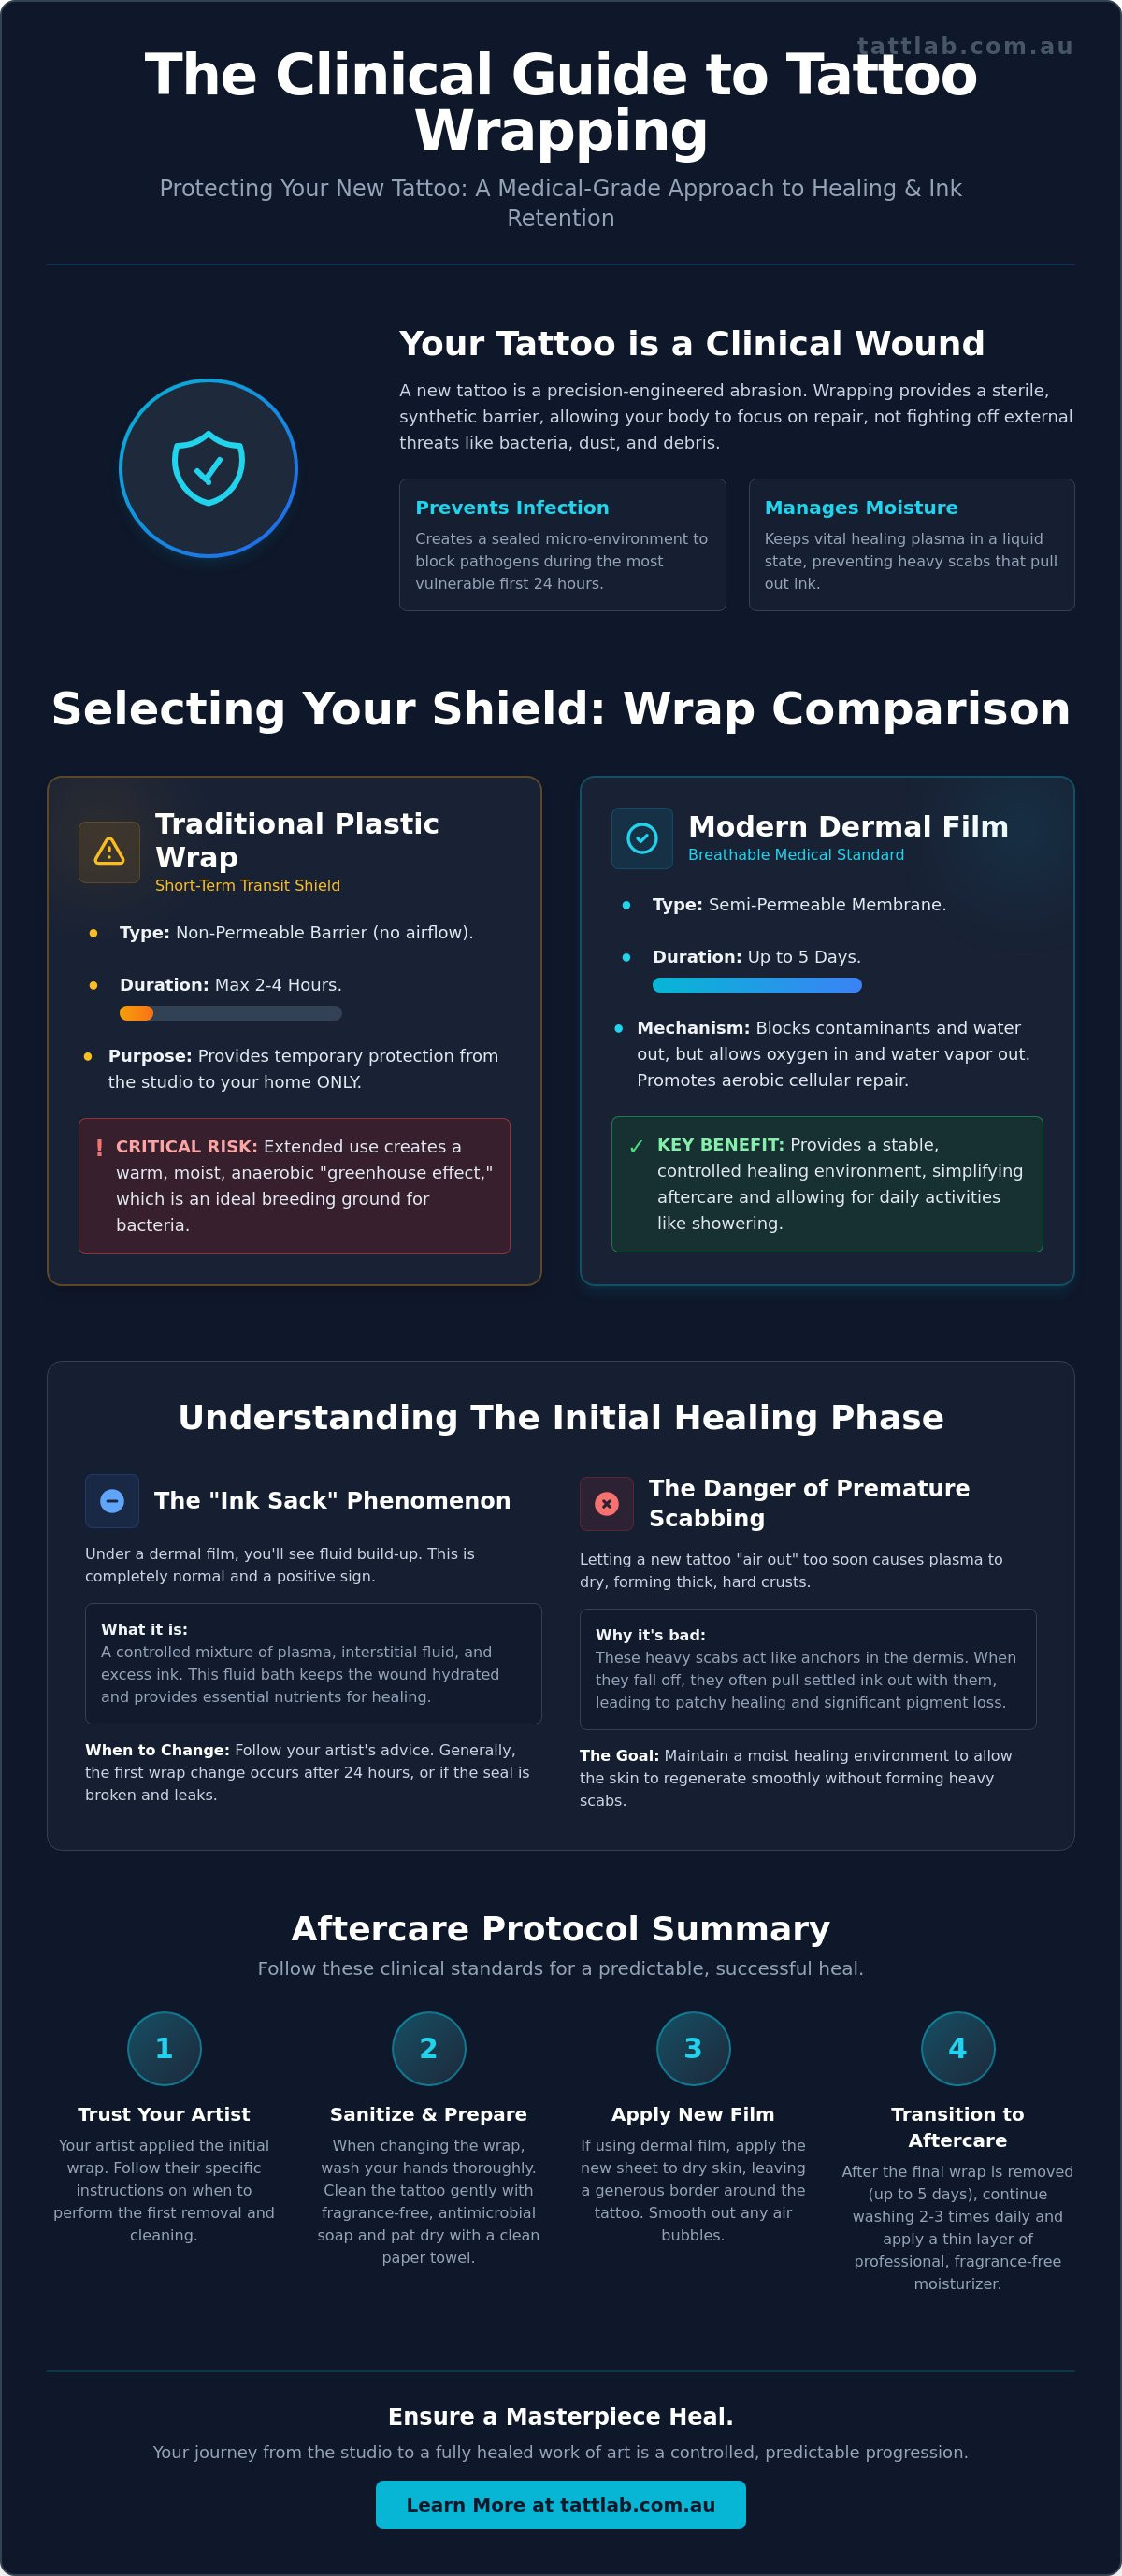
A tattoo is far more than a lifestyle choice; it's a medical event that results in a large scale abrasion across the skin's surface. During the tattooing process, needles penetrate the epidermis thousands of times to deposit pigment into the dermis. This creates an open wound that is temporarily incapable of performing its primary function: acting as a biological shield against the outside world. Understanding how to wrap a new tattoo correctly is the first step in restoring this barrier through synthetic means, ensuring your body can focus on repair rather than fighting off external threats.
The wrap functions as a sophisticated "second skin" that takes over while your natural defenses are compromised. It provides a controlled, sterile environment that prevents exogenous pathogens, environmental debris, and common household dust from entering the fresh wound. Beyond protection, the wrap is essential for managing the initial weeping phase. By containing the mixture of plasma, interstitial fluid, and excess ink, the barrier prevents these fluids from drying out on the surface. This containment is a vital part of modern tattoo aftercare methods, as it maintains the physical integrity of the site during its most vulnerable hours.
Protecting the Open Wound Environment
In the first 12 to 24 hours following your session, your skin is highly susceptible to airborne bacteria. A professional wrap creates a sealed micro environment that is optimized for cellular repair. Without this shield, the wound is exposed to microscopic contaminants that can lead to localized infections or inflammatory spikes. Many clients feel tempted to "air out" the tattoo immediately, but doing so too early causes the surface to dehydrate. This dehydration leads to premature, thick scabbing, which often results in uneven healing and significant ink loss. A steady, protected environment is what allows the skin to begin its narrative of transformation safely.
Managing Plasma and the Inflammatory Response
Plasma is a clear, protein rich fluid that plays a heroic role in your body's inflammatory response. It serves as the primary transport vehicle for white blood cells, which move to the tattoo site to begin the healing process and clear away debris. When you learn how to wrap a new tattoo correctly, you're essentially ensuring this plasma stays in a liquid state. If plasma is allowed to evaporate and dry, it hardens into a thick crust. These heavy scabs act like anchors; when they eventually flake off, they often pull settled pigment out with them. By maintaining a moist environment under a professional grade wrap, you ensure that the inflammatory phase remains productive rather than destructive, leading to vibrant, long lasting results.
Selecting Your Shield: Plastic Wrap vs. Dermal Film (Second Skin)
Choosing the right protection is a critical decision that influences the trajectory of your recovery. While the industry has evolved significantly, the methodology behind how to wrap a new tattoo correctly generally bifurcates into two distinct categories: traditional plastic wrap and modern dermal films. Each serves a specific purpose in the narrative of your skin's restoration. Your specialist's choice often depends on the biological demands of the piece, such as the level of pigment saturation or the anatomical location of the work. Understanding these tools allows you to participate actively in your own healing process with a sense of informed calm.
Traditional Plastic Wrap: The Short-Term Solution
Plastic wrap, often referred to as cling film, is a non-permeable barrier. Its primary function is to act as a temporary shield for the immediate transit from the studio to your home. Because plastic does not allow for any oxygen exchange, it is governed by a strict 2 to 4 hour rule. Keeping a tattoo sealed in non-breathable plastic for longer periods creates a localized greenhouse effect. This entrapment of body heat and stagnant fluid can trigger a bacterial bloom, where pathogens thrive in the warm, anaerobic environment. While effective for a short commute, it is not a viable long-term strategy for those seeking dermatologist-approved aftercare standards.
Modern Dermal Films: The Breathable Medical Standard
In contrast, medical grade dermal films represent a sophisticated leap in wound management technology. These are semi-permeable membranes. They are engineered to block external water and contaminants while remaining permeable to oxygen and water vapor. This gas exchange is vital because aerobic cellular regeneration requires oxygen to function efficiently. These films can safely remain in place for extended windows, sometimes up to five days, providing a consistent micro-environment that mirrors the body's natural state. This steady protection replaces uncertainty with a controlled, predictable progress toward a healed result.
The practicality of these films is a significant benefit for the modern client. They allow you to shower, wear your usual clothing, and move through your daily routine without the constant anxiety of an exposed wound. Because the adhesive is medical grade and the material is ultra thin, it moves with your body. This reduces the mechanical stress on the healing dermis. If you are preparing for your next session, securing professional tattoo aftercare supplies ensures you have the clinical tools necessary for a seamless recovery. Ultimately, the choice between these shields is a balance between immediate protection and sustained biological support.
Step-by-Step: How to Wrap a New Tattoo Correctly for Optimal Healing
The transition from the studio to your home environment is a critical phase where the physical integrity of your work is most at risk. Mastering how to wrap a new tattoo correctly requires a methodical commitment to sanitization and precision. The "Golden Rule" of aftercare is absolute: never apply a secondary wrap to a surface that hasn't been meticulously cleaned and dried. Trapping moisture or bacteria beneath a seal is a primary cause of complications. To mitigate tattoo risks and precautions, you must treat the application area as a sterile field, ensuring your hands and the surrounding skin are free from contaminants before proceeding.
A professional wrap should extend at least 2 to 3cm beyond the edges of the tattooed area. This margin isn't just for security; it ensures the adhesive or tape bonds with healthy, undisturbed skin rather than the sensitized wound itself. This creates a robust perimeter that prevents the edges from lifting during movement, maintaining the vacuum like seal necessary for aerobic repair. Whether you're using a traditional non-adhesive barrier or a modern film, the logic remains the same: total isolation of the wound from the external environment.
Preparation: Sanitization and Skin Calming
Begin by washing the area with a pH balanced, fragrance free cleanser to gently lift away surface plasma and residual ink. Avoid the temptation to use a washcloth; your clean fingertips are the only tools required. When it comes to drying, the "Air Dry" method is superior to patting. Even a clean paper towel can leave microscopic fibers behind. Ensure the skin is completely matte and devoid of moisture before the wrap is applied. If you're using an adhesive dermal film, do not apply ointments or lotions first. These products will compromise the medical grade bond, causing the film to slide and potentially allowing bacteria to seep in under the edges.
Application Techniques for Dermal Film
Applying a dermal film is a high precision task that benefits from a steady hand. Carefully peel the paper backing to expose the sterile adhesive, taking care not to touch the side that will contact your skin. Position the film over the center of the tattoo and smooth it outward. This movement eliminates air bubbles and prevents tension that could pull on the skin. Once the film is anchored, remove the top carrier layer. It's helpful to keep the skin slightly taut during this final step to ensure a flush, second skin finish. This methodical approach ensures you know how to wrap a new tattoo correctly, replacing uncertainty with a controlled, professional result that respects the biological needs of your new ink.
The Critical First 48 Hours: Managing Your Wrap and Monitoring Progress
The initial 48 hours following your session represent the peak inflammatory phase of dermal recovery. During this window, your body is working at its highest capacity to seal the wound and stabilize the newly deposited pigment. One of the most common sources of anxiety for clients is the appearance of the "ink sack." This is a dark, murky accumulation of fluid trapped beneath the film. While it may look concerning, this fluid is a concentrated reservoir of plasma and white blood cells essential for healing. Understanding how to wrap a new tattoo correctly involves recognizing that this buildup is a sign of a healthy biological response, provided the seal remains intact.
Monitoring the integrity of your wrap is a continuous process. A secure seal maintains a sterile, anaerobic environment that facilitates rapid repair. However, if the fluid reaches the edge of the film and begins to leak, the clinical protection is compromised. A leak is a two way street; if fluid can escape, environmental pathogens can enter. In the event of a breach, the wrap must be removed immediately to prevent the risk of infection. Maintaining a proactive stance during these first two days ensures your journey toward a healed masterpiece remains on a predictable, safe trajectory.
When to Remove, Clean, and Re-wrap
Most specialists recommend a primary wrap change within the first 24 hours. This initial period usually sees the heaviest fluid production. Once the "ink sack" becomes excessive or the adhesive begins to lose its grip due to the volume of plasma, it's time for a refresh. To remove the film safely, do so under a warm shower. The heat and moisture help to loosen the medical grade adhesive, allowing you to gently peel the film back without causing mechanical trauma to the sensitized skin. After a thorough, gentle cleaning and complete air drying, you can apply a second wrap. This subsequent application can often remain in place for 5 to 7 days, providing the long term stability required for deep tissue regeneration.
Troubleshooting: Leaks, Bubbles, and Skin Irritation
Precision in aftercare means knowing how to distinguish between normal healing and clinical issues. Small air bubbles under the film are generally harmless, but any break in the perimeter seal requires immediate action. If you notice redness that follows the exact outline of the adhesive rather than the tattoo itself, you may be experiencing a localized reaction to the medical glue. This is distinct from the "healing itch," which is a standard part of the inflammatory process. If the skin feels excessively hot or the swelling extends significantly beyond the tattooed area, consult your specialist. For those committed to a professional recovery, investing in high quality tattoo aftercare supplies is the best way to ensure you have the tools to manage these critical first 48 hours with confidence.
Professional Integrity: Elevating Your Aftercare with Artist-Vetted Supplies
The final stage of physical restoration relies on the quality of the materials you introduce to your skin. While household cling wrap is a common makeshift solution, it remains a sub-optimal choice for anyone serious about skin recovery. Food-grade plastics are designed for preservation, not respiration. They lack the hypoallergenic properties and medical-grade certifications found in specialized dermal films. Mastering how to wrap a new tattoo correctly involves more than just technique; it requires a commitment to using tools engineered for human biology. High-quality materials significantly reduce the risk of pigment "fall out," ensuring the precise lines and gradients created during your session remain intact without the need for premature touch-ups.
By choosing professional-grade barriers, you're investing in the longevity of your transformation. These supplies are designed to mirror the skin's natural elasticity, moving with your body rather than pulling against it. This mechanical harmony is essential for preventing micro-tears in the healing dermis. When you understand how to wrap a new tattoo correctly using artist-vetted supplies, you transition from a passive observer to a dedicated partner in your own healing narrative.
Why Studio-Grade Materials Outperform Alternatives
The primary difference between generic alternatives and professional films lies in the adhesive chemistry. Clinical medical supplies for tattoo artists are engineered to be breathable and hypoallergenic, minimizing the risk of contact dermatitis. These films allow for a steady, controlled exchange of oxygen that is vital for aerobic repair. It is equally important to ensure your aftercare kit includes cleansers that are chemically compatible with modern tattoo ink. Harsh, generic soaps can strip the skin of essential lipids, whereas professional solutions support the skin's microbiome during its most vulnerable state.
Final Steps: Transitioning to Topical Care
Once the final wrap phase concludes, typically after five to seven days, your skin enters the hydration phase. At this point, the surface may appear dry or begin to flake. This is a normal sign of progression. Avoid the temptation to use generic petroleum-based ointments, which can clog pores and trap heat. Instead, select a specialist balm from a range of professional tattoo supplies designed for deep tissue hydration. These balms provide a breathable lipid barrier that maintains vibrance while soothing the "healing itch." Transitioning to a dedicated tattoo aftercare routine ensures that your recovery is never rushed, replacing the uncertainty of quick fixes with a sense of meticulous, long-term care.
Elevating Your Healing Standards for Lasting Results
You've moved through the critical stages of aftercare, from understanding the biological necessity of a barrier to mastering the precision of application. Knowing how to wrap a new tattoo correctly is more than a technical skill; it's a fundamental commitment to your body's recovery and the preservation of your artistic investment. By prioritizing clinical standards over household convenience, you ensure that every line and shade heals with the clarity and vibrance intended during your session. This methodical approach replaces the anxiety of the unknown with a controlled, predictable progression toward total skin health.
Maintaining this level of physical integrity requires tools that match the precision of the work itself. Tatt Lab is an artist-owned and operated facility dedicated to providing clinical-grade medical supplies that support your skin's narrative of transformation. We offer express nationwide shipping across Australia to ensure your recovery is never compromised by a lack of professional resources. Secure your professional-grade aftercare supplies at Tatt Lab and transition into your healing journey with the confidence of a specialist. Your skin deserves a result that reflects the care you put into its protection.
Frequently Asked Questions
Can I shower with my tattoo wrap on?
Yes, you can shower with a medical-grade dermal film, as these membranes are engineered to be waterproof and resilient. You should avoid submerging the area in baths, pools, or salt water, as prolonged saturation can compromise the adhesive edges. If you are using traditional plastic wrap, it's best to wait until the wrap is removed before showering. Always ensure the water temperature is lukewarm to prevent irritating the sensitized dermal tissue underneath.
What should I do if my dermal film starts leaking fluid?
You must remove the wrap immediately if the seal is breached and fluid begins to leak out. A leak creates a two-way pathway where internal fluids escape and external pathogens can enter the sterile environment. Once the seal is broken, the wrap is no longer performing its clinical function of protection. Clean the tattoo thoroughly with a pH-balanced cleanser and follow your specialist's protocol for applying a fresh barrier or transitioning to topical care.
Is it normal for my tattoo wrap to look like it's filled with black liquid?
Yes, a dark accumulation of fluid is a normal and healthy part of the initial inflammatory phase. This "ink sack" is a concentrated mixture of plasma, interstitial fluid, and excess pigment that your body expels during the first 48 hours. This fluid is rich in white blood cells that facilitate cellular repair and keep the wound moist. As long as the seal remains intact, this liquid environment prevents the wound from drying and forming damaging scabs.
How long should I keep the original wrap on after leaving the studio?
The duration for the initial wrap depends entirely on the material used by your artist. If your specialist applied traditional plastic wrap, it should be removed within 2 to 4 hours to prevent heat entrapment and bacterial growth. For those using adhesive dermal films, the first wrap is typically left on for 24 hours. Learning how to wrap a new tattoo correctly during this first change ensures the wound remains protected as fluid production begins to stabilize.
Can I re-wrap my tattoo with Saran wrap at home if the first one falls off?
You should avoid using household Saran wrap as a long-term aftercare solution at home. Cling film is non-permeable and traps body heat, which can encourage a bacterial bloom in the wound environment. If your professional wrap falls off prematurely, it's safer to clean the tattoo and leave it uncovered or apply a new medical-grade film. Professional integrity relies on using supplies designed for wound management rather than food preservation to ensure a predictable recovery.
Why is my skin red or itchy around the edges of the adhesive wrap?
Redness or itching around the perimeter often indicates a localized sensitivity to the medical glue or simple skin tension. If the irritation is strictly limited to where the adhesive meets the skin, it is likely a minor contact reaction rather than an infection. However, if the redness spreads or the area feels excessively hot, you should consult your specialist. Ensuring you know how to wrap a new tattoo correctly without over-stretching the film can help reduce this mechanical stress.
How do I remove the adhesive film without it hurting or pulling out ink?
The most effective way to remove adhesive film is under a stream of warm, running water to soften the medical-grade bond. Instead of pulling the film upward like a traditional bandage, try stretching it horizontally away from the center of the tattoo. This "stretch and release" technique breaks the bond with the skin gently. It ensures you don't cause unnecessary trauma to the fresh ink or the delicate healing epidermis during the removal process.
What happens if I leave the wrap on for too long?
Leaving a dermal film on beyond the recommended 5 to 7 days can lead to skin maceration or irritation from trapped sweat and dead cells. While these films are breathable, they aren't designed for indefinite use. Overstaying the wrap phase can make the adhesive more difficult to remove, potentially causing mechanical damage to the new skin. Transitioning to a high-quality hydration routine at the correct time is essential for maintaining the long-term vibrance and integrity of your work.


Comments (0)
There are no comments for this article. Be the first one to leave a message!