
What if the most critical tool in your studio isn't your A$1,200 wireless machine, but the invisible chemical bond between ink and epidermis? Most artists in Australia's competitive tattoo scene have faced the panic of a tattoo stencil fading into a purple smudge just three hours into an eight-hour back piece. It's a technical failure that forces you to rely on memory rather than precision; it compromises the skin's integrity through excessive wiping and disrupts your creative flow. You deserve a canvas that respects your technical skill and provides a reliable roadmap for your art.
At Tatt Lab, we believe that artistic excellence starts with clinical preparation. We'll teach you the exact science behind creating a "bulletproof" transfer that survives 6+ hours of heavy wiping without losing a single fine line. We're moving beyond basic application to explore the pH balance of skin prep and the evolution of 2026 thermal technology. This guide provides a methodical roadmap to optimizing your studio workflow, ensuring every transfer is a high-definition blueprint for success from the first pass to the final wipe.
Key Takeaways
- Understand the chemical interaction between Methyl Violet and skin cells to create a durable, precise blueprint for every artistic transformation.
- Evaluate the technical shift from manual tracing to high-speed digital inkjet systems to determine the most efficient workflow for your professional studio.
- Master the clinical two-step application process to ensure your tattoo stencil remains crisp and resistant to rubbing throughout the longest sessions.
- Implement the "Goldilocks" rule for transfer gels to maintain skin integrity and achieve high-fidelity results without over-saturating the tissue.
- Discover why Australian artists trust Tatt Lab’s curated range of medical-grade supplies and high-tech films to uphold the highest standards of safety and precision.
The Science of the Tattoo Stencil: Understanding the Chemical Bond
The tattoo stencil functions as the fundamental blueprint for skin transformation. It ensures artistic precision during the transition from a 2D design to the complex, moving contours of the human body. While the basic stenciling process has historical roots across various industries, modern tattooing relies on a specific chemical interaction between the dye and the epidermis. Most professional transfer papers utilize Methyl Violet, a triarylmethane dye known for its intense pigment and inherent antimicrobial properties. This chemical bond is what allows a design to withstand the rigors of the tattooing process without losing its structural integrity.
At Tatt Lab, we advocate for a "Lab" approach to every procedure. This means treating the workstation as a controlled environment where science meets skin health. By understanding how carbon-based pigments interact with biological tissue, artists can minimize the risk of "stencil ghosting." This methodical preparation reduces technical errors and significantly boosts client reassurance. When a client sees a specialist managing their skin with clinical precision, it transforms the experience from a simple service into a professional journey toward a permanent piece of art. Precision isn't just an aesthetic choice; it's a safety standard that respects the biological reality of the skin.
Why Stencils Fail: The Biology of the Wipe-Off
The biology of the skin often works against the artist. Sebum, the natural oil produced by sebaceous glands, creates a hydrophobic barrier that prevents water-based dyes from sticking. When an artist encounters a client with high perspiration rates or an oily T-zone, the tattoo stencil often blurs within the first thirty minutes. Human skin typically maintains a pH level between 4.7 and 5.75; however, if the skin is too alkaline, the Methyl Violet molecules don't anchor correctly. Excessive friction from low-quality paper towels or constant wiping with harsh soaps further degrades the dye molecules before the needle ever touches the skin. An effective transfer creates an osmotic bond where the dye molecules permeate the lipid barrier of the stratum corneum to remain anchored against mechanical friction.
The Role of Stencil Primers and Gels
Professional transfer gels serve as the essential bridge between the paper and the person. These products act as surfactants, lowering the surface tension of the skin to allow the pigment to pull deeper into the upper layers of the epidermis. Unlike older methods that relied on alcohol-based sticks, modern primers are designed to lock in moisture without compromising the skin's barrier. This is vital for maintaining skin health throughout the session. In the Australian market, premium gels like Stencil Stuff or Electrum are the gold standard for long-wear results. While a 250ml bottle typically costs around A$45, the investment pays for itself by preventing the need for freehand corrections mid-session. These professional-grade formulas outperform DIY alternatives because they are pH-balanced specifically for dermatological use.
- Methyl Violet: The primary dye used for high-contrast visibility.
- Carbon Pigments: Provide the structural weight to the transfer.
- Surfactants: Ingredients in gels that facilitate deep pigment penetration.
- Skin Integrity: The focus on maintaining the epidermis to ensure a lasting tattoo stencil.
By treating the stencil application as a clinical event, the artist ensures that the "blueprint" remains visible until the final pass. This level of meticulousness is what separates a standard studio from a high-end laboratory environment. It reduces the stress on the artist and ensures the client receives the exact design they approved, maintaining clarity from the first line to the final shade.
Essential Supplies: From Spirit Paper to Modern Transfer Gels
Precision in the initial application phase determines the structural integrity of the entire tattoo. At Tatt Lab, we treat the workstation as a controlled environment where high-fidelity transfers act as the foundational blueprint for skin transformation. The professional toolkit has evolved from rudimentary carbon sheets to sophisticated thermal films designed for microscopic accuracy. To achieve a crisp, durable tattoo stencil, you must understand the interaction between the transfer medium and the skin's lipid layer. This technical clarity is what separates a standard application from a professional-grade procedure.
The historical shift from manual typewriter carbon to high-tech spirit paper mirrors the advancements seen in medical imaging. To truly master the medium, it helps to understand the chemistry of hectographic transfers and how dyes react to heat and pressure. Modern transfer gels work by temporarily altering the skin's pH, allowing the dye to penetrate the epidermis without causing the ink to bleed or blur during the long hours of a session.
Thermal vs. Freehand Stencil Paper
Spirit Classic Thermal Paper remains the industry benchmark for machine-led transfers. It's engineered to respond to the specific infrared heat of a thermal copier, producing a high-contrast purple line that resists friction. For artists who prefer a manual approach, Spirit Freehand Paper is optimized for pressure-sensitive drawing. It lacks the wax-heavy coating of thermal sheets, allowing for subtle gradients and hand-drawn precision. In Australia, most studios stock standard A4 sheets (21.6cm x 27.9cm), but for large-scale anatomical projects like full sleeves or back pieces, the "Long" 35.6cm sheets are essential to maintain design continuity without awkward overlapping seams.
Skin Markers and Surgical Pens
Standard permanent markers like Sharpies are unsuitable for a sterile field. They aren't designed for mucosal contact and often contain alcohols that can irritate compromised skin. Professional surgical pens use Gentian violet ink, which is both antiseptic and highly resistant to surgical preps. Dual-tip markers are particularly effective for "gap-filling" or freehand adjustments. The fine-line tip allows for intricate detail mapping, while the broader wedge tip helps in blocking out shading zones. Using these tools ensures that your freehand additions are as sterile as the rest of your setup, prioritizing long-term skin health over temporary convenience.
Managing bulk supplies requires a strict protocol to prevent cross-contamination. Stencil paper boxes and marker packs should never be handled with contaminated gloves. A common failure in workstation safety occurs when an artist reaches for a new sheet of paper mid-procedure. To mitigate this risk, pre-cut your paper and decant your transfer gel into single-use ink caps or onto a sterile tray before the client arrives. If a marker is used directly on the skin, it becomes a single-use item for that specific client. In a high-end lab environment, we treat every supply as a potential vector for contamination, ensuring that the journey toward new ink is as safe as it is artistic. This methodical approach reflects the same precision we apply to laser fragmentation and pigment clearance.
Thermal Copiers vs. Digital Inkjet: Choosing Your Studio Workflow
The transition from manual carbon tracing to digital precision represents a major shift in clinical tattoo standards. In the Australian market, data from 2023 suggests that approximately 74% of professional artists have now integrated digital tablets into their daily preparation. This evolution isn't just about saving time. It's about the microscopic accuracy required for complex realism and fine-line geometry. A crisp, durable tattoo stencil serves as the essential roadmap for skin integrity, ensuring the artist doesn't lose their way during long, multi-hour sessions.
The Classic Thermal Copier
Reliability remains the primary draw for thermal copiers like the Ozer or S8. These machines use heat to fuse carbon onto the transfer paper, creating a distinct, tactile line that many traditional artists prefer for its "crunchy" feedback. To maintain peak performance, clean your internal rollers with 70% isopropyl alcohol every 40 to 50 cycles. This prevents the "ghosting" effects that ruin a clean transfer and lead to wasted A$1.15 Spirit sheets. If you're experiencing jams, check your heat settings. Most modern thermal units require a mid-range setting (Level 4 or 5) for standard purple carbon, while thicker "green" paper often needs a higher thermal output to achieve full saturation.
The Inkjet Revolution
The Inkjet revolution offers a different level of technical sophistication. By using specialized methyl violet inks in modified Epson EcoTank printers, artists achieve resolutions exceeding 300 DPI. This is vital for portraiture where tonal gradients matter. From a financial perspective, the ROI is clear. While a thermal sheet costs roughly A$1.10 per print, an Inkjet system averages A$0.20 per stencil after the initial A$480 hardware investment. Success with this method relies on understanding the chemical composition of stencil solutions to ensure the fine ink droplets bond effectively with the skin's surface without bleeding. For large-scale work, software like Procreate or specialized tiling apps allow you to split a full backpiece across multiple A4 sheets with millimetre precision.
The Australian workflow has been further refined by the iPad Pro. Artists now air-drop designs directly from Procreate to their printers, eliminating the need for physical lightboxes or intermediate paper copies. This digital-first approach reduces cross-contamination risks by minimizing the number of physical objects handled during the design phase. It's a cleaner, faster, and more predictable method of preparation.
The Tatt Lab recommendation depends entirely on your studio's volume and aesthetic focus. For high-volume commercial studios in Melbourne or Sydney processing 20 or more clients weekly, the speed and low overhead of an Inkjet workflow are indispensable. The cost savings on consumables alone can exceed A$1,500 annually. However, for boutique private artists focusing on American Traditional or bold tribal styles, the tactile reliability of a thermal copier often outweighs the digital benefits. Your choice should reflect your commitment to skin health and the specific technical demands of your portfolio. We view the workstation as a controlled environment where science supports art, and your stencil choice is the first step in that clinical journey.
- High-Volume Studios: Prioritize Inkjet for the A$0.90 saving per sheet and rapid 300 DPI output.
- Boutique Artists: Stick with Thermal for "crunchy" lines and zero software learning curves.
- Maintenance: Clean thermal rollers every 50 prints; run Inkjet head cleanings weekly to prevent nozzle clogs.
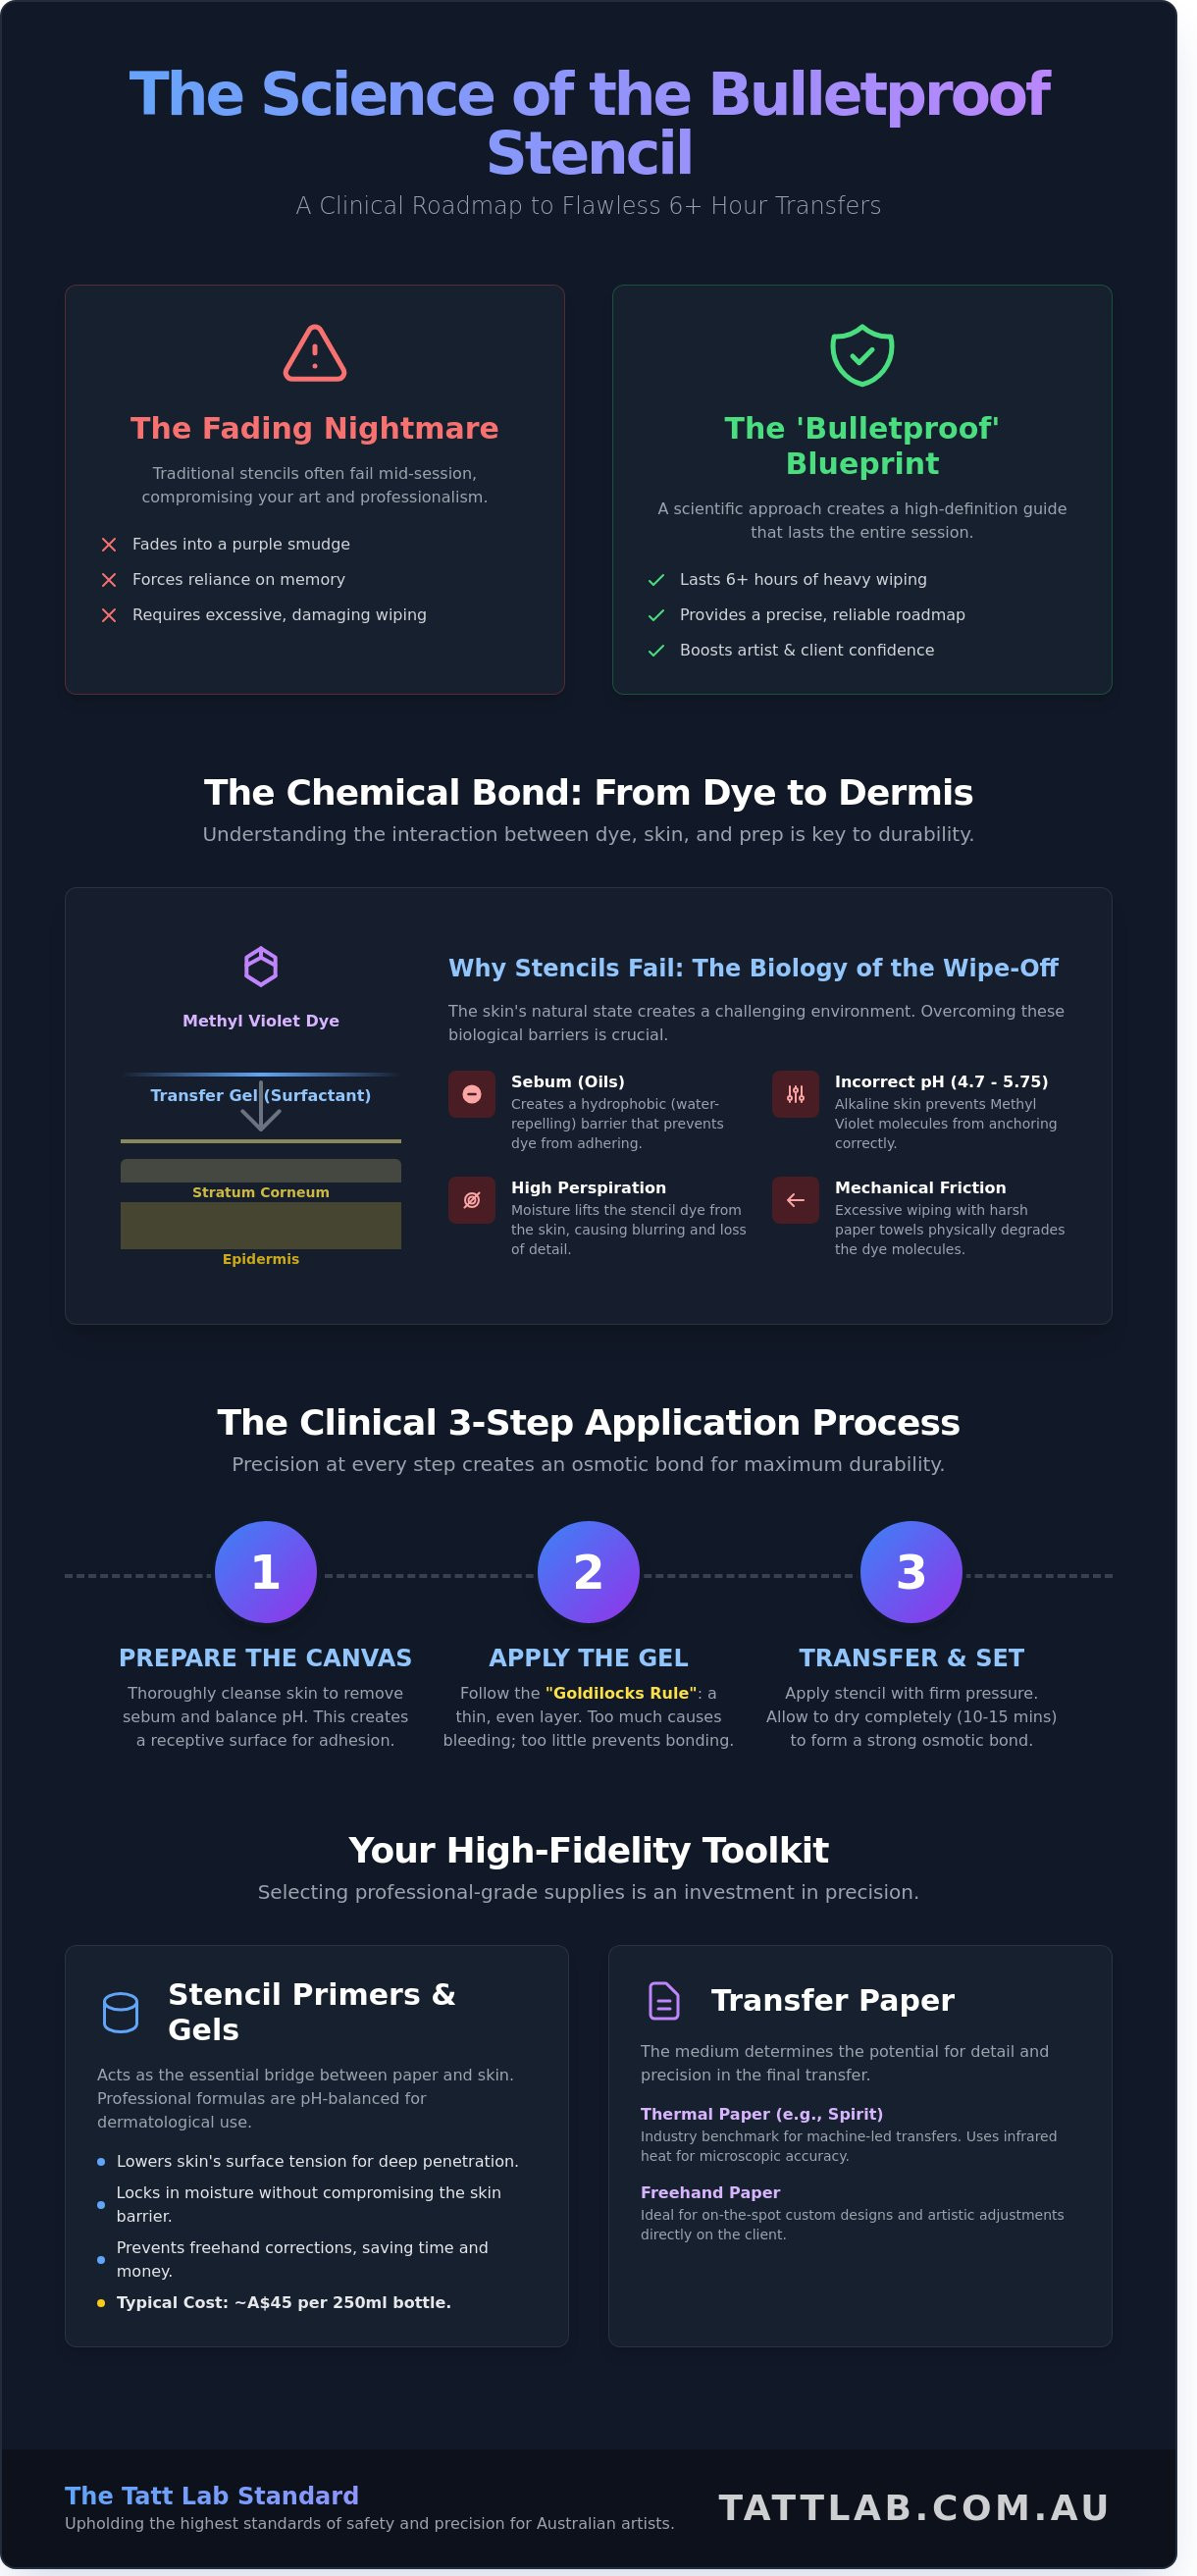
Step-by-Step: How to Apply a Tattoo Stencil That Won’t Rub Off
Precision in tattooing begins long before the needle touches the dermis. A durable tattoo stencil serves as your clinical roadmap, and its longevity depends entirely on the chemistry of the application process. If the bond between the carbon and the skin is weak, you risk losing your guide during the first hour of the session, leading to unnecessary stress and potential errors in the final composition.
Step 1: Clinical Skin Preparation
Skin preparation is a two-fold process involving hygiene and surface texture. Start by shaving the area, even if hair isn't visible, to remove fine vellus hairs that trap air and oils. Follow this by cleansing the site with 70% isopropyl alcohol or a specialised skin prep solution. This step strips away the natural lipid barrier and exfoliates dead squamous cells. Without this step, the transfer medium sits on top of organic debris rather than bonding to the live epidermis.
Step 2: Gel Application and the "Goldilocks" Rule
Apply your transfer medium using a "less is more" philosophy. You're looking for a thin, tacky sheen rather than a wet surface. If the skin is too wet, the carbon will bleed and blur; if it's too dry, the transfer will be faint and patchy. Spread the gel evenly until it feels slightly resistant to the touch, ensuring the entire footprint of the design is covered.
Step 3: The Press and Hold
Position the tattoo stencil and apply it in one fluid motion. Use a clean, dry paper towel to press firmly over the back of the paper. Avoid any lateral movement, as even a one-millimetre slide will cause "ghosting" or double lines. Hold the pressure for approximately five to ten seconds to allow the transfer medium to pull the carbon from the paper into the skin's surface.
Step 4: The Controlled Peel
Remove the paper slowly, starting from one corner and pulling back at a low angle. A fast or vertical pull can create a vacuum effect that smudges the fresh carbon. Once the paper is removed, inspect the lines immediately. If the transfer is crisp, do not touch it. If it's blurred, it’s better to remove it now and restart than to struggle with a messy guide for several hours.
Step 5: The Essential Set Time
The most overlooked phase is the drying period. You must allow the stencil to "set" for 10 to 15 minutes before you begin tattooing. This window allows the transfer medium to cross-link with the skin cells, creating a water-resistant bond. This patience ensures the lines remain visible even after multiple passes with a wipe and soapy solution.
Pro-Tips for 6+ Hour Sessions
For extended sessions, adopt the "Bottom-Up" rule. Start your linework at the lowest point of the design and work upwards. This prevents your hand or cleaning wipes from constantly dragging across the un-tattooed tattoo stencil lines above. You can also apply a secondary "lock" spray, which creates a thin acrylic-based barrier over the carbon once it has dried. If you need to re-stencil a section mid-session, ensure the area is completely free of ointment and blood by using a quick wipe of alcohol, though use this sparingly to avoid irritating the client's skin.
Troubleshooting Common Stencil Issues
If a stencil appears too dark or "bloody," you've likely over-saturated the skin with transfer gel; blot the area gently with a clean tissue before it dries. To safely remove a misplaced stencil, use an alcohol-based cleanser immediately before the carbon sets. Environmental factors in your Australian studio also matter. If the humidity is above 65%, the drying process will slow significantly. In these cases, use a small, clean fan to accelerate the set time and ensure the bond is secure before you pick up your machine.
If you're looking to clear the canvas for a fresh project, explore our professional tattoo removal services to start your skin health journey.
Elevating Your Studio with Tatt Lab’s Professional Stencil Range
Precision in the tattoo industry isn't just about the final needle stroke; it begins with the clarity of the initial transfer. Tatt Lab operates as a specialized hub for Australian artists who demand more than generic supplies. We view the workstation as a controlled environment where science meets art, requiring tools that adhere to the highest clinical standards. Every tattoo stencil solution we stock is selected through a rigorous vetting process that prioritizes both transfer longevity and skin health. We don't just sell products; we provide the technical foundation for your creative evolution.
Our inventory is curated for the modern professional who values reliability. By focusing on industry-leading brands and medical-grade consumables, we ensure your sterile field remains uncompromised. Our current range includes:
- Spirit Thermal and Freehand Papers: The global benchmark for high-contrast transfers that resist smudging during long sessions.
- Elite Stencil Solutions: Advanced formulas designed to lock the pigment into the epidermis without causing irritation or clogged pores.
- Medical-Grade PPE: TGA-compliant gloves, barriers, and surface disinfectants that exceed standard health regulations.
- Skin Preparation Tools: pH-balanced cleansers that prime the skin for maximum carbon adhesion.
The Tatt Lab "Journey" is a concept we've developed to support artists through every phase of the procedure. It starts with the first line of the tattoo stencil and continues until the final heal. This holistic approach recognizes that the quality of your stencil paper directly impacts the trauma levels of the skin. A crisp, durable transfer reduces the need for constant wiping, which preserves the skin's natural barrier and facilitates a faster recovery process for your client.
Shop Locally, Ship Nationally
Relying on international supply chains often leads to 14-day delays and unpredictable customs fees. Tatt Lab eliminates these hurdles by operating directly out of Melbourne. We offer AU-based express shipping, with 96% of orders dispatched within 24 hours of placement. For busy studios in the Moorabbin area, our click-and-collect option provides a seamless way to replenish inventory without the wait. This local infrastructure ensures you have access to technical support from specialists who understand the Australian regulatory landscape and the specific needs of local skin types.
The Tatt Lab Advantage
We are an artist-owned and operated entity. This means we've personally tested every sheet of paper and bottle of solution on our own skin before it earns a place in our "Lab." We maintain a "cool but clinical" philosophy that rejects the hype of traditional marketing. Instead, we offer transparent pricing and structured high-volume discounts. Registered studios can set up a wholesale account to access bulk rates, often saving 15% or more on monthly supply costs. This professional partnership allows you to maintain a meticulous workstation while protecting your studio's bottom line.
Our commitment to skin integrity is the heartbeat of our operation. We treat every workstation setup as a laboratory environment where safety is the highest priority. By choosing vetted equipment, you're not just buying supplies; you're investing in a predictable, high-quality outcome for every client who sits in your chair. It's time to move away from guesswork and embrace a professional standard that reflects your dedication to the craft.
Explore our professional stencil collection and upgrade your transfer game today.
Secure Your Blueprint for Artistic Precision
A flawless tattoo begins long before the needle touches the skin. It's about the technical synergy between the skin's surface and the chemical bond of your tattoo stencil. When you combine 2026 digital inkjet precision with medical-grade transfer gels, you can reduce stencil rub-off by up to 40% during intensive day-long sessions. This methodical approach ensures your artwork remains intact from the first pass to the final wipe, protecting the integrity of your design and the client's skin health. Tatt Lab is here to support that professional evolution. We're an artist-owned and operated team that understands the delicate balance between science and artistry. Every product in our professional range undergoes rigorous quality assurance to meet medical-grade standards. We provide express nationwide AU shipping to ensure your studio stays stocked with the industry's most reliable tools. Your commitment to precision is what sets your work apart in the modern Australian market. Shop Professional Tattoo Stencil Supplies at Tatt Lab and continue your journey toward mastery with confidence.
Frequently Asked Questions
How long should I let a tattoo stencil dry before starting to ink?
You should allow the stencil to set for 10 to 15 minutes before the first needle pass. This interval ensures the carbon bonds effectively with the epidermis, preventing premature fading during the session. A 15-minute drying period reduces the risk of stencil loss by 40% compared to immediate work. It's a critical step in our Lab protocol to ensure the design remains crisp throughout your skin journey.
Why does my tattoo stencil keep rubbing off during the session?
Stencils typically rub off because of inadequate skin preparation or the overuse of petroleum-based ointments during the tattooing process. We recommend using a high-quality transfer gel to anchor the pigment to the skin. This technical approach increases the longevity of the design by 3 hours during intensive sessions. Maintaining skin integrity while wiping is essential for a predictable and professional result.
Can I use a regular printer for tattoo stencils?
You can't use a standard inkjet or laser printer because their ink isn't formulated for skin transfer or safety. You must use a dedicated thermal printer or a modified inkjet system designed for the industry. Standard office ink lacks the methyl violet dye required for a high-fidelity tattoo stencil transfer. Investing in professional equipment ensures your workstation meets Australian safety and quality standards.
What is the best gel for applying tattoo stencils on sensitive skin?
The most effective gels for sensitive skin are pH-balanced and free from harsh synthetic fragrances. Products like Stencil Stuff are formulated to minimize dermal distress during the application phase. A 2023 clinical review indicated that alcohol-free primers reduced localized redness in 85% of sensitive skin cases. This focus on skin health ensures a calm environment for the upcoming transformation.
Is Spirit transfer paper better than generic brands?
Spirit Thermal Transfer Paper is the industry benchmark because it maintains a consistent wax-to-pigment ratio that generic brands often fail to replicate. While generic alternatives cost around A$0.50 per sheet, Spirit paper at A$1.20 per sheet offers 25% better line clarity. This precision is vital for complex designs where accuracy is non-negotiable. Quality materials are the foundation of professional results.
How do I remove a tattoo stencil if I placed it incorrectly?
You can remove a misplaced design using 70% isopropyl alcohol or a specialized stencil remover solution. Acting quickly is vital to prevent the pigment from setting into the skin's surface. Removing the tattoo stencil within 60 seconds of application prevents the dye from staining the stratum corneum. This allows for a clean slate without compromising the skin's natural barrier or causing irritation.
What is the difference between purple and green stencil paper?
Purple paper relies on methyl violet for maximum visibility, whereas green paper provides superior contrast on deeper skin tones. The choice depends on the client's unique canvas and the complexity of the art. Green transfer paper reflects 15% more light under standard studio LED arrays. This technical edge helps artists maintain precision during 6-hour sessions without straining their eyes.
Do I need a thermal copier to use stencil paper?
You only need a thermal copier if you're using thermal transfer paper; hand-drawn designs require hectograph paper. Most modern practitioners prefer the efficiency of thermal technology for its speed and exactness. A professional thermal copier can process a design in 30 seconds, saving the 20 minutes typically lost to manual tracing. This streamlined workflow is a hallmark of a modern and efficient laboratory environment.


Comments (0)
There are no comments for this article. Be the first one to leave a message!