

The pen that feels familiar in your hand may be the wrong choice for a client’s skin. Ordinary stationery and cosmetic pens aren’t automatically suitable for tattoo preparation. If a line smudges, fades or disappears against the skin, it can disrupt careful freehand work. Choosing skin marker pens for freehand tattooing means checking more than tip shape and colour: confirm the product is intended for skin contact and fits your studio’s hygiene workflow.
A useful marker should keep the design legible through your planning process without creating uncertainty about skin compatibility or cross-contamination. This guide covers how to assess intended use, visibility, tip format, packaging and workflow fit. It also explains what to check before ordering and how to mark skin within a controlled studio routine. Product specifications and hygiene requirements vary, so verify the details for the specific marker and check current guidance for the Australian state or territory where you practise.
Key Takeaways
- Choose skin marker pens for freehand tattooing by checking their stated skin use, visibility and fit with your studio workflow.
- Compare tip format, colour and packaging against the design detail and conditions in which you’ll be working.
- Choose between freehand marking and stencil transfer based on the design’s flexibility needs and your preferred process.
- Use the product’s instructions and applicable Australian guidance to shape a controlled marking workflow.
- Before ordering, verify the exact product documentation and confirm current supplier availability rather than relying on generic listings.
What makes a skin marker pen suitable for freehand tattooing?
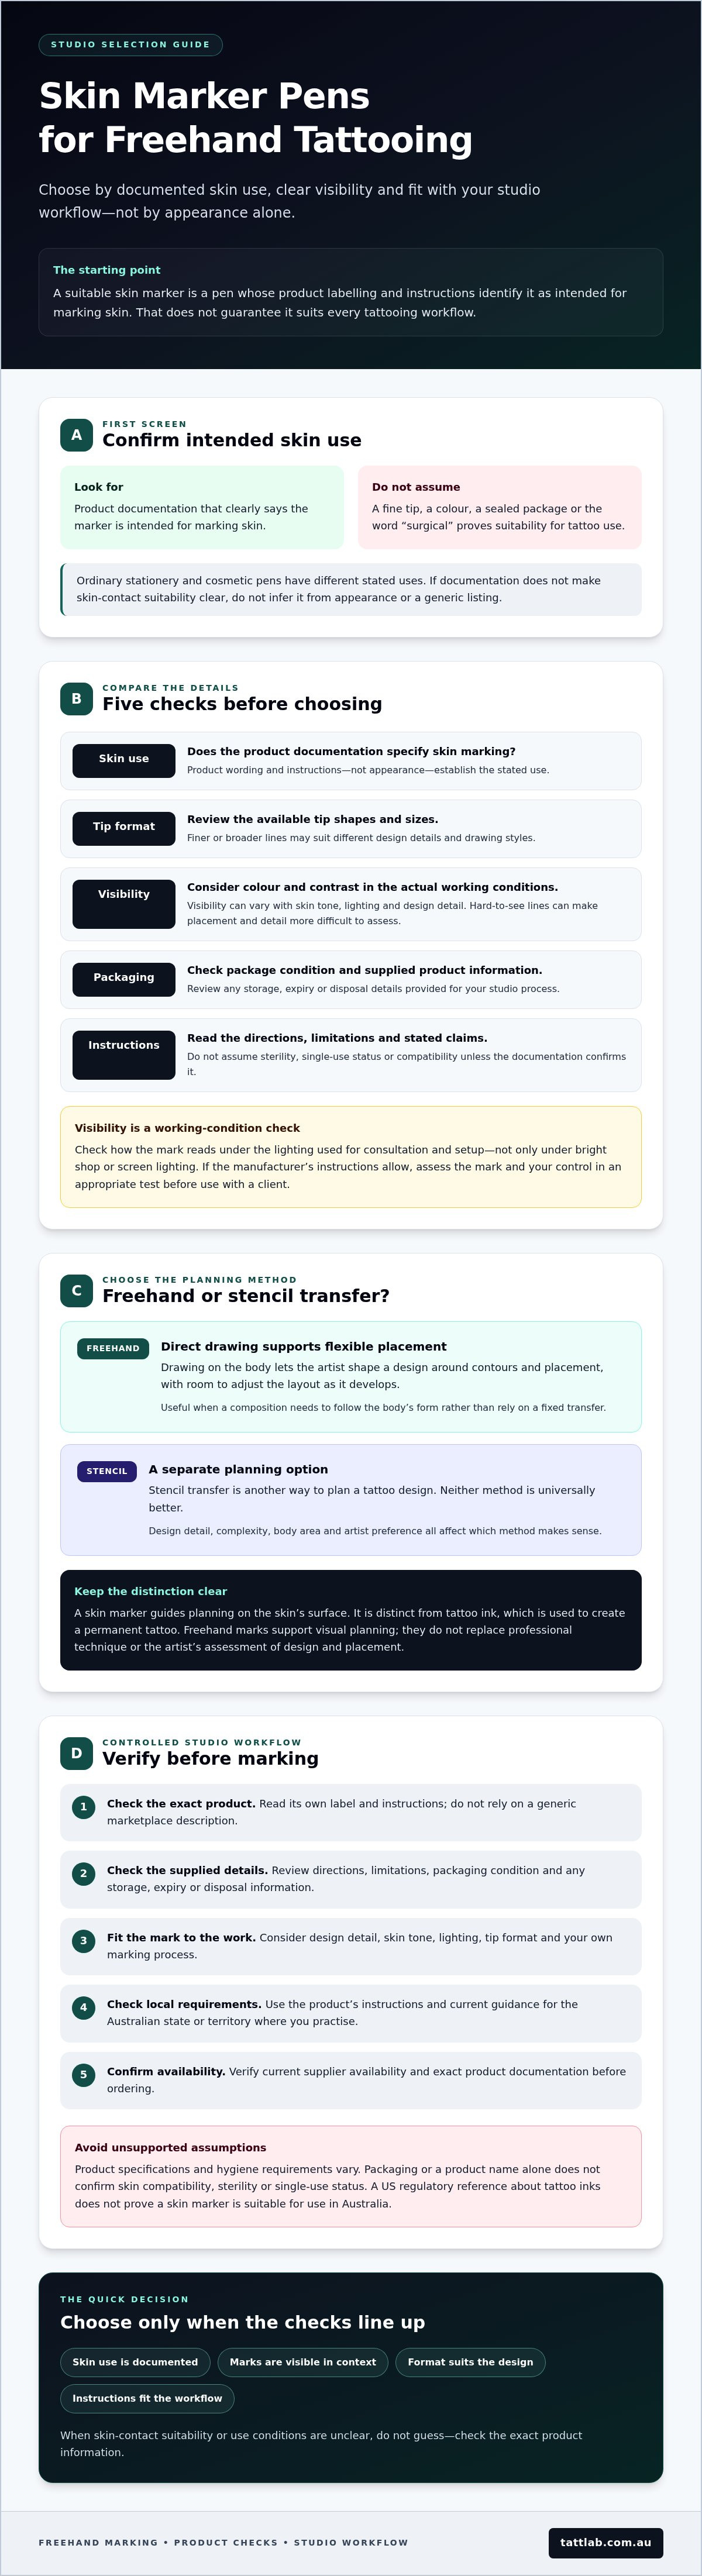
A skin marker is a pen whose product labelling and instructions identify it as suitable for marking skin. That’s the starting point, not a guarantee that it will suit every tattooing workflow. A pen’s appearance, colour or fine tip can’t confirm its intended use. For skin marker pens for freehand tattooing, check the exact product information and follow the manufacturer’s directions.
Freehand planning relies on lines the artist can see and control while mapping a design onto the body. The marks should make the intended shapes and details legible under the studio’s lighting and suit the pace of the session. They also need to fit the artist’s marking and skin-preparation process. Treat these as practical criteria to assess, not performance promises you can assume from a product name.
Skin marker, surgical marker, or ordinary pen: what is the difference?
Terms such as “skin marker” or “surgical marker” can be useful clues, but read the label and instructions for the specific product. Confirm that it’s intended for contact with skin and check any stated directions or limitations. The word “surgical” alone doesn’t establish that a marker is appropriate for tattoo use or for your studio workflow.
Ordinary stationery and cosmetic pens have different stated uses. Don’t treat them as skin markers simply because they draw on a surface or are marketed for decorative use. If the product documentation doesn’t make skin-contact suitability clear, don’t infer it from the pen’s appearance or a generic marketplace description.
Why artists choose freehand marking for selected designs
Drawing directly on the body lets an artist shape a design around contours and placement, with room to adjust the layout as it develops. This can help when a composition needs to follow the body’s form rather than rely on a fixed transfer. Tattoo stencils are another planning option; neither method is universally better.
Freehand marks support visual planning, but they don’t replace professional technique or the artist’s assessment of the design and placement. Detail, complexity, body area and artist preference all affect which method makes sense for a session.
A skin marker is also distinct from tattoo ink, which is used to create a permanent tattoo. For background on the composition of tattoo inks, see the overview of their pigments and carriers. A marking pen guides planning on the skin’s surface, so assess it according to its own labelling and instructions.
Which skin marker pen features matter most for freehand tattooing?
Start with the work the marker needs to support, then check the details on its label and in its instructions. For skin marker pens for freehand tattooing, compare intended skin use, visibility, packaging information and fit with your studio’s workflow, not just colour or tip shape.
| Feature | What to check | Why it matters |
|---|---|---|
| Intended skin use | Does the product documentation specify marking skin? | Appearance and generic listing terms don’t establish suitability for skin contact. |
| Tip format | Review the available tip shapes and sizes. | A finer or broader line may better suit different details and drawing styles. |
| Visibility | Consider colour and contrast against the client’s skin tone, your lighting and the design. | A line that’s hard to see can make placement and detail more difficult to assess. |
| Packaging | Check the package condition and any supplied storage, expiry or disposal information. | These details can inform how the product fits your studio process. |
| Instructions | Read stated directions, limitations and any claims about use. | Don’t assume sterility, single-use status or compatibility unless the product documentation confirms it. |
How should artists compare marker colour, visibility, and tip format?
Check visibility under the lighting you’ll use during consultation and setup, not just under bright shop or screen lighting. Contrast can vary with skin tone, and a line that reads clearly for a large shape may obscure finer details. If the manufacturer’s instructions allow, assess the mark and your control in an appropriate test before using the product with a client.
Tip choice is a workflow preference, not a universal ranking. A fine format may suit smaller details, while a broader one may feel more controlled for larger shapes. The right option depends on the design, the available formats and the artist’s drawing technique.
What should the product label and packaging tell you?
Look for clear confirmation that the product is intended for skin marking, then follow all stated directions. Review any storage, expiry, packaging-integrity and disposal information supplied. Don’t infer skin compatibility, sterility or single-use status from sealed packaging or a product name alone. The FDA’s information on tattoo inks concerns the US regulatory context for tattoo products. It doesn’t prove that a skin marker is suitable for use in Australia.
Once you’ve set your criteria, browse Tatt Lab’s professional tattoo supplies and check the current catalogue and product documentation for availability and intended use.
Skin marker pens versus stencil transfer: which method fits the design?
Choose between drawing directly on the skin and transferring a prepared stencil based on the design, placement and artist’s process. Freehand marking lets the artist build or adjust a composition on the body. A stencil can help carry a prepared outline onto the chosen area. Neither approach is automatically more suitable. The aim is to choose the method that supports clear planning for that session.
When can freehand marking be useful?
Direct drawing may suit a composition that needs to follow body contours or be adjusted to a particular placement. The artist can assess the design on the body and make considered changes to its layout before tattooing begins. Skin marker pens for freehand tattooing can support that planning, but the artist should consider whether the design’s detail and their own technique make direct drawing appropriate.
Freehand work isn’t a shortcut around design preparation or professional judgement. A complex design, placement that needs precise alignment, or the artist’s preferred process may call for another approach. Make the decision based on the actual composition and session, not a blanket rule that freehand is better.
When might stencil transfer be the more practical choice?
A stencil transfers a prepared version of an outline, which can help the artist position and assess that design on the body. This may be useful when consistent placement of the prepared artwork is a priority. The artist still needs to consider how the design relates to the client’s anatomy and intended placement.
The methods can also complement each other. An artist might use a stencil as a starting point, then make selected adjustments by hand where the composition needs to respond to the body. Tatt Lab offers tattoo stencils; check the current catalogue for relevant supplies, and don’t assume stencil products are compatible with a particular marker.
For broader context on studio equipment and selection, see Tatt Lab’s professional tattoo supplies guide. The studio safety guide for tattoo artists provides further hygiene context. These considerations sit alongside, not in place of, checking the instructions for the specific marking or stencil product.
One regulatory detail needs careful interpretation: the linked FDA skin-marker classification relates to the US system. It doesn’t establish Australian requirements or determine whether a particular marker suits a tattooing workflow in Australia. Use it as US reference information only, and verify applicable local guidance separately.
How can artists use skin marker pens in a controlled studio workflow?
A clear routine keeps product checks, skin marking and contamination control in the right order. Follow the manufacturer’s instructions alongside your studio procedures, and check current official guidance for the Australian state or territory where you practise. Don’t assume that one marker’s directions or handling requirements apply to another.
What should artists check before marking skin?
Before opening or using a marker, confirm its identity, intended use and instructions. Check the packaging condition and any expiry or storage details supplied. If information is missing or unclear, pause and seek clarification rather than guessing. Prepare the work area and follow your studio’s procedures for hand hygiene and barriers, keeping clean supplies separate from items used during the session.
Consider the client’s skin condition and follow your professional protocols if you have concerns. Prepare the skin, or use any other product alongside the marker, only as directed by the marker manufacturer and applicable guidance. Don’t improvise compatibility.
How should markers be handled between clients?
Use the product label to determine whether a marker is disposable or has directions for reuse, storage and disposal. Never assume a marker can be shared or reused because it looks intact. Keep used items away from clean supplies and the prepared work area, and follow studio contamination-control procedures for handling them.
A practical sequence for skin marker pens for freehand tattooing is:
- Inspect: Confirm the product and skin-marking instructions; check the packaging and any expiry details.
- Prepare: Set up the work area and follow studio procedures for hand hygiene, barriers and separation of clean and used items.
- Mark: Follow the manufacturer’s directions, including any stated preparation steps or limitations.
- Assess: Check that the marks are clear enough for the planned work and that the process stays within your studio protocol. If anything is unclear, stop and resolve it before proceeding.
Australian requirements may differ by state or territory and can change. Before publishing or updating studio procedures, verify current requirements against official guidance for the relevant jurisdiction. This workflow is a practical checklist, not a substitute for local requirements or the product’s own directions.
To review other studio essentials, browse Tatt Lab’s professional tattoo supplies. Check the current catalogue and product documentation for availability and intended use.
How to choose and source skin marker pens for your tattoo studio
Use a short, evidence-based checklist before adding a marker to your studio supplies. For skin marker pens for freehand tattooing, the exact product documentation matters more than a marketplace title or photograph. If the intended use, handling details or current specifications aren’t clear, ask the retailer before ordering.
A pre-purchase checklist for professional artists
- Confirm intended use: Look for product information that expressly identifies the marker for skin marking, then read the directions and any stated limitations.
- Assess visibility and format: Consider whether the available colour and tip suit the design detail, skin tone, studio lighting and your drawing workflow.
- Review packaging and handling: Check the condition and any supplied storage, expiry, disposal or reuse information. Don’t infer sterility or single-use status unless it’s stated.
- Check workflow fit: Confirm that the instructions can be followed within your studio’s contamination-control procedures and applicable guidance.
This checklist helps narrow the options, but it can’t replace a review of the specific product documentation. Two markers that look similar may have different directions or stated uses.
What to ask a supplier before placing an order
Ask whether the exact marker is intended for skin marking and request its instructions or product documentation. If your workflow depends on claims about single use, sterility, storage or compatibility with other products, ask the supplier to confirm what the manufacturer states. If the information can’t be verified, don’t treat an assumption as a product specification.
For an Australian order, check the current listing and confirm availability, fulfilment and shipping details with the retailer before purchasing. Don’t rely on a delivery estimate unless the seller currently provides one. Also verify relevant state or territory hygiene requirements against current official guidance, as requirements and advice may vary by jurisdiction.
Tatt Lab is an Australian, artist-owned supplier of professional tattoo equipment and medical supplies, including tattoo stencils. Check the current catalogue or contact the retailer to verify whether skin marker pens are available and to confirm product details before considering a specific marker purchase.
For other studio essentials, explore Tatt Lab’s professional supplies, then review the current product information before ordering. Checking the details at the sourcing stage helps you choose supplies that fit both your design process and your studio’s established procedures.
Choose with confidence, then verify before ordering
The right marking approach depends on the design, placement and artist’s workflow. For skin marker pens for freehand tattooing, first confirm that the product is labelled for skin marking and review its instructions. Then consider visibility, tip format and fit with your studio’s contamination-control procedures. Freehand drawing and stencil transfer can each support planning, and either may suit a particular session.
Before purchasing, compare the exact product documentation rather than relying on a generic listing or appearance alone. Confirm current specifications and availability with the retailer. Tatt Lab is an Australian, artist-owned supplier offering tattoo stencils and professional studio supplies. Check the current catalogue to see whether skin marker pens are available and to review product details. Verify fulfilment information for your Australian order as well.
Explore Tatt Lab’s professional tattoo supplies and review the available product information before ordering.
Frequently Asked Questions
Is any skin marker pen safe to use for freehand tattooing?
No. A marker isn’t suitable automatically just because it’s sold as a skin marker. Choose a product whose manufacturer explicitly states that it’s intended for skin marking, then follow its directions and your studio procedures. Check the packaging, any expiry information and handling instructions. Don’t assume ordinary stationery pens are suitable for skin. Before using a product in client work, verify relevant professional guidance and requirements for your Australian state or territory.
Can I use a regular pen to draw a tattoo design on skin?
Don’t assume a regular pen is appropriate for skin contact. A product designed for paper may not include skin-use directions, and its ingredients and handling instructions may differ from those of a skin marker. Select a marker specifically labelled for skin marking and follow the manufacturer’s guidance. Include it in your studio’s contamination-control procedures. If the product’s intended use or instructions aren’t clear, ask the supplier before using it.
What is the difference between a skin marker and a tattoo stencil?
A skin marker draws or makes marks directly on skin, while a tattoo stencil transfers a prepared design onto the skin. They support different workflows: freehand marking allows direct drawing, while a stencil can help place a prepared outline. Artists may use either method, or combine them, depending on the design, placement, client and professional judgement. Check each product’s own directions rather than assuming a marker and stencil product are compatible.
How do I choose the right tip size for freehand tattooing?
Start with the design’s detail and the line control you need, then compare the tip formats available for products expressly intended for skin marking. A finer tip may suit detailed drawing, while a broader tip may make larger forms easier to see, but performance varies by product. Review its specifications and, where the directions allow, assess visibility and control under your studio lighting before client use.
Do skin marker pens need to be sterile or single-use?
Don’t assume a marker is sterile, reusable or single-use based on its appearance or category. Handling depends on the specific product’s stated use, manufacturer instructions and applicable studio guidance. Check the packaging and directions for disposal, reuse and storage details, and follow your contamination-control procedures. Before adopting a marker in your workflow, verify current requirements and professional guidance for the Australian state or territory where you practise.
Can tattoo stencil transfer and freehand marking be used together?
Yes, an artist may use both if they suit the design and session. A stencil can provide a prepared outline, while freehand marks may help with adjustments or additional drawing. Decide based on the placement, client and professional judgement, rather than assuming the combined approach is right for every design. Follow each product’s directions, don’t presume compatibility, and handle both in line with your studio hygiene procedures.
What should I check before ordering skin marker pens online?
Confirm that the exact product is intended for skin marking, then review its instructions and available details about tip, colour, packaging, storage, expiry and disposal. Check any sterility or single-use claim against manufacturer documentation rather than relying on generic listing language. Ask the retailer to confirm current availability and specifications before ordering. For an Australian purchase, check current shipping and fulfilment details directly, without assuming a delivery timeframe.


Comments (0)
There are no comments for this article. Be the first one to leave a message!